I still remember the clink of empty tins on the kitchen counter and the sudden idea of turning them into something lively. Upcycled Tin Can Herb Garden Crafts felt like a small recipe for joy: ordinary metal, a little dirt, and fragrant leaves that made the windowsill feel alive.
There’s a comfort in seeing basil and thyme peeking out of a once-forgotten can.
Over the years I tried many variations of upcycled tin can herb garden crafts, learning which textures and colors made herbs look happiest. Each little pot carries a story, and tending them has become a quiet, everyday pleasure I look forward to.
Twine-Wrapped tin can basil pots for windowsill

I have a soft spot for slowly weathered twine coiling around old tins; it brings a hand-made rhythm to a sunny windowsill. The rough fiber contrasts with shiny metal, while the green of basil pops against the natural brown.
Morning light hits the twine and creates a warm, almost golden halo that makes the whole row feel cozy. I like the faint scent of dried rope mixing with basil when I reach for a leaf.
Seeing that humble texture beside soft leaves always lifts my mood.
Steps
- Gather clean empty tin cans and a length of natural twine for each can.
- Secure the end of the twine near the top rim and wind it downward until the can is wrapped evenly.
- Tuck or knot the final tail neatly and trim any excess twine.
- Add drainage holes to the bottom, fill with potting mix, and place small basil seedlings inside.
- Arrange the wrapped cans along a bright windowsill where they will receive steady light.
Chalkboard label tins for easy identification

There’s a simple pleasure in a tiny matte label that can be written on and changed when seasons shift. The dark, velvety surface of chalkboard paint paired with a shiny tin edge makes each herb feel like a little announcement.
I remember scribbling names with a smudgy white stroke while a breeze carried mint scent through the room. The tactile contrast between cool metal and soft chalk traces invites people to touch and read, making the arrangement feel playful and homey rather than purely practical.
Steps
- Prepare clean tins and apply a smooth coat of chalkboard surface to a central band on each can.
- Allow the surface to cure fully before writing on it to avoid smudging.
- Use a slim chalk marker to write the name of each herb on the band.
- Punch small drainage holes, add potting medium, and nestle seedlings inside each tin.
- Wipe and rewrite labels as herbs mature or are replaced.
Clustered hanging tin can herb planters?

I still grin when I spot a cluster of cans dangling like little bells under a balcony eave. The cans sway gently in warm afternoons, leaves brushing against one another with a soft rustle.
Air moving through basil and chives gives an almost musical quality to the space, and the arrangement casts playful shadows on the wall behind. The metal catches light differently as it turns, a subtle shimmer against the sky.
Hanging herbs add vertical life to a small corner and make me think of lazy summers.
Steps
- Select tins of similar size and punch drainage holes in their bases.
- Fasten strong cord or wire securely around each can’s rim for hanging support.
- Hang cans at staggered heights from a sturdy beam or bracket outdoors.
- Fill with light potting medium and position herb seedlings so foliage has space to move.
- Trim any overcrowded growth after establishment to maintain airflow between plants.
Stacked tea-can tower for a herb corner

Stacking cans into a narrow tower felt like a small sculpture experiment the first time I tried it. Each level offers a new herb personality, from the citrus-scented top to the earthier base.
The tower has visual rhythm, a narrow silhouette that fits into tight corners where a traditional planter would feel clumsy. I love the way the light plays between tiered leaves, and the structure invites a casual peek from different angles.
It becomes a living column that quietly shifts as fragrances mingle on warm afternoons.
Steps
- Choose cans of varying diameters and ensure they are clean and stable.
- Create a central support rod or dowel anchored in a heavy base to hold tiers.
- Thread cans onto the support, stacking them with drainage holes aligned.
- Add potting mix into each can and place one herb variety per level.
- Position the tower in a bright corner and water gently until roots settle.
Patina-style copper tins with rosemary flair

There’s a compelling warmth when copper tones meet rosemary’s silvery foliage. A faint green-brown veil across metal makes the tins feel aged, almost heirloom.
I enjoy tracing the cool rim with my finger and inhaling rosemary’s pine-like scent as it mingles with the faint metallic tang. The contrast between slender rosemary sprigs and rounded can edges creates a sculptural, elegant look that reads slightly formal yet very lived-in.
It’s the kind of little detail that quietly elevates a windowsill.
Steps
- Clean tins thoroughly and apply a faux patina finish or aged metallic coating for a warm copper look.
- Allow finishes to dry fully before handling to avoid transfer.
- Add drainage holes and a layer of coarse grit at the bottom for good runoff.
- Fill with potting medium and nestle a rosemary plant into each tin.
- Place in bright light and rotate occasionally so growth remains even.
Magnetic tin herb garden for the fridge

Sticking tiny herb tins to the fridge felt like a playful cheat of garden space. The cool metal door becomes a living pinboard where mint and basil sit at eye level, sending fresh scent each time the kitchen opens.
I love the tactile surprise when fingers brush leaves while reaching for a jar. The magnets create small islands of green against stainless steel, and light bouncing off the door gives leaves an almost jewel-like glow.
It’s a compact way to keep kitchen herbs within easy reach and sight.
Steps
- Attach strong magnetic strips or magnets to the back of small clean tins.
- Ensure magnets are secured with an adhesive rated for weight and allow to cure.
- Add a small layer of potting medium and compact soil into each tin.
- Place micro-herbs or cuttings inside and press gently to seat roots.
- Affix tins to the fridge door, spacing them for airflow and light exposure.
Bright painted stripe tins that catch light

I always smile at a row of striped tins lined up like little candies on a shelf. Bold color bands make the herbs feel festive, while the reflective metal peeks between stripes.
The contrast of matte ribbon and glossy rim gives a tactile sense that begs a closer look. I remember choosing colors on a rainy afternoon and how each plant seemed to take on a personality tied to its stripe.
The arrangement becomes lively in bright light, every leaf highlighted like a brushstroke.
Steps
- Prepare cans by cleaning and lightly sanding the exterior for better finish adherence.
- Mask off stripe areas with tape and apply selected colors, allowing each layer to dry.
- Remove masking to reveal clean crisp stripe lines and let colors cure.
- Add drainage holes, fill with potting mix, and seat herbs into the tins.
- Arrange in a sunny spot so the stripes catch natural light.
Window-box row of mismatched tin can planters
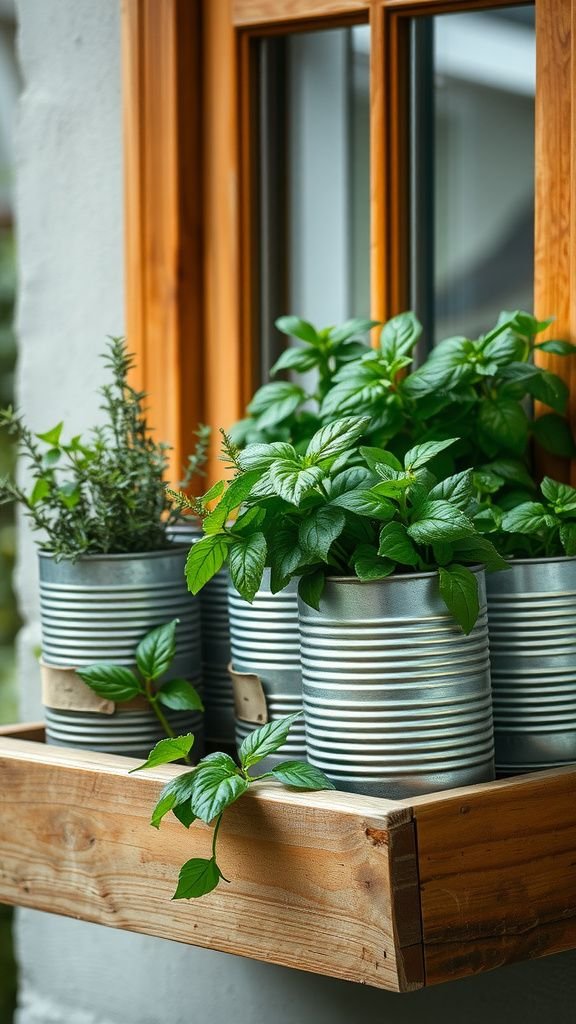
Mismatched tins in a window-box create a kind of friendly clutter that feels welcoming. Each can carries its own scuff marks and labels, and when lined up they form a little parade of textures and greens.
I like how thyme weaves low along the front while taller basil stands guard at the back, producing a layered skyline. Morning sun and a hint of rain on the sill bring out a soft sheen on metal and leaves alike.
The whole setup feels like a tiny neighborhood of plants.
Steps
- Collect tins of different sizes and shapes, cleaning each one thoroughly.
- Line the bottom of the window-box with a breathable liner for drainage.
- Place tins snugly inside the box, arranging by height for a tiered effect.
- Fill cans with potting medium and plant herbs according to space.
- Water lightly and set the window-box where it receives steady bright light.
Mini greenhouse lids for cozy microclimates

There’s a small triumph in sliding a clear lid over a tin and watching condensation bead like morning on glass. The mini greenhouse effect makes seedlings feel snug and speeds that first delicate growth.
I recall the tiny fog that forms and the way the scent of damp earth intensifies for a moment before the lid is lifted. The little domes create warm, humid pockets where seed leaves unfurl more confidently than in open air.
It turns a humble can into a protected little world.
Steps
- Find clear plastic or glass lids that fit snugly over tin rims to create a dome.
- Prepare tins with drainage holes and add a small amount of potting medium.
- Sow seeds or place seedlings inside each tin and press soil gently around them.
- Cover tins with the clear lids to trap moisture and warmth for seedling establishment.
- Remove lids briefly each day to allow air exchange and prevent mold buildup.
Mosaic-tiled tins with colorful ceramic accents

Tiny ceramic chips glued to metal make each tin feel like a little treasure chest. The mosaic catches afternoon light and throws playful speckles across leaves, while the irregular edges offer a pleasing tactile quality.
I often find myself running a fingertip over the tiny tiles and enjoying the contrast of smooth ceramic against cool metal. When herbs sway, little glints of color move like confetti.
The overall effect is cheerful and unexpectedly refined, turning a simple herb container into something that draws compliments from guests.
Steps
- Gather small ceramic tile pieces or broken pottery and arrange them into a pleasing pattern around the tin.
- Adhere each piece securely to the can with a strong outdoor adhesive, allowing it to set.
- Fill gaps with grout and wipe away excess to reveal bright mosaic details.
- Once cured, add drainage holes and soil, then place herbs into the tin.
- Seal the grout if desired for weather resistance and place the mosaic tins in a well-lit spot.
Small trellis tin cans for vining herbs

A tiny trellis tucked into a tin gives vining herbs someplace to lean and display their delicate tendrils. I enjoy the vertical sweep of leaves as they spiral upward, catching light and throwing feathery shadows.
The thin lattice introduces a sculptural line that contrasts with rounded can edges and soft foliage. On breezy days the vines tap the trellis with a faint whisper, a small, lively sound that makes the planter feel animated.
It reads like a poised little landscape within a metal frame.
Steps
- Select tins that are tall enough to accommodate a small trellis structure.
- Insert a miniature trellis made of bamboo, wire, or thin wooden slats into the soil.
- Plant vining herbs near the base of the trellis and guide initial shoots gently toward the structure.
- Ensure adequate watering and light so vines can climb steadily.
- Monitor growth and make light adjustments to support as plants elongate.
Tiered railing tins for balcony herb displays

Hanging a neat line of cans along a railing turned my narrow balcony into a fragrant border. Each container catches breeze and light differently, creating a small moving panorama of scent and color.
I remember leaning on the rail with a mug and watching mint leaves shiver in a gentle gust. The repetition of rounded tins along a straight line provides a pleasing rhythm, and alternating herb heights creates a soft skyline.
It’s an economical way to turn rail space into a living, aromatic fence.
Steps
- Choose sturdy metal hangers that clamp or hook securely to the balcony railing.
- Attach the hangers to each cleaned tin and test for balance before loading with soil.
- Place tins at regular intervals and fill with potting medium, then plant herbs suited to the light available.
- Water carefully to avoid runoff while ensuring even moisture across the row.
- Check stability periodically and adjust hangers as needed for wind or growth changes.
Decoupage map tins that whisper travel stories
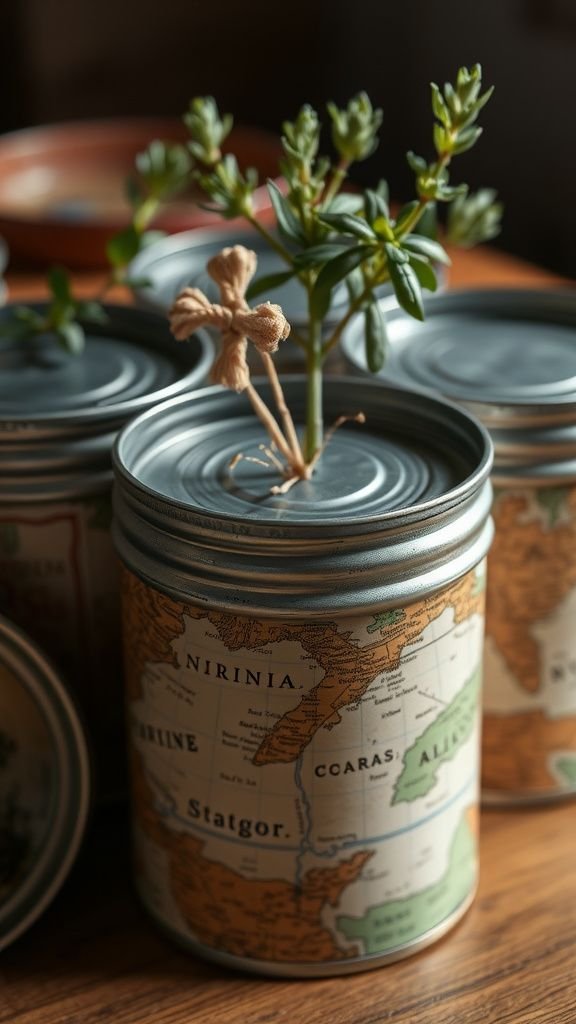
Applying old map clippings to tins felt like wrapping each herb in a tiny travel memory. The paper’s fine lines and faded inks create a nostalgic surface that pairs beautifully with vivid green leaves.
I like the way a basil plant suddenly seems like a passport stamp, a small reminder of a summer market. The tactile crinkles of paper and varnish make each can feel personal, like a souvenir.
The contrast of delicate paper against sturdy metal produces an inviting collision of textures and stories.
Steps
- Select map sections or vintage paper and arrange them around the cleaned tin to plan placement.
- Apply a decoupage medium to the can surface and smooth paper pieces carefully to avoid bubbles.
- Brush a protective top coat over the paper to seal and lend slight sheen.
- Once dry, add drainage holes and fill with potting mix before placing herbs.
- Position the map tins where the paper can be admired without constant wetting.
Burlap-wrapped tins with a country kitchen vibe
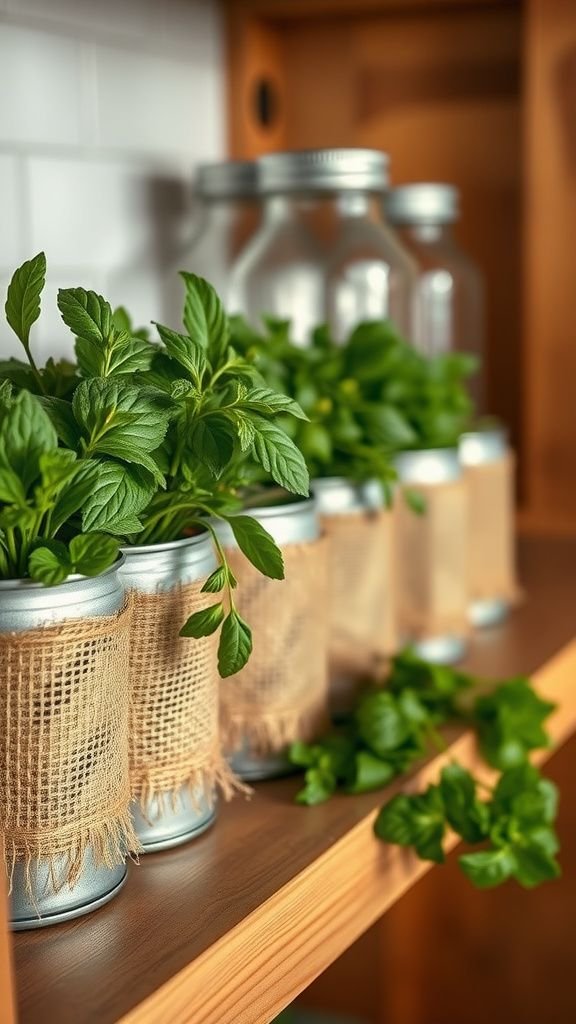
Burlap brings warmth and a touch of farmhouse charm to a row of tins. The coarse weave muffles metal shine and invites a hand to linger, feeling the rough threads between fingertips.
I love the juxtaposition of soft herb leaves against the bold texture of burlap; it creates balance. Occasional stray fibers dust the sill in a way that feels homey rather than tidy, and the overall look pairs well with open shelving and wooden counters.
When guests ask where herbs came from, the burlap often starts a conversation.
Steps
- Measure and cut burlap to wrap around each tin, leaving a small overlap for joining.
- Secure the burlap with a line of adhesive along the seam and allow it to dry.
- Add decorative twine or a label band around the middle for visual interest.
- Punch drainage holes in the tin, fill with potting medium, and set herbs inside.
- Place the wrapped tins on open shelving or a sunny stretch of countertop.
Herb chandelier made from rings of tins

Suspending tins in a circular arrangement gave the kitchen a dramatic, botanical focal point. The chandelier casts layered shadows and releases different herb scents as it turns slightly with air currents.
I enjoy standing beneath it and smelling basil, sage, and oregano blending overhead like a culinary bouquet. The composition feels architectural, a living mobile that shifts mood with light and wind.
At dusk the silhouette against the ceiling reads like art, and the movement of leaves adds a soft, living rhythm to the room.
Steps
- Arrange a strong circular support such as metal hoops to hold a ring of tins securely.
- Attach tins evenly around the ring with corrosion-resistant wire or hooks rated for weight.
- Ensure the central support is balanced before suspending the chandelier from a sturdy ceiling anchor.
- Fill each tin with potting mix and set herb plants into place, spacing for airflow.
- Check the installation periodically for balance and plant health, adjusting as required.
Labelled seedling starter tins for tiny sprouts

Starting seeds in small tins felt almost like launching a miniature nursery. Tiny green cotyledons unfurling inside metal cups is an endlessly hopeful sight.
I liked writing the date and variety on a little tag and watching handwriting and seedlings grow in parallel. The heat from a sunny sill warms the soil quickly, coaxing delicate roots below.
The tactile crunch of dry seed covers turning soft under gentle watering is something I still find oddly satisfying. These little starter tins make the slow anticipation of growth feel visible and intimate.
Steps
- Clean small tins and label each with the herb variety and sow date on a tag.
- Fill tins with a light seed-starting mix and moisten gently to provide even contact.
- Sow seeds at recommended depths, covering lightly with soil and firming the surface.
- Place tins in bright, warm light and monitor moisture until germination occurs.
- Transplant seedlings to larger containers once roots have developed and leaves are established.
Hanging macramé holders with snug tin pockets

Combining macramé and tins brought a boho softness to my herb display. The knotted cords cradle metal with surprising gentleness, and the contrast of fiber against cold tin is pleasingly tactile.
I enjoy the rhythmic pattern of knots and how each can hangs at a slightly different height, creating a relaxed silhouette. Herbs waving in midair feel liberated, and light catches on both fiber and leaf edges.
It’s the kind of arrangement that makes a balcony feel curated yet unscripted, a friendly nod to casual styling.
Steps
- Craft macramé holders with snug pockets sized to hold the tins securely.
- Test each holder with an empty tin to ensure balance and even distribution of weight.
- Hang the macramé planters from a sturdy beam, hook, or balcony overhang at the desired height.
- Place filled tins into the holders and adjust knots for even hanging.
- Water carefully to avoid soggy fibers and refresh holders gently as herbs grow.
Vintage tea-label look with sepia tones

Applying sepia-toned tea labels to tins gave the herbs an old-world tea-room charm. The soft faded papers and delicate script make each container feel curated and calm.
I remember arranging a set with chamomile and mint, the muted labels complementing delicate blossoms. The overall palette is quiet and inviting, and the gentle contrast of green leaves against aged cream or pale brown creates a soothing vignette.
It reads like a little cabinet of curiosities that invites a slow, appreciative glance when walking past.
Steps
- Source vintage-style paper labels or print sepia-toned designs to fit tin surfaces.
- Affix labels to clean tins with a durable adhesive and smooth to avoid bubbles.
- Apply a protective top coat to guard paper from moisture and handling.
- Add drainage holes, soil, and plant chosen herbs into labeled tins.
- Arrange the labeled tins on a shelf where their soft tones can be admired.
Solar-lit tin planters for evening herb glow

Adding small solar lights to tins makes a balcony feel magical after dusk. The gentle, warm glow highlights leaf silhouettes and creates cozy pockets of light among herbs.
I like sitting outside with a cup as little lamps flicker on, casting soft pools of radiance that emphasize silver-toned thyme and glossy basil alike. The lights turn a practical herb row into an evening feature, transforming routine watering into a small ritual.
The combination of metal, greenery, and light reads both modern and tender.
Steps
- Choose low-profile solar stake lights compatible with tin planter placement.
- Affix the lights near the soil surface or mount small solar panels where they receive sun.
- Ensure tins have adequate drainage and plant herbs with similar light needs.
- Test lights after sundown and adjust positioning so each planter is softly illuminated.
- Recharge panels in sunlight periodically to maintain evening brightness.
Seed-library tins with folded craft paper tags

Keeping a tidy row of seed-library tins felt like curating a pantry for future seasons. Folded craft-paper tags tucked into each can carry handwritten notes that feel personal and hopeful.
I enjoyed the ritual of opening a tin and feeling the faint papery scent of stored seed packets. The tins themselves show little dents and labels, each one a memory of past plantings.
Lining them up on a shelf makes the kitchen feel prepared and seasonal, like a tiny archive of potential green beginnings.
Steps
- Clean tins and prepare small folded craft paper tags for labeling each seed variety.
- Fill tins with seed packets or small seed storage envelopes, positioning tags for easy reference.
- Store the tins in a cool, dry spot away from direct sunlight to maintain seed viability.
- Rotate and check seeds periodically for moisture or damage.
- Replenish tags with notes on planting dates or germination tips as needed.
Mason-tin hybrid trough for long herb rows

Combining tins into a long trough gave my kitchen a continuous green ribbon that felt elegant and practical. The stretched shape allowed herbs to spill and mingle, creating a pleasing tapestry of textures and scents.
I liked the clean line of a narrow trough against a rustic counter, and the way sunlight moved along the row throughout the day. It turned a set of small planters into a cohesive garden feature that felt intentionally designed, while each tin still kept its own little ecosystem and character.
Steps
- Line a shallow trough or box with a breathable liner to hold multiple tins securely.
- Arrange tins inside the trough so each has space for root growth and airflow.
- Add potting medium to each tin and set herb transplants according to light needs.
- Water the row evenly and tilt or rotate the trough occasionally for balanced light exposure.
- Trim and harvest selectively to maintain a neat, continuous appearance.