I fell into no sew felt home decor crafts during a gray weekend when the thought of a sewing machine felt heavier than the couch. Playing with bright scraps and a glue gun became my way of brightening small corners of the flat, and those little pieces of felt started to feel like tiny mood boosters.
There is something quietly satisfying about arranging soft shapes against wood and linen.
No Sew Felt Home Decor Crafts let me remix color and texture without fuss, and they invited a kind of playful improvisation that stuck with me.
Soft felt flower wall hanging for cozy corners

I still smile when I walk past the little cluster of felt blooms on the hallway wall. The felt has a plush, slightly fuzzy feel that warms the atmosphere in a way canvas never did.
Petals in muted mustard and coral sit against a linen-wrapped dowel, catching light differently as the afternoon shifts. The arrangement reads handmade without looking messy, and the layered shapes cast gentle shadows that make the whole piece feel alive.
It often starts conversations with guests who stop to touch the petals and comment on the texture.
Steps
- Trace petal shapes onto felt and cut out multiple sizes for depth.
- Stack petals and secure centers with hot glue, creating layered blooms.
- Glue small felt circles or beads to bloom centers for contrast.
- Affix blooms to a wrapped dowel with hot glue, spacing as desired.
- Tie a length of twine to the dowel ends for hanging.
Round felt coasters with stitched look edges

These round coasters became a tiny ritual: reaching for one and feeling the snug edge under my fingertips. The felt surface absorbs the warmth of a mug while staying forgiving to accidental drips.
I like the way contrasting edge felt creates a faux-stitched border that looks neat without fuss. The soft pads sit quietly on wood, protecting surfaces and adding a deliberate color pop.
They developed small nap from use, which only made them softer, and the slightly fuzzy rims pick up the light in a pleasing, tactile way.
Steps
- Trace circles onto two felt layers for each coaster and cut them out.
- Apply craft glue around the edge of one circle and sandwich the second circle on top.
- Press along the rim to bond the layers and create a sealed edge.
- Add a narrow contrasting felt strip around the perimeter with glue for a border effect.
- Let coasters dry flat under a light weight for best adhesion.
Leaf garland that brings a window to life

I draped a felt leaf garland across a small window and the room felt like it breathed a little easier. Each leaf carries a gentle curve so that the garland has a lifelike sweep, and the felt’s matte finish makes the colors feel calm rather than flashy.
Light filters through the window and creates a soft halo around the edges of the leaves, producing a quiet, organic rhythm across the sill. The garland settles into the space, nodding slightly with drafts and adding movement without demanding attention.
Steps
- Cut leaf shapes in several sizes from different colored felt sheets.
- Run a thin line of fabric glue along the center of each leaf and fold slightly for dimension.
- Space leaves along a length of twine and secure with hot glue at the base of each leaf.
- Allow the glue to set and drape the garland along the window or mantel.
- Trim excess twine and tuck ends into decorative hooks or wall pins.
Tiny felt succulents for a shelf that never needs watering

I placed a cluster of felt succulents on a kitchen shelf and forgot about them for weeks, only to smile when I noticed how they caught the light. Each rosette has the wooly, dense look of a real plant but remains perfectly still and soft to the touch.
The felt surface feels slightly fuzzy and warm, and the variety of greens reads very natural when grouped with a clay pot. They offer that reassuring greenery without the fuss of care, and they resist the slow decline that real succulents sometimes suffer from.
Steps
- Cut concentric circles and petal strips from felt to form rosettes and layering shapes.
- Roll and glue the felt pieces into spiral succulent forms, securing bases with glue.
- Glue each finished succulent into small pebble-filled pots or shallow ceramic dishes.
- Add a dusting of fine gravel or sand around the base for a realistic look.
- Arrange a few different shapes and colors together on a shelf or windowsill.
Felt tassel curtain tiebacks with playful movement

I swapped out plain tiebacks for felt tassels and the curtains gained a playful rhythm. The tassels feel plush and a little weighty as they hang, and their soft edges brush gently against fabric when the curtain moves.
Combined colors in a single tassel created a satisfying contrast that brightened the drapery without overpowering it. They added a handmade note to the living room and seemed to soften the light that streamed in through the curtains, making afternoons feel slow and warm.
Steps
- Cut long strips of felt and stack them in pairs for thickness.
- Roll the strips tightly and secure the top with hot glue to form a tassel head.
- Trim the ends to even the fringe and fluff the fibers gently.
- Wrap a short felt cord or twine around the tassel neck and secure with glue.
- Loop the finished tassel around the curtain and tie or knot to hold it in place.
Weighted felt door stop with charming pattern

There’s a small felt door stop by the bedroom door that feels unexpectedly intentional. The exterior felt has a firm, dense hand that contrasts with a cool metal weight tucked inside.
Patterns cut from contrasting felt give it a cottage-like personality that makes an ordinary object feel considered. When the door nudges it, the felt absorbs the little thud and keeps the doorway happily still.
It sits low on the floor like a quiet helper, and the soft surface is pleasant against bare feet on cooler mornings.
Steps
- Cut two identical shapes from heavy felt for the door stop outer shell.
- Glue the edges together, leaving a small opening for filling.
- Pour dry sand or small pebbles into a fabric bag and insert it through the opening.
- Seal the opening with a line of hot glue to close the seam.
- Decorate the exterior with glued felt appliqué for a patterned finish.
Pillow cover embellishments that transform a couch

A plain pillow found new life after a felt makeover that felt indulgent in the coziest way. Felt appliqué shapes adhered to the cover created a layered scene that invites touch; the wooly surface adds a soft contrast to a linen pillow.
The tactile ridges and tiny felt motifs catch fingers and eyes alike, making the couch feel curated without fuss. I appreciated how a few well-placed pieces changed the whole mood of the seating area.
The pillow now reads like a small textile story rather than an anonymous cushion.
Steps
- Lay the pillow cover flat and arrange felt shapes on the surface to plan placement.
- Secure each felt shape with fabric glue, smoothing edges as you go.
- Add layered bits and small circles for texture, attaching them with glue.
- Press gently across the design to ensure good adhesion.
- Allow the cover to dry completely before placing it back on the pillow insert.
Table runner with scalloped felt edges and charm

A felt edged table runner added a quiet cheer to Sunday breakfasts. The scalloped felt trim sits slightly raised from the tabletop, creating a gentle shadow line that feels elegant and friendly at once.
The felt has a soft spring when touched, and the rounded edges soften the meal setting. Colors chosen to echo the ceramic dishes made the whole table feel thoughtfully coordinated, and the fabric resists small spills long enough to be dabbed away.
It feels like a gentle accessory with personality, not a flashy centerpiece.
Steps
- Measure the table runner length and cut a base fabric to size.
- Cut scalloped trim from a long strip of felt using a scallop template.
- Run craft glue along the runner edges and press the scalloped felt trim in place.
- Smooth the trim to ensure even bonding and let the glue set.
- Place a light weight along the seam while drying for a flat finish.
Felt key holder that brightens the entryway

The felt key holder by the door became a daily pleasure for its soft, tactile presence. Small pockets hold keys and receipts and the felt muffles the jingling so that mornings feel gentler.
The holder adds a vertical splash of color to the wall and invites a quick pat as hands search for keys. I liked how a few felt tabs created an airy grid that still looked deliberate, and the soft surface absorbed scuffs that would show up on wood or metal.
It warmed the entry without asking for maintenance.
Steps
- Cut a rectangular felt panel and create small pocket shapes from contrasting felt.
- Glue pocket bases to the panel, spacing them evenly for keys and small items.
- Add felt tabs or small loops at the top to hold key rings.
- Attach a hanging loop to the panel back with strong glue.
- Hang the finished key holder near the door and arrange essentials in pockets.
Magnetic felt fridge decorations for cheerful mornings

I found myself rearranging felt magnets on the fridge like small artworks when recipes were on the mind. The felt’s soft surface contrasts pleasantly with the cold metal, and the little shapes bring color to grocery lists and kids’ drawings.
The magnets are light and velvety between fingers, and they cling without slipping. Grouped mosaics formed by simple shapes feel playful, and the matte finish keeps reflections low so the colors remain rich under kitchen light.
They became a low-effort routine for brightening the busiest wall in the house.
Steps
- Cut small whimsical shapes from felt such as circles, fruit, or geometric tiles.
- Glue round or strip magnets to the back of each felt shape.
- Press firmly and allow glue to dry before placing on metal surfaces.
- Arrange the magnets on the fridge to create patterns or to hold notes.
- Refresh the set by making new shapes and swapping them in.
Felt candle mat that softens tabletop light
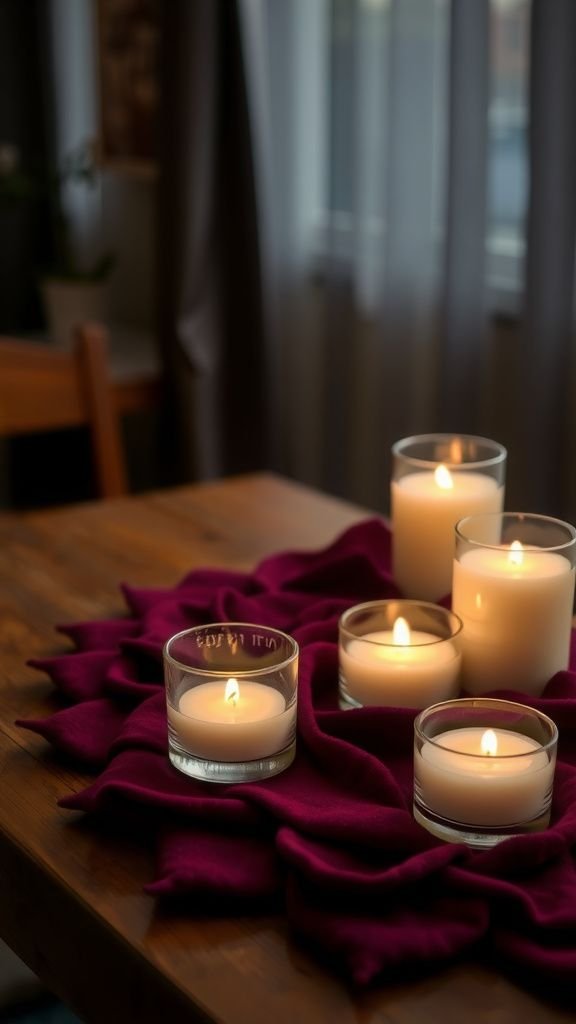
A felt candle mat beneath a cluster of votives gave the table a softer silhouette at dusk. The felt felt cool to touch yet absorbs a warm glow when candlelight flickers above.
The thicker felt muffles the clink of glass and protects surfaces from heat and wax splatters in a tactile, forgiving way. I appreciated the way the felt edge framed the group and turned a practical object into a quiet stage for light.
It seemed to make evenings linger a little longer, with shadows that felt cozy rather than stark.
Steps
- Cut a round or oval shape from thick felt sized for your candle group.
- Layer smaller felt pieces in complementary colors and glue them to the base for decoration.
- Apply a small ring of glue where candles will sit to secure bases.
- Let everything dry fully before placing lit candles on the mat.
- Remove candles when not in use to preserve the felt.
Mirror frame embellished with soft felt layers

A plain round mirror gained a soft halo after felt layering around its edge. The felt created a cushiony frame that breaks harsh reflections and adds a handcrafted vibe.
I liked the contrast between the cool mirror glass and the woolly rings; the layers absorb nearby sound slightly and give the mirror a domestic presence. The felt edge has a hand-cut charm, with tiny irregularities that feel honest rather than precious.
It sits in the hallway as a tactile detail that somehow invites a second look when passing by.
Steps
- Cut concentric rings or decorative shapes from felt to fit the mirror perimeter.
- Apply a bead of strong craft glue to the back of each felt piece and press onto the mirror frame.
- Layer the felt pieces for depth, ensuring even spacing around the mirror.
- Allow the adhesive to cure fully before hanging.
- Clean any visible glue residue gently with a damp cloth after drying.
Wreath with muted felt petals for a soft welcome
I swapped a seasonal wreath for a felt petal version and found it oddly calming. The wreath’s felt petals overlap like scales, creating a soft, muffled silhouette that feels welcoming but not loud.
The felt absorbs the morning light so colors read as gentle tones instead of punchy contrast. Hanging on the door, it brings a hint of textile warmth to arrivals and departures, and the cushiony surface mutes any rattle from the frame.
It has become the kind of home accent that feels like a soft handshake.
Steps
- Cut many petal shapes from felt and lay them around a simple foam wreath base to plan placement.
- Glue petals to the base, overlapping to create full coverage and texture.
- Fill gaps with smaller petals or felt leaves to achieve a uniform look.
- Add a felt-covered loop at the back for hanging and secure with glue.
- Hang on the door or a wall hook and adjust petals for symmetry.
Hanging felt pockets to tame desk clutter

A vertical row of felt pockets brought an ordered softness to my desk area. Each pocket has a slight give that makes slipping in a pen or notepad feel effortless, and the felt muffles the clatter of small items.
Color blocking the pockets created a visual rhythm that made the wall feel intentional rather than cluttered. The fabric edge is forgiving when hands reach for things, and the whole piece casts a modest shadow that reads like quiet structure.
It turned scattered supplies into a tidy, approachable display.
Steps
- Cut equal-sized rectangular pockets from felt and plan a vertical arrangement.
- Glue pocket sides and bottom onto a larger felt backing, leaving tops open.
- Attach a sturdy felt or ribbon loop at the top for hanging and secure with glue.
- Reinforce pocket edges with additional felt strips if needed.
- Hang near the desk and insert small supplies into each pocket.
Felt placemat set that softens family meals
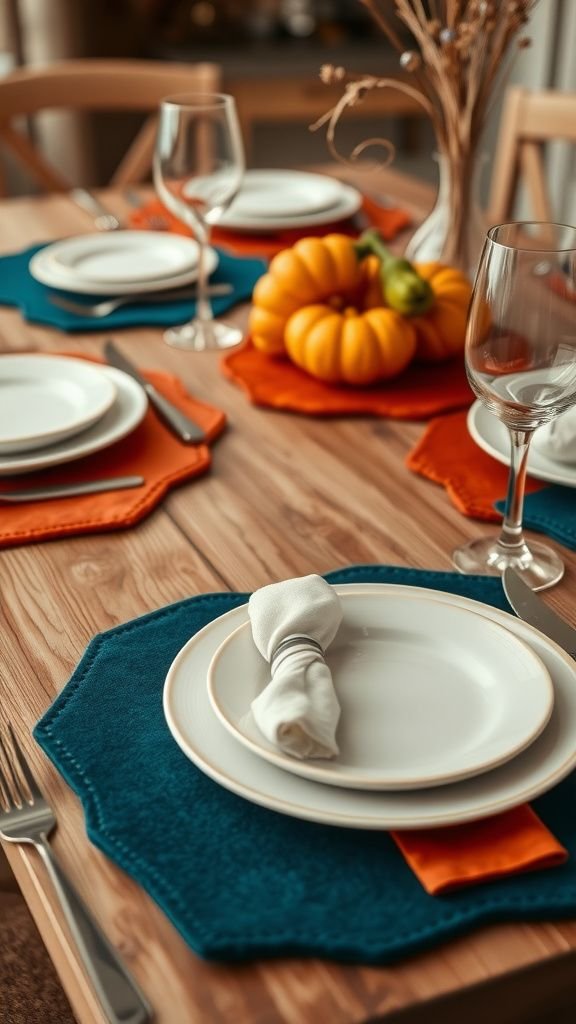
An afternoon of gluing felt shapes into placemats turned routine dinners into a little ritual. The mats feel warm under plates and give the dining table a soft, muffled soundscape when forks tap.
Felt edges resist fraying and the density protects the table from heat, so the mats feel practical as well as cozy. Mixing muted jewel tones created a relaxed table palette that encouraged lingering conversation, and the slightly fuzzy surface made hands and arms feel welcomed rather than chilled by the table.
Steps
- Cut rectangular or oval placemat shapes from thick felt to desired size.
- Decorate placemats with glued felt appliqué or layered strips for contrast.
- Smooth glued elements and press firmly to ensure adhesion.
- Let the mats dry flat under light weight to maintain shape.
- Store flat or roll gently when not in use to preserve edges.
Felt drawer liners for a cushioned, quiet interior

Sliding open a drawer lined with felt introduced a small joy into daily routines. The felt creates a plush base that softens the clink of utensils and protects delicate surfaces from scratches.
It feels dense and slightly springy under the fingertips and lays in place with a quiet presence that dampens noise. Custom-cut to fit, the liner hugs the drawer corners and keeps items from shifting wildly.
I appreciated the muted color beneath my things; it made the contents look curated rather than thrown in, and the liner stayed tidy with only occasional dusting.
Steps
- Measure the drawer interior and transfer dimensions onto a felt sheet.
- Cut the felt to size, trimming corners for a neat fit.
- Apply thin strips of double-sided adhesive to the drawer base.
- Press the felt liner into the drawer, smoothing out bubbles.
- Replace items and enjoy a quieter, cushioned drawer experience.
Minimalist felt shelf liners that frame decor objects
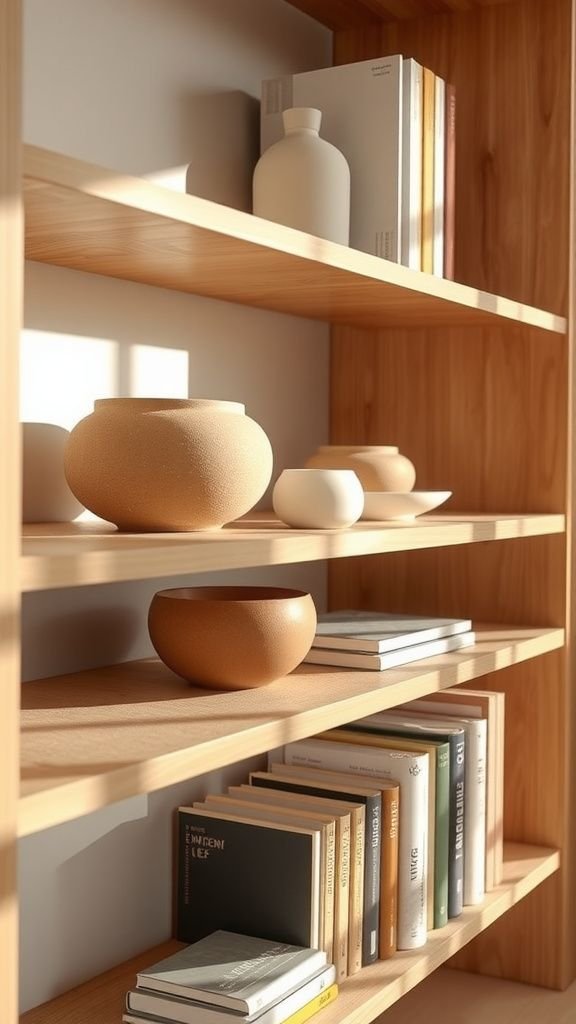
A set of slim felt shelf liners reframed the knickknacks on my bookcase, giving each object a soft stage. The felt absorbs tiny scratches and provides a neutral, velvety backdrop that makes ceramics and glassware appear calmer and more deliberate.
The liners feel smooth to the touch and reduce sliding for small items, which brought a quiet order to displays. I liked how the edges tuck under items and soften the shelf lines, turning everyday storage into a curated still life without adding bulk or visual clutter.
Steps
- Measure shelf widths and cut felt strips slightly narrower than each shelf.
- Round or bevel the felt edges for a polished appearance.
- Place liners on shelves and adjust positions for symmetry.
- Secure with small bits of double-sided tape at corners if needed.
- Arrange decor items on top, allowing liners to frame each piece.
Felt picture frame mats that warm photographs

Replacing a white mat with a felt one gave framed photos a softer, more tactile presence. The felt edge softens the transition between frame and image, making the scene within feel more intimate.
Its plush border adds depth and absorbs harsh reflections so that photographs invite closer viewing. The felt’s fibrous edge creates a muted halo that complements sepia tones and candid snapshots especially well.
There is a comforting quality to the finished frame, as if the picture were nestled into a small textile hammock rather than displayed flat.
Steps
- Measure the frame opening and cut a felt mat to match dimensions.
- Cut an inner window in the felt mat for the photograph placement.
- Attach the photograph to the back of the felt mat with small pieces of archival tape.
- Insert the felt mat and photo into the frame and secure the backing.
- Clean the glass gently and hang or place the frame on a shelf.
Wall-mounted felt pinboard for soft, colorful notes

A felt pinboard became my weekend command center, and its soft surface changed the way notes and photos looked when displayed. Pins sink in with a quiet tactile resistance and images sit flat without curling.
The board’s plush depth invites layering and rearranging until the composition feels right, and the felt muffles the sound of pins being pressed in. Choosing a calming palette made the board blend into the wall while still allowing colorful memos to pop, turning reminders into a more pleasant part of the room’s visual rhythm.
Steps
- Cut a large rectangle of thick felt to fit the chosen wall area.
- Mount the felt on a lightweight backing board with strong adhesive.
- Frame the mounted felt with a thin wooden frame glued or taped to the edges.
- Hang the board securely on the wall using picture hooks.
- Use push pins to attach notes, photos, and small mementos.
Felt lampshade trim that mellows light quality

Adding felt trim to a lampshade made the lamp feel gentler in the evenings. The felt edge softens the shadow cast and reduces glare, creating a more intimate pool of light.
The texture warms the visual profile of the shade and gives the lamp a handcrafted silhouette when lit. The felt’s color slightly filters reflected light, introducing a subtle tint that changed the room’s mood in small, pleasing increments.
It felt like a simple tweak that made bedtime reading more comfortable and the corner lamp more personal.
Steps
- Measure the lampshade circumference and cut a strip of felt to match.
- Glue the felt strip along the shade rim, pressing firmly for a secure bond.
- Smooth seams and trim any overhanging bits for a clean finish.
- Allow the adhesive to cure fully before turning the lamp on.
- Inspect the lampshade in low light and adjust trim if needed.
Soft felt mobile for living room movement
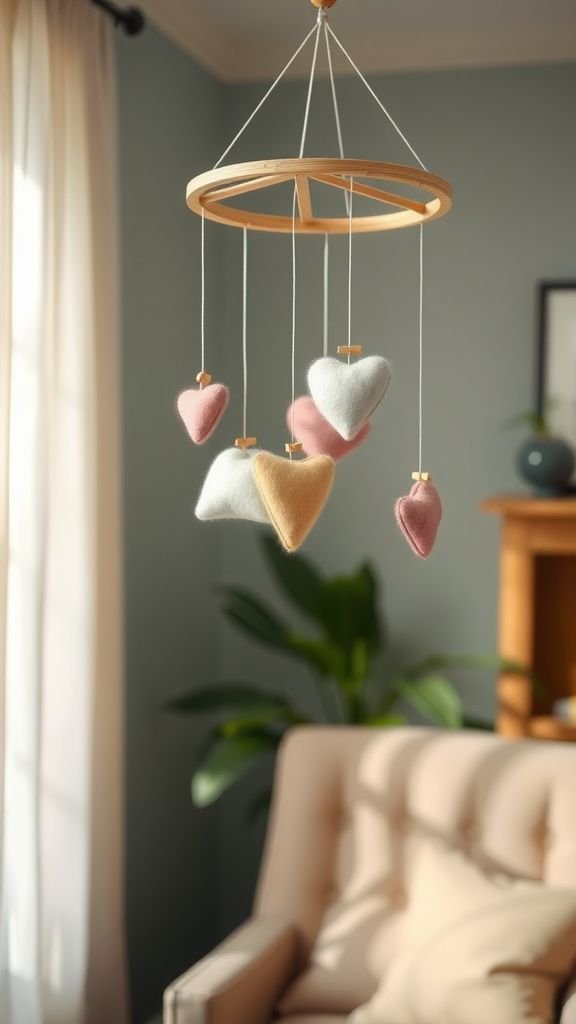
A felt mobile added a slow choreography above the reading nook that felt soothing. Lightweight felt shapes drift with air currents, creating delicate motion without a sound.
The matte surfaces absorb light and cast faint shadows that change throughout the day, offering a quiet entertainment during still moments. I appreciated how the individual pieces balanced into a calm composition, each color contributing to the whole in a subtle way.
The mobile felt like a slow breath for the room, an unassuming element that rewarded idle gazes with soft movement.
Steps
- Cut a selection of simple shapes from various colored felt sheets.
- Attach thin threads to each shape with small drops of glue at the top.
- Tie threads to a lightweight hoop or dowel at varying lengths to create balance.
- Adjust positions until the mobile hangs level and moves freely.
- Suspend the mobile from a ceiling hook in a draft-free spot for gentle motion.