I’ve always liked making Memorial Day patriotic wreath crafts on slow weekends, pulling out ribbon, fabric scraps, and a handful of tiny flags. There’s something soothing about arranging colors and textures while a fan hums in the background and lemonade waits nearby.
These Memorial Day patriotic wreath crafts felt like small rituals—each one carrying a memory or a favorite sound from parades and backyard barbecues.
I keep coming back to the mix of linen, poppy red, and weathered wood that somehow feels both respectful and warm.
Small grapevine wreath with tiny waving flags
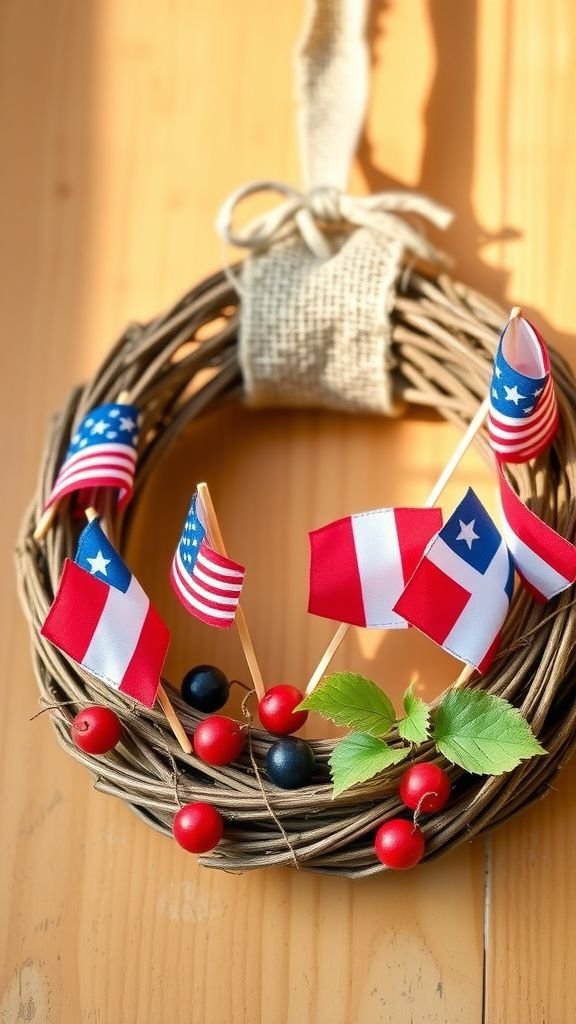
I remember finding a lopsided grapevine ring at a flea market and thinking how cozy patriotic accents could feel. The little flags fluttered softly when a breeze drifted past, and the dry twig scent mixed with sunbaked porch air.
The contrast of rough vine against soft ribbon made each glance a small comfort. I liked that a humble circle could carry colors that tugged at memory without being loud.
It felt like a quiet nod to neighborhood parades and iced tea afternoons.
Steps
- Gather a small grapevine wreath, mini fabric flags, thin floral wire, and ribbon that complements red, white, and blue.
- Secure each mini flag into the grapevine by wrapping floral wire around the flag stick and twisting the wire so it holds snugly in place.
- Tuck lengths of ribbon into gaps in the vine, letting ends trail naturally, and fasten ribbon ends with discreet wire or hot glue.
- Step back and shift flag positions until the arrangement feels balanced, evening out any dense spots.
- Hang the wreath on a sheltered door or lean it against a weathered porch crate for display.
Burlap bloom wreath with poppy accents
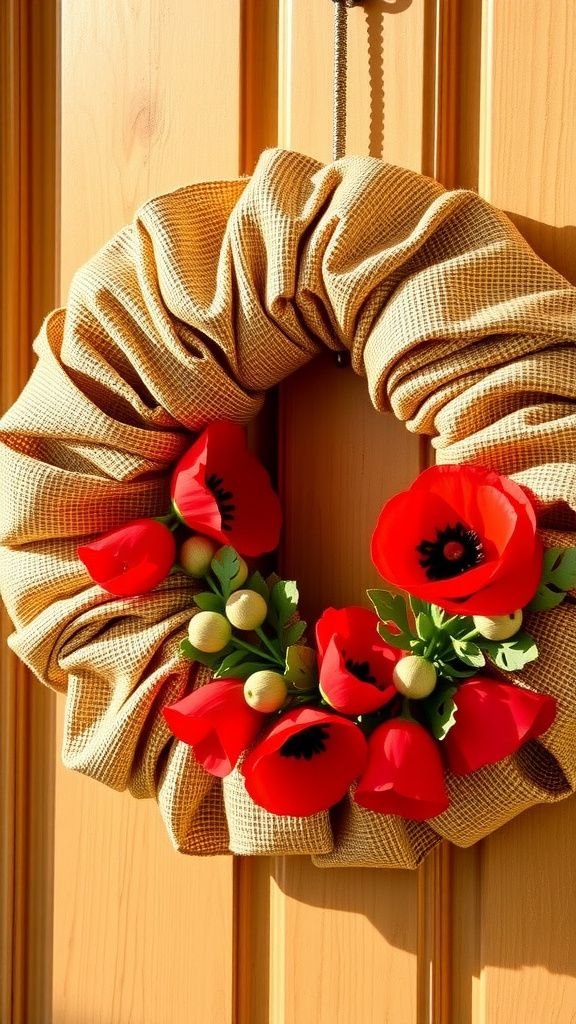
Burlap always feels tactile, a little scratchy at first touch but comforting in a country way. I remember arranging poppy-like blooms against the coarse weave and thinking how the roughness made the red petals glow.
The scent of fresh-cut stems mingled with sun-warmed fabric in my hands. That combination of tactile burlap and bright blooms made the wreath read like an old postcard.
It seemed like the kind of piece that would soften as it lived on a door, catching weather and memory.
Steps
- Start with a medium foam or wire wreath base and a length of natural burlap ribbon or fabric strips.
- Form loops or gathered ruffles of burlap and secure them around the base by threading floral wire through the weave and twisting on the back.
- Position artificial or dried poppy stems among the burlap ruffles, fastening each stem with floral wire so they sit snugly without slipping.
- Add a simple bow or tuck in sprigs of seeded eucalyptus for texture and fasten securely.
- Inspect edges to make sure the burlap looks full and the poppies are evenly distributed for an organic silhouette.
Weathered wood slice wreath with metal stars
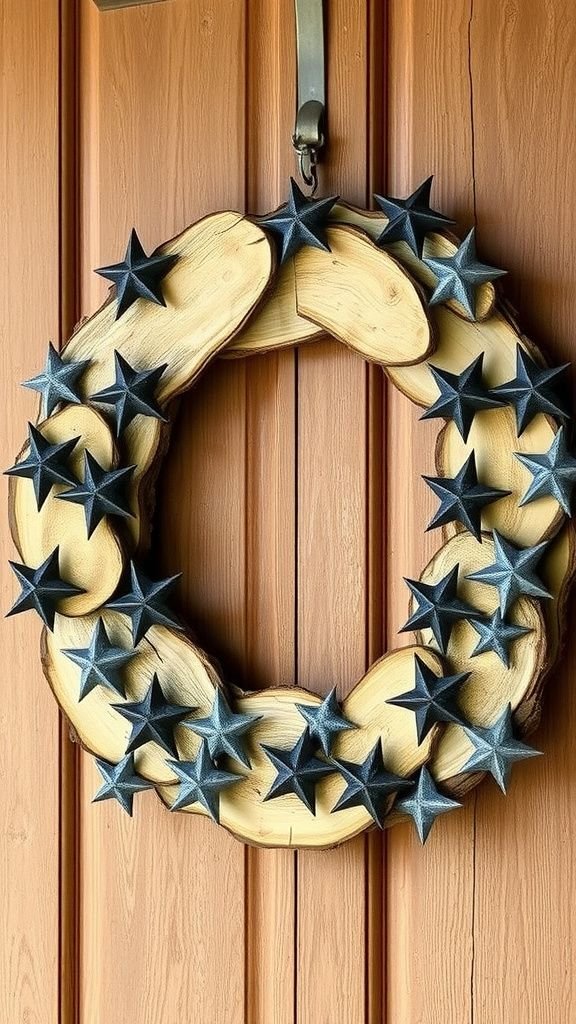
There was a shed full of leftover wood slices that smelled faintly of sawdust and rain, and I loved arranging them into a circle that felt both handmade and timeworn. Metal stars with a faint patina added a quiet gleam, cool against the rough warm wood.
Running a palm across the slices revealed grain lines and tiny knots. The contrast between metallic chill and sunbaked wood made this wreath feel earnest and tactile, the sort of thing that could sit on a stoop and whisper old stories.
Steps
- Collect wood slices of similar thickness and rough-cut edges and lay them in a circular pattern on a flat surface.
- Secure the slices together on their backs with a strong outdoor adhesive or small screws into a backing ring, ensuring alignment and stability.
- Arrange metal star ornaments across the face of the wood, spacing them for visual movement, and attach with small screws or outdoor glue.
- Add a loop of jute or weather-resistant twine to the back for hanging and let adhesives cure fully before lifting.
- Lightly sand any rough back edges for safer hanging and test the wreath on the intended spot.
Denim and lace patriotic wreath—unexpected mix

Torn denim feels pleasantly worn, soft at the edges with threads that catch the light, and pairing it with lace felt oddly right. The cool indigo of the denim calmed the brighter patriotic tones, while the lace introduced a whisper of vintage charm.
I could almost hear the faint rustle of fabric when I nudged the piece. It had a lived-in quality, like a favorite shirt reimagined, and made me think of backyard chats under string lights and trailing conversations about hometown memories.
Steps
- Cut denim strips from old jeans and gather delicate lace trims for contrast.
- Tie or loop the denim strips around a foam or wire wreath base, ensuring even coverage and a textured surface.
- Intermix lace trim by threading it through denim loops or securing small sections with craft wire, creating pockets of delicate detail.
- Add a few small flag accents or star buttons threaded onto thin wire and weave them gently among the fabrics.
- Trim stray threads for a neat silhouette and attach a sturdy hanger to the back for display.
Foam base wrapped in ribbon and vintage buttons

Buttons always feel like small treasures, cool and varied under fingertips, and pairing them with smooth ribbon created a playful rhythm. The ribbons slid softly against the foam base, while the buttons clicked faintly when I nudged the wreath into a new pose.
A handful of red, white, and blue buttons added cheerful punctuation, while a frayed ribbon edge kept things humble. It gave the wreath a tactile melody that made me smile when I walked by the door each morning.
Steps
- Cover a foam wreath base with wide ribbon, overlapping slightly to hide the foam and create a smooth foundation.
- Sort a collection of vintage and modern buttons in patriotic tones and plan their placement across the wreath face.
- Sew or glue buttons to the ribbon-covered surface in clusters and lines to form visual interest and balance.
- Add a ribbon bow or loop if desired and secure its base with stitching or adhesive.
- Allow any glue to dry completely before hanging the wreath in a sheltered outdoor spot.
Poppy cluster arrangement on reclaimed wire frame
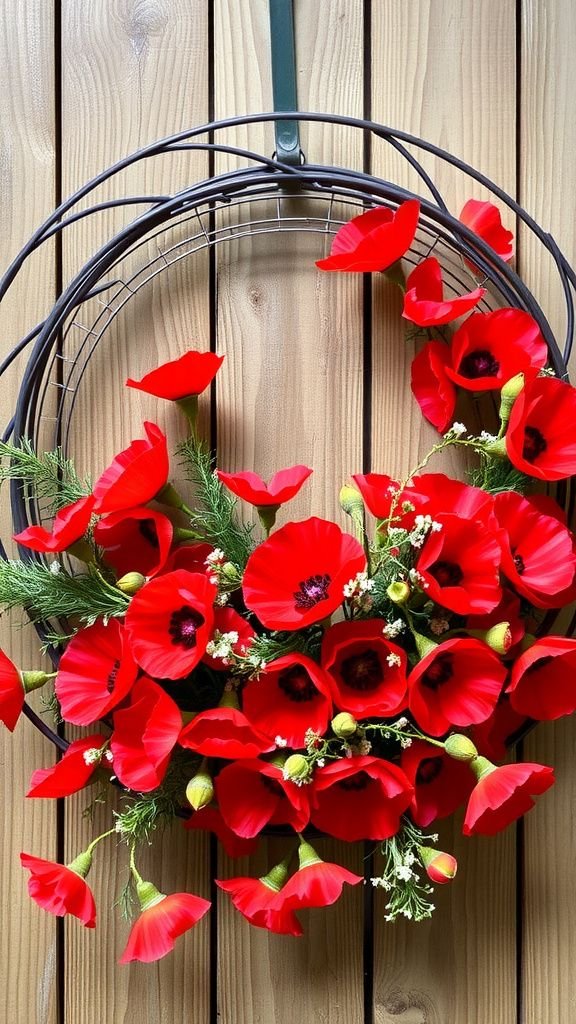
A reclaimed wire frame has an industrial hum to it, cool and slightly springy, and the poppy cluster softly countered that with a velvety red. Pressing a petal near the frame revealed a contrast of smooth silk and stubborn metal.
The arrangement felt lively, like a small bouquet caught mid-breeze, and the rhythmic repetition of blooms made for a soothing visual heartbeat. It was the kind of wreath that seemed to lean into both remembrance and the lightness of late-spring afternoons.
Steps
- Select a circular wire wreath frame and gather faux or dried poppy stems with varied lengths.
- Insert stems into the wire frame, weaving them through openings and bending the stems to hold position.
- Cluster blooms more densely on one side for a modern asymmetric look, securing stems with floral tape or thin wire where needed.
- Add greenery sprigs around the cluster to soften the metal and create a natural transition.
- Check stability and press any loose stems snugly into the frame before hanging.
Mason jar lid wreath with tiny charm trinkets
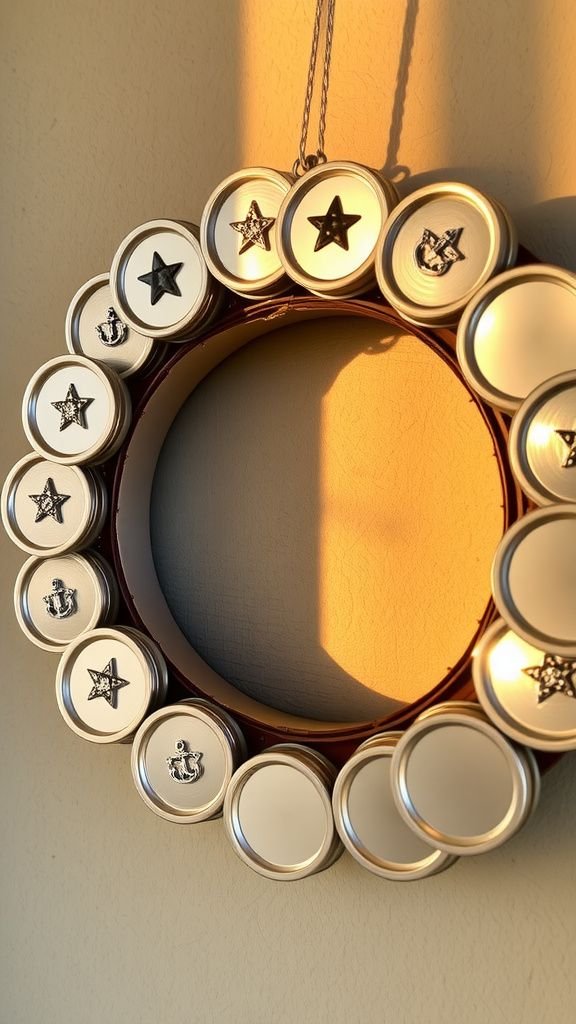
Mason jar lids clicked together with a satisfying metallic rhythm while I arranged them into a circle, their stamped patterns catching light. Small charms nestled into lids—tiny stars, anchors, and little flags—added intimate details that invited close inspection.
The cool metal against a sun-warmed porch felt tactile in a quiet way. When hung, the wreath made a tinkling sound in the breeze and gave off a decidedly homemade charm, like something passed between neighbors over a sidewalk fence.
Steps
- Collect clean mason jar lids and liners and lay them face-up in a circular arrangement on a flat surface.
- Affix lids to a sturdy backing circle by stitching through holes or using a strong adhesive designed for metal.
- Glue or fasten small trinket charms into the center of select lids for detail and variation.
- Add a rustic twine hanger loop to the back and ensure all pieces are secured for outdoor display.
- Hang the wreath in a spot where gentle breezes can coax a soft metallic chime.
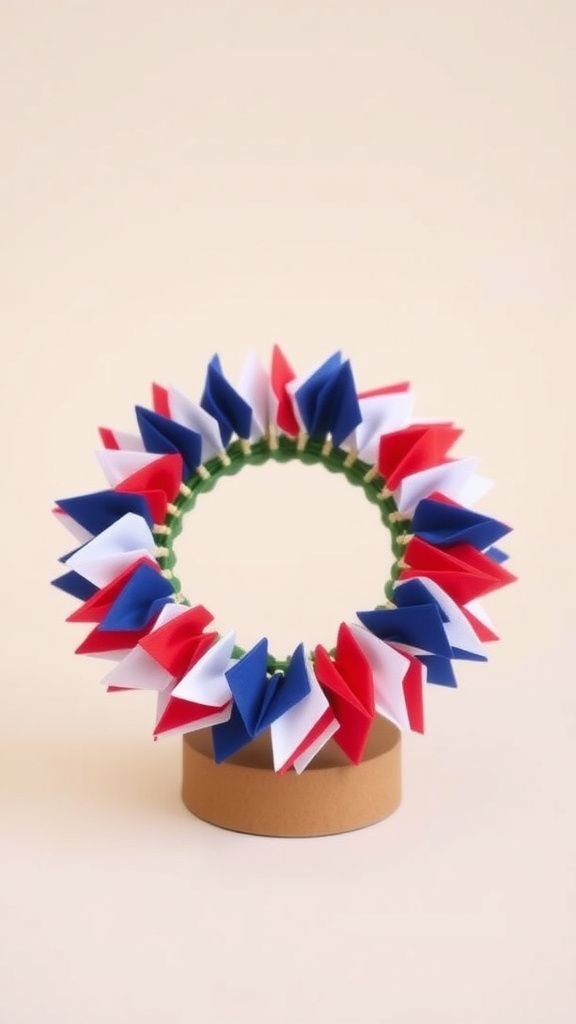
Paper rosettes in flag colors—cheerful and airy
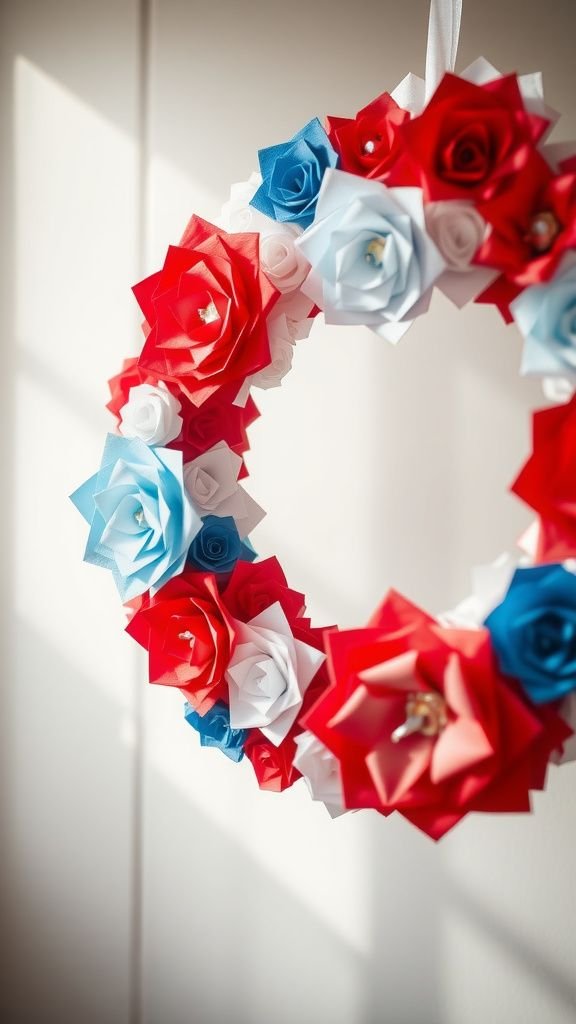
Paper rosettes have a crisp whisper when touched and stacking them felt almost like folding a memory. The red and blue papers had slightly different weights, which gave each rosette its own character, and the white centers acted like little pauses.
Watching shadows shift across the layered folds in late afternoon light made the wreath feel delicate and lively at once. It brought to mind festive tablescapes and the quick thrill of catching a parade float glimpsed between trees.
Steps
- Prepare paper strips in coordinating red, white, and blue tones and score them for easy folding into rosettes.
- Form each rosette by folding the paper accordion-style and joining the ends into circular shapes, securing with glue or tape.
- Arrange the rosettes on a flat wreath base, layering sizes to create depth, and attach them with adhesive.
- Fill gaps with small paper stars or tissue pom-poms for texture and balance.
- Attach a light hanger to the back and hang in a sheltered area to protect paper from moisture.
Eucalyptus sprigs and ribbon for gentle patriotism
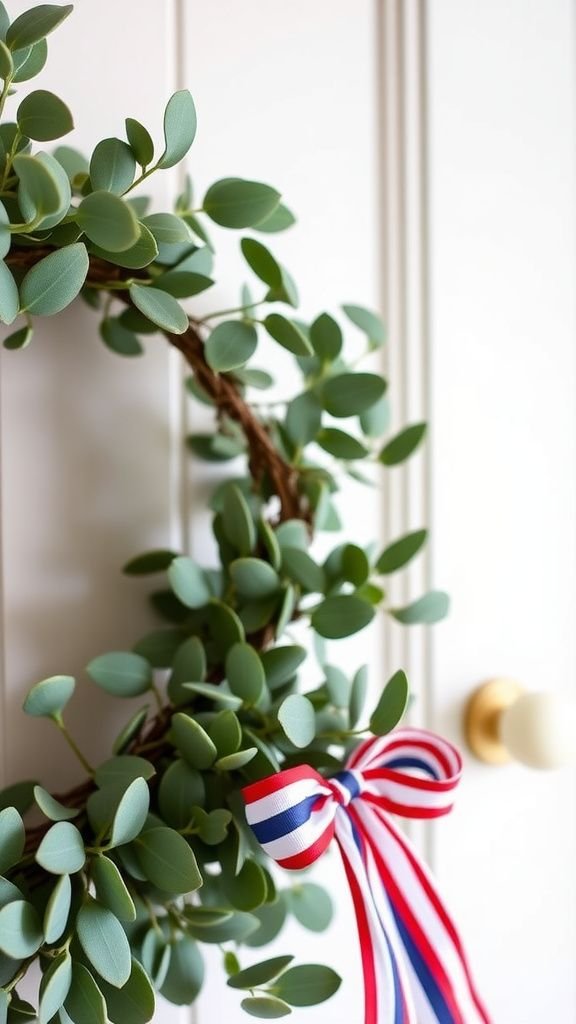
Eucalyptus has a cool, herbal scent that mingled with the ribbon sheen as I arranged stems into a round form. The silver-green foliage offered a calm backdrop to the patriotic palette, and the leaves brushed softly like a cool evening wind.
A satin ribbon threaded through the greenery added a quiet sparkle that didn’t shout. It felt like a responsive, breathing arrangement that read both fresh and respectful, suitable for a season that balances celebration and reflection on warmer, slower evenings.
Steps
- Collect fresh or preserved eucalyptus stems along with coordinating satin ribbon in patriotic colors.
- Layer eucalyptus stems around a wreath frame, overlapping stems to create a continuous ring and secure them with floral wire.
- Weave or tie ribbon around the foliage, allowing gentle loops or tails to fall naturally for a soft accent.
- Tuck in a few small flagged picks or floral accents among the leaves to hint at color without overwhelming the greenery.
- Trim any protruding stems and fasten a hanging loop to the back of the wreath.
Scrap fabric tassel wreath with a homespun vibe
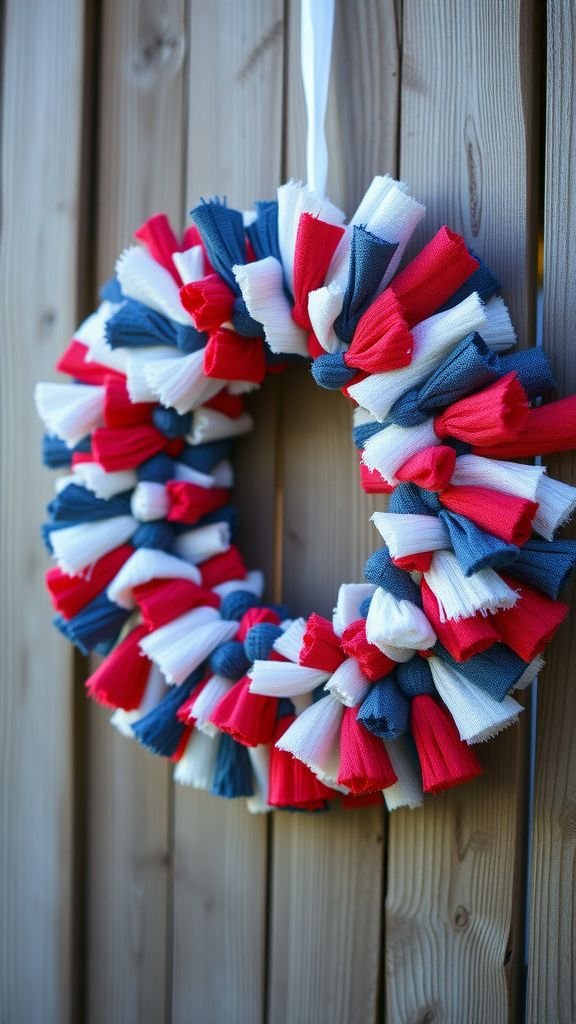
Tassels made from leftover fabric carried the faint smell of old cotton and warm dryer days, and they swung with a lazy rhythm when nudged. The feel of frayed edges under fingertips made the piece feel handcrafted in the gentlest sense.
There was an ease to the mix of textures—knit scraps, linen strips, and printed cotton—that felt like a patchwork memory. Hanging on a backdoor, it conveyed a relaxed welcome, like a neighbor dropping by with a pie and stories from the block.
Steps
- Cut cloth scraps into long strips and group them by color family for an even distribution around the wreath.
- Tie strips into tassel-like knots and loop them onto a wire or foam wreath base to create dense coverage.
- Alternate textures and colors to form a rhythmic pattern, making sure tassels overlap for fullness.
- Add a small cluster of ornamental stars or a simple bow to one side for focal interest.
- Fluff the tassels to achieve an even silhouette and attach a hanging loop behind the wreath.
Layered felt stars wreath—soft, cozy texture
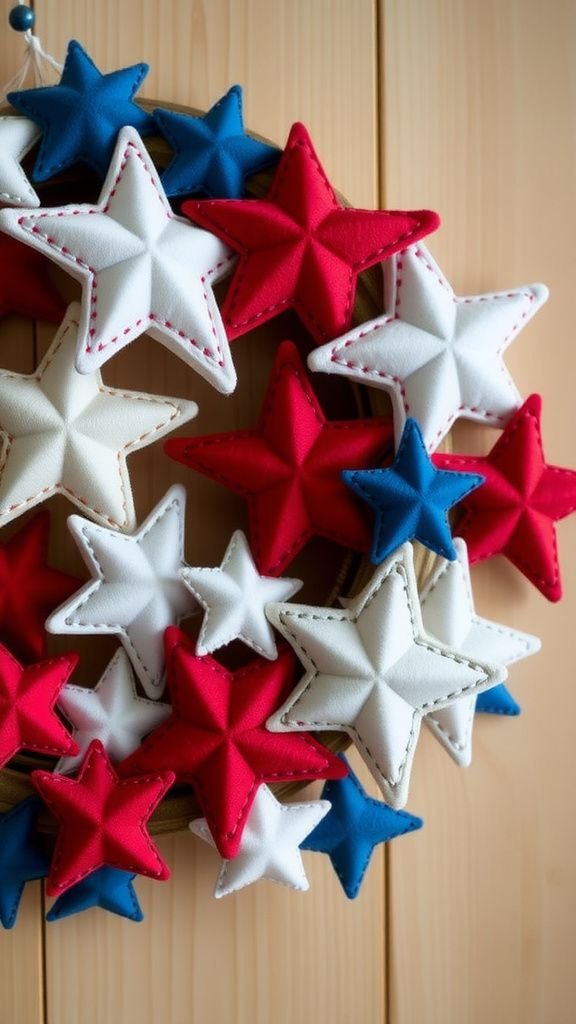
Felt felt quiet in my hands, almost velvety, and cutting out star shapes felt oddly soothing. Layering stars of different sizes created little pockets of shadow and warmth where the felt overlapped.
The edges had a soft give, and the yarn stitches I added peeked like freckles across surfaces. Placing it on the door gave a gentle, muffled look that contrasted with summer brightness.
It read more like a warm quilt than a parade banner, which I appreciated on cooler mornings.
Steps
- Cut star shapes from sheets of felt in complementary patriotic colors and plan a layered layout on a round base.
- Glue or stitch larger stars to the background, then stack smaller stars on top to build depth.
- Embellish some stars with simple embroidery stitches or bead accents for texture.
- Cover any visible backing with a neat ring of felt or ribbon to finish the edge.
- Attach a loop for hanging and press gently so layered pieces sit flat for display.
Patriotic yarn pom-pom wreath—playful and bright
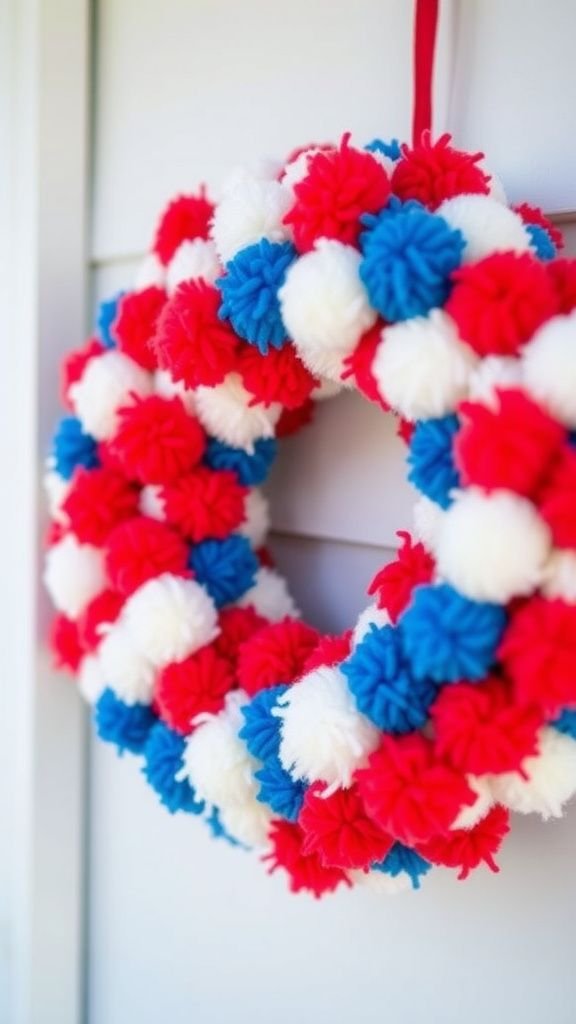
Making yarn pom-poms produced a soft cloud of fiber that felt almost like touching a warm cloud. The varied thickness of yarn added an unpredictable, bouncy texture and the pom-poms clustered into a plush, cushiony ring.
Colors popped against one another in a friendly, childlike way that brought a smile whenever I passed the doorway. The wreath had a happy buoyancy, a playful energy that reminded me of ferris wheels and balloon strings at early summer fairs under a wide blue sky.
Steps
- Wrap yarn around a pom-pom maker or cardboard and secure at the center before trimming into fluffy pom-poms.
- Create numerous pom-poms in patriotic shades, varying sizes for visual interest.
- Attach each pom-pom to a foam wreath base using hot glue or pins, clustering them tightly for a plush look.
- Fill any gaps with smaller pom-poms or yarn tassels to create an even texture across the wreath face.
- Add a ribbon hanger and fluff the pom-poms for fullness before displaying.
Seashell and starfish wreath with subtle flags

Seashells carried summer in their curves, cool and smooth with sun-warmed edges, while starfish offered a surprising stiffness under palm. The little flag accents felt like small punctuation marks among the shells, creating a nautical whisper of patriotism.
Salt air seemed almost present, even indoors, as light caught pearly surfaces and cast soft reflections. The overall feel was breezy and coastal, as if the wreath had been gathered from a shoreline walk and arranged with a fond, quiet attention to memory.
Steps
- Collect clean, dry seashells and a few small faux starfish and plan their arrangement around a sturdy base such as foam or a wire frame.
- Attach shells and starfish using a strong adhesive suitable for porous surfaces, spacing to create texture and rhythm.
- Insert tiny flag picks among the shells for subtle patriotic color, securing them so they sit flush.
- Fill in gaps with sand-dusted rope or small pebbles glued to the base for a cohesive seaside look.
- Allow everything to set fully before hanging on an entryway with a protective finish if needed.
Wire word wreath spelling out a heartfelt message
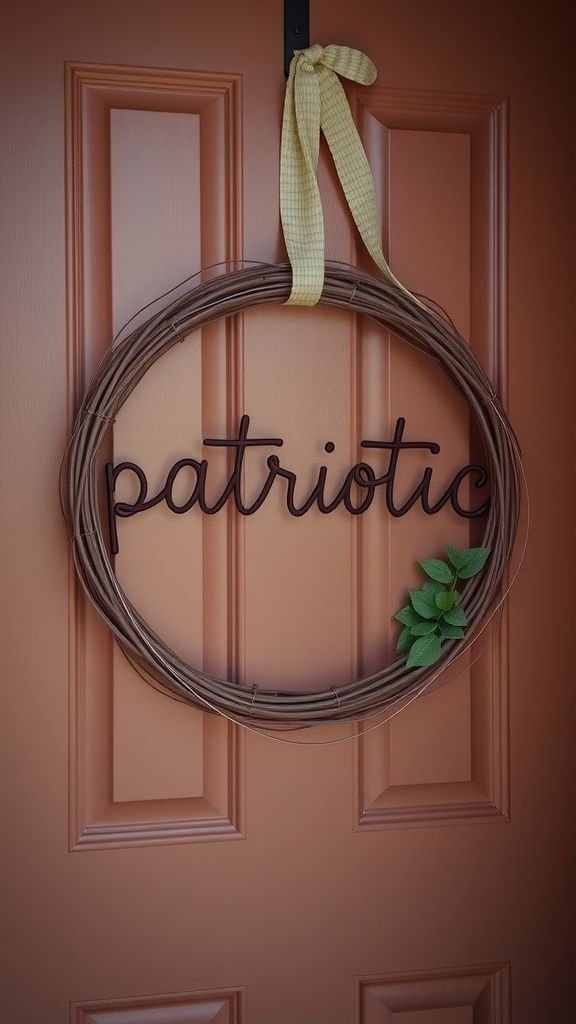
Bending wire into letters felt intimate and rhythmic, metal yielding with a soft resistance under fingertips. The word curved into a circle like a whispered sentiment, and the little bends caught late afternoon light.
I liked how the thin metal seemed both fragile and steadfast, paired with a simple base that let the letters float. The wreath felt like a quiet hello to anyone passing by, an understated expression that read more like a memory note than a billboard, and it seemed to age well over seasons.
Steps
- Cut a length of pliable craft wire and shape it into desired word or short phrase, making sure letters are legible and connected where necessary.
- Attach the wire word to a round frame or backing using thin wire wraps or small loops that keep the letters secure.
- Optionally add minimal accents like small ribbon loops or a single sprig of greenery to complement the lettering.
- Reinforce attachment points on the back so the word maintains its position when hung.
- Hang the wreath and adjust the letters gently to ensure even spacing and balance.
Mini flag fan wreath for a compact front door
A tiny fan of flags created an immediate sense of cheer, the small fabric ripples whispering when the breeze passed. The layered flags formed a miniature skyline of color against a tidy circular base.
Holding it up revealed a playful scale, like a parade condensed into a palm. It felt perfectly suited for small spaces where a full-scale wreath would overwhelm, offering a bright wink to neighbors while keeping a modest footprint on a narrow entry.
Steps
- Gather mini fabric flags on short sticks and decide on a fan layout that radiates from a single central point on a small wreath base.
- Insert flag sticks into the base, angling them outward to create a layered fan effect and secure with floral foam or adhesive.
- Add a small ribbon or bow at the center to hide attachment points and provide a focal accent.
- Ensure stick ends are trimmed flush on the back for safe hanging and attach a loop for display.
- Hang on a petite door or use as tabletop décor for a compact patriotic touch.
Rustic twine wrapped wreath with metal tag

The coarse twine felt honest and warm in hand, each wrap layering a subtle rope scent and a homespun look. A small metal tag engraved with a short word or date added a personal anchor, its cool face contrasting the rope’s warmth.
The whole piece felt quiet and steady, like a porch light in early evening. It carried a slow charm, the kind that aged with sun and rain and became part of a doorway’s story over time.
Steps
- Wind natural twine tightly and evenly around a foam or wire wreath base until fully covered, securing the start and end points with knots or glue.
- Prepare a small metal tag engraved or stamped with a brief sentiment and attach it to the front with thin twine or small hardware.
- Add a modest bow or a sprig of dried wheat for a subtle accent and affix it near the tag.
- Tuck or trim any loose fibers at the back and add a sturdy loop for hanging.
- Position the wreath on a sheltered door to keep the twine looking fresh longer.
Knotted rope wreath with maritime charm

Thick rope has a rounded heft that sits nicely in the palm, its braided surface feeling both strong and familiar. The repeat of knots around the circle created a steady rhythm that felt calming.
When sunlight hit the fibers, tiny highlights appeared along each twist. The maritime undertone leaned toward a seaside memory, and small starfish or anchor charms made it feel anchored to that mood.
It read as both sturdy and welcoming, perfect for a breezy entry that sees a lot of summer traffic.
Steps
- Select a durable length of nautical rope and form it into a circular shape, tucking and overlapping to achieve desired thickness.
- Create decorative knots around the circumference, spacing them for a balanced pattern and securing each with hidden stitching or glue.
- Attach small maritime charms such as anchors or starfish to select knots for thematic detail.
- Finish the back with a neat wrap of rope to hide seams and add a hanging loop.
- Hang on a covered porch where the rope can retain its texture and keep charm details visible.
Vintage map wreath marking hometown pride
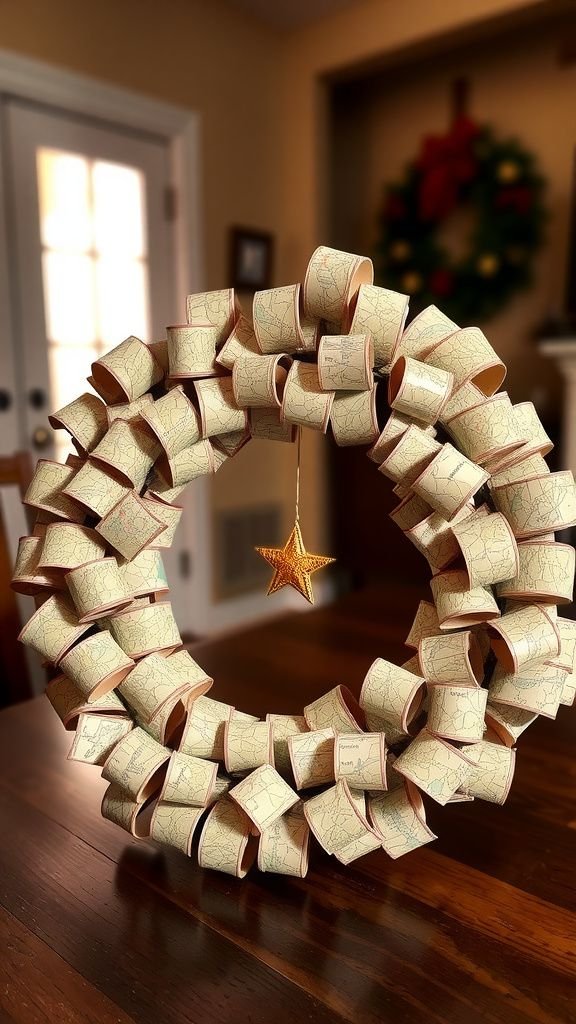
Old maps have a papery creak and faint ink smell that felt like a small time capsule. Folding and curling map pieces around a base produced layers that hinted at roads and river bends.
A tiny marker or glued star over a hometown spot felt quietly meaningful, like tucking a memory into the center of the circle. The whole thing read as a personal geography, full of lanes and landmarks that meant more to me than a flag alone could convey.
Steps
- Cut vintage or reproduction map scraps into strips and curl or fold them for texture before arranging on a wreath base.
- Layer map pieces around the base, overlapping to hide the backing and create an interesting collage of lines and colors.
- Highlight a small town or meaningful location with a tiny pinned flag or star secured on the map surface.
- Seal the paper with a protective spray to guard against moisture and fading if the wreath will be displayed outdoors.
- Attach a hanger and place the wreath where it can spark conversation about the marked location.
Layered ribbon cascade wreath with soft silhouette
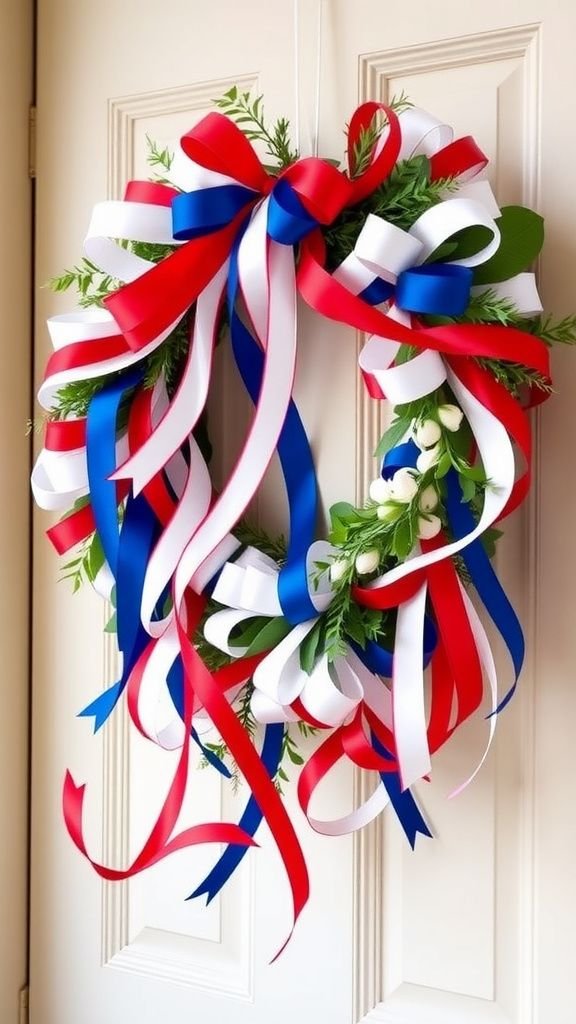
Ribbons of different widths created a gentle cascade that rustled faintly in the hallway breeze. Satin gave a tiny sheen while grosgrain offered a matte counterpoint, and their contrast felt satisfying under fingertips.
The layered effect read like a soft portrait rather than a bold statement, folding light into subdued highlights. I liked how the wreath looked from across the yard and up close, each ribbon edge catching a glint of light and shifting slightly with passing clouds.
Steps
- Select ribbons of complementary textures and widths in patriotic tones and cut them to varied lengths for depth.
- Tie or loop ribbon pieces around a wreath base in overlapping layers to achieve a cascading silhouette.
- Add a larger focal bow or knot on one side to anchor the design and create visual balance.
- Tuck in a few small accents like faux laurels or mini flags near the focal point for context.
- Trim ribbon ends for a tidy finish and hang the wreath in a spot protected from strong wind.
Mini wooden bead wreath with rustic paint splashes
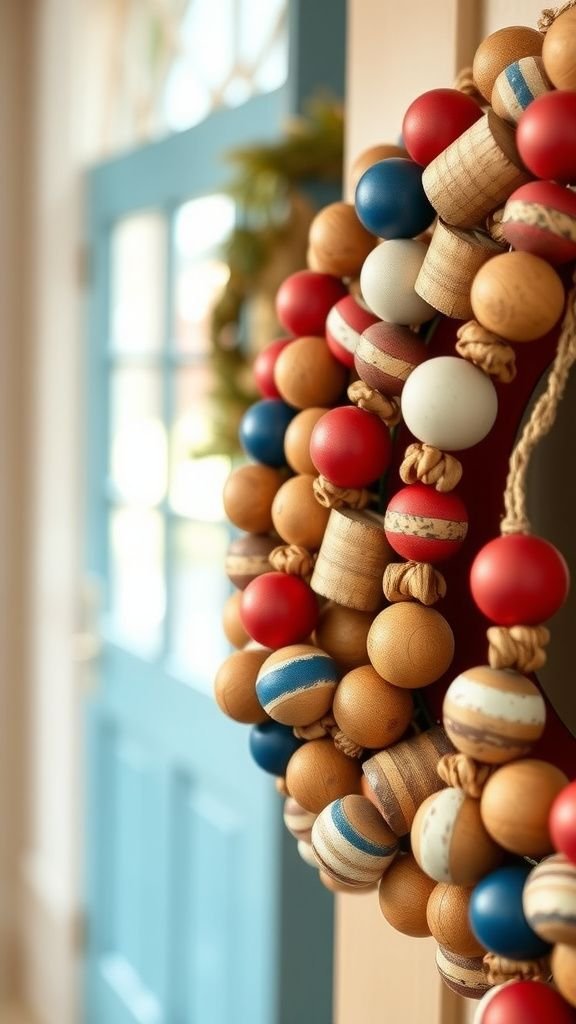
Wooden beads felt smooth and warm, their roundness pleasing to roll between fingers. Painting random beads in patriotic hues left faint brushstrokes that read like memories of backyard craft days.
Grouping beads on a circular wire created a rhythmic texture that was simple yet rich under light. The small splashes of color gave it a playful tempo without overwhelming the wood’s natural grain.
It felt like something made while chatting with a friend over cold drinks, relaxed and slightly imperfect in a charming way.
Steps
- Thread wooden beads onto a sturdy wire or cord, alternating natural and painted beads to create an engaging rhythm.
- Paint select beads in red, white, and blue, allowing slight brush textures to remain for character before drying.
- Form the beaded strand into a circle and secure the ends discreetly, adjusting bead spacing for fullness.
- Add a small ribbon or metal charm at the top for added interest and a hanging loop.
- Hang on a door where the bead textures catch light and create subtle shadows.
Pressed flower wreath with faded patriotic palette
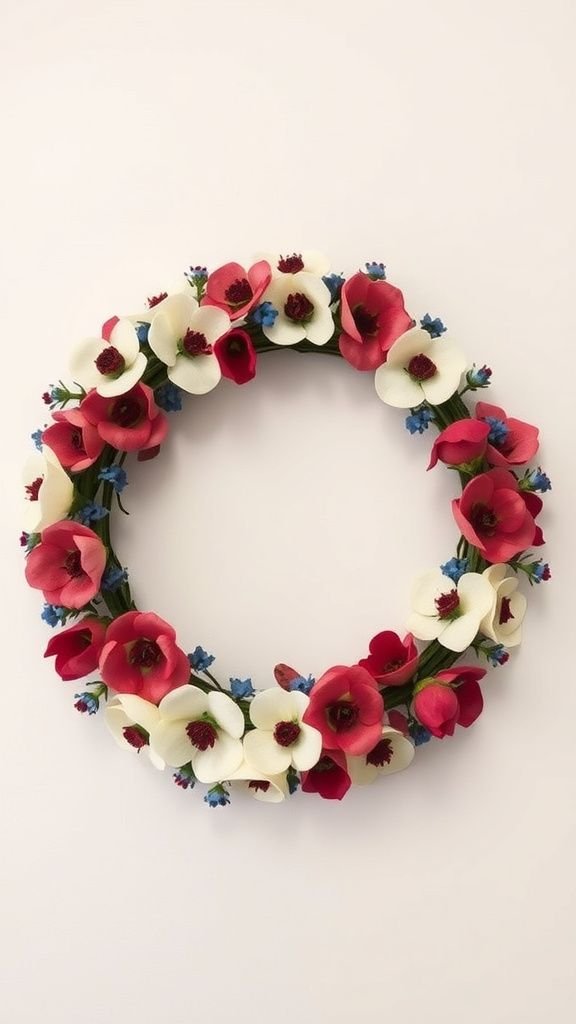
Pressed flowers carry a flat, papery hush and the faint scent of sun and grass. Layering muted petals into a circular collage felt like preserving a single afternoon.
The faded reds and soft blues read as gentle and nostalgic rather than loud, and touching the surface revealed delicate veins that felt almost like paper lace. It had an archival quiet that invited slow looks, the kind of wreath that seemed to hold a summer afternoon captive behind glassy petals.
Steps
- Select and press flowers and foliage until thoroughly dried and flat, preserving delicate veins and colors.
- Arrange pressed blooms on a flat backing in a circular composition, layering to create depth while keeping pieces flat.
- Secure each piece with archival adhesive and cover the surface with a clear protective layer or glass for preservation.
- Finish the edge with a thin frame or ribbon to conceal backing seams and provide structure.
- Hang in a location out of direct sun to prolong the colors and protect the delicate petals.