I’ve always loved the way a mask can change the mood of an evening. Making Mardi Gras masks became a way to slow down, sit with glitter on my fingertips, and remember noisy parades and the smell of sweet beignets.
Over time I collected ideas that felt playful and personal, from feathered classics to glow-in-the-dark experiments. These Mardi Gras mask craft ideas are the sorts of projects I reach for when I want color, a little mess, and a small moment of celebration at home.
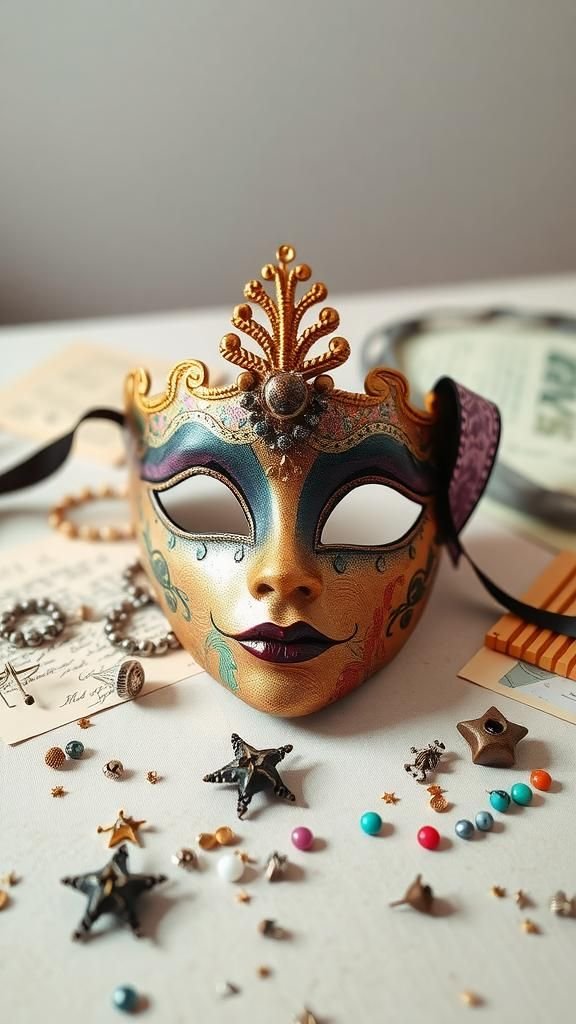
Feathered Venetian mask with vintage flair

I still smile thinking about this feathered Venetian mask I made one humid afternoon. The weight of the feathers felt light against my cheek, and the metallic filigree caught late sunlight in a way that made the whole room shimmer.
Handling the soft plumes and tiny beads brought back memories of parade floats and brass bands. Color combinations of deep purple, emerald green, and gilded gold created that classic Mardi Gras mood that filled me with warmth and a hint of mischief.
Steps
- Trace a mask shape onto sturdy cardstock and cut out the eye openings for a comfortable fit.
- Attach a decorative filigree base to the mask surface, overlapping edges for a layered look.
- Arrange feather clusters along one side and fix them in place with adhesive until secure.
- Embellish the mask edge with small beads and metallic trim for added shimmer and definition.
Beaded mosaic mask with tactile charm

This beaded mosaic mask felt like crafting a tiny city of color. Each bead added reflected light differently, creating a lively surface that seemed to dance in candlelight.
The texture under the fingertips was pleasantly uneven, like a landscape of little glass hills. I loved pausing to choose bead colors, watching how a single shade could shift the whole mood.
Wearing it felt weighty in a comforting way, a reminder of slow, deliberate work that rewards patience with bursts of sparkle.
Steps
- Sketch a mask outline on a rigid base and paint a subtle background color to unify the palette.
- Place adhesive in small sections and arrange beads in flowing patterns, working outward from the center.
- Mix larger focal beads with tiny seed beads to create contrast and tactile interest across the surface.
- Seal exposed edges with a thin clear coat to keep beads secure and enhance shine.
Glitter watercolor mask with soft sheen

There’s something quietly joyful about a glitter watercolor mask that blends soft washes with bright accents. The pigments pooled and blended like a tiny sky, while flecks of glitter caught the light like distant stars.
The paper base had a slight waviness where the paint met it, a handmade imperfection that felt honest and charming. Holding it up to the sun, the colors shifted from cool to warm, and the subtle glitter added a celebratory glimmer without feeling overly ornate.
Steps
- Start with heavyweight watercolor paper cut to a mask silhouette and sketch gentle eye shapes.
- Apply layered watercolor washes, letting colors bleed into each other for soft transitions.
- Sprinkle fine glitter over tacky areas and press gently so sparkle adheres evenly.
- Add a fine ink outline around the eyes to give the design subtle definition.
LED-lit mask for night parade vibes

I once brought an LED-lit mask to a night walk and the reaction felt playful and a little wild. The tiny lights threaded behind translucent accents created a halo effect, and the gentle hum of batteries under the skin of the mask added a mechanical charm.
The glow softened edges and made colors pop against the dark. There was an unexpected coziness in that small electric warmth, as if the mask had its own tiny heartbeat while beads clinked in the background.
Steps
- Select a lightweight mask base and plan LED placement so lights sit behind translucent decorations.
- Secure a thin battery pack to the back with adhesive padding for comfortable wear.
- Attach LEDs along intended lines and test the illumination before fixing decorations.
- Cover wiring with fabric or trim to keep connections neat and comfortable against the face.
Paper mache mask with textured personality

The ritual of layering paper and paste for a paper mache mask felt soothingly slow. Each soaked strip left a subtle ripple, and the drying process brought out tiny valleys and creases that gave the mask character.
I enjoyed the tactile progression from floppy to firm, pressing gently to feel the surface harden under my fingers. Once painted, those imperfections became part of the story, catching paint differently and adding depth.
The finished piece felt truly handmade, with warmth and a hint of nostalgia.
Steps
- Create a mask form over a support such as a balloon or mold and apply strips of paper soaked in paste.
- Build multiple layers for strength, allowing the piece to dry between additions for firmness.
- Refine edges and eye openings once dry, smoothing rough spots with fine sanding if desired.
- Paint the surface with acrylics and add matte or metallic accents to enhance texture.
Nature-inspired leaf and bark mask idea

Making a mask with leaves and bark felt like borrowing a piece of the woods for a parade. The dry leaves crinkled softly and smelled faintly of earth, while the bark introduced a rugged texture that contrasted with the smoothness of painted veins.
The palette of muted greens and warm browns had a quiet richness that felt grounding among brighter celebrations. Wearing it brought a playful connection to outdoor walks and the memory of collecting bits of the forest on autumn afternoons.
Steps
- Gather flat, sturdy leaves and small pieces of bark, pressing them briefly to remove moisture.
- Arrange organic elements on a firm mask base to explore shapes and balance before fixing.
- Adhere natural pieces with a suitable glue and add subtle highlights with paint to unify tones.
- Protect the surface with a breathable sealant to preserve texture and keep materials intact.
Lace and velvet mask for elegant evenings

A lace and velvet mask felt like slipping into an old photograph. The velvet was plush under the fingertips and the lace cast delicate shadows against skin.
The contrast between matte velvet and the lace’s tiny, open patterns created a layered richness that felt quietly luxurious. Holding it up to the light, the lace tangled with the shadows in an intricate dance.
It brought an intimate, ballroom feeling that paired nicely with slow music and a cup of something warm.
Steps
- Select a soft velvet fabric and a complementary lace overlay for a refined combination.
- Cut the fabric to the mask silhouette and secure lace smoothly over the top edge to avoid lumps.
- Attach trim around the perimeter to hide raw edges and create a finished look.
- Add thin ribbon ties or a comfortable elastic band to keep the mask in place.
Jester-style mask with jingling bells

The jester-style mask brought a playful clatter to a quiet living room. Small bells along the points chimed lightly with movement, and the curved shapes created a happy silhouette that made me grin even before wearing it.
Bright reds and greens mixed with metallic accents felt bold without being loud. There was a tactile joy in the tiny bells’ cool metal and the soft sway of fabric, an invitation to laugh and step a little lighter as if the world were a stage for a brief, gleeful performance.
Steps
- Design a multi-pointed mask base reminiscent of a jester’s hat and reinforce key points for durability.
- Cover the points with colorful fabric and attach small bells to each tip with strong thread.
- Embellish the face portion with contrasting trims and painted accents for theatrical flair.
- Balance weight across the mask so the bells jingle without pulling the piece forward.
Peacock-inspired mask with iridescent touches

Creating a peacock-inspired mask felt indulgent in color and shimmer. Iridescent accents shifted from teal to gold depending on how the light hit them, and the fan of feathers echoed the bird’s regal drama.
The cool shimmer of the central eye spots contrasted with warm metallic highlights, producing a luxurious depth. When held up, the mask seemed to change mood with every slight tilt, offering a small, mesmerizing spectacle that made putting it on feel like accepting a tiny coronation.
Steps
- Cut a sturdy mask base and plan for a feather fan to sit prominently behind one side.
- Select iridescent paints and small reflective elements to recreate the peacock’s shimmer.
- Attach the feather arrangement and secure it firmly to prevent drooping during wear.
- Add metallic highlights and small gem accents to mimic feather eye spots and intensify sheen.
Half-face masquerade mask with understated mystery

I appreciate the subtlety of a half-face masquerade mask that leaves room for surprise. The asymmetry felt intriguing, a gentle invitation more than a proclamation.
Satin and a matte paint finish played off each other, creating a quiet tension that made expressions read differently through the eye aperture. Wearing it in a dim room, I noticed how shadows emphasized contours and brought forward the eye area in a way that felt both private and theatrical.
It was a small instrument of mood.
Steps
- Trace a half-mask profile on a flexible base to ensure it conforms comfortably to one side of the face.
- Cover surfaces with satin fabric or smooth paint for an elegant finish and refine eye edges for comfort.
- Accentuate the mask with subtle trim along the dividing line to highlight the asymmetry.
- Secure with a discreet elastic band or ribbon for a clean, minimal look.
Child-friendly foam mask with playful shapes

Making foam masks with kids brought out a different kind of happiness. The foam material was soft and forgiving, and bright, bold colors felt right for little hands.
Sticky glitter that clung to fingertips and foam stickers that popped with texture made the process tactile and joyful. There was spontaneous creativity in mismatched patterns and oversized shapes, and the light feel of the finished masks meant endless running around without complaints.
It became less about precision and more about laughter and colorful chaos.
Steps
- Draw fun, oversized shapes on craft foam and cut them out carefully to form mask bases.
- Decorate with foam stickers, adhesive gems, and large glitter patches that appeal to little hands.
- Punch holes for elastic and attach soft elastic bands so masks stay comfortable during play.
- Encourage mixing colors and textures for vibrant, whimsical designs that reflect a child’s imagination.
Embroidery-adorned mask with stitched details

An embroidered mask felt quietly meditative, each stitched motif adding a thread of patience. The tension of the thread against fabric created tiny raised lines that invited fingers to trace them.
Floral samplers and looping vines introduced old-fashioned charm, and the stitched textures caught light differently than flat paint. The slow rhythm of the needle offered time to think, and the result had a hand-hewn softness.
Wearing it felt like carrying a small piece of folk art, a textile conversation stitched into the face.
Steps
- Choose a fabric-covered mask base that can hold embroidery stitches without stretching or warping.
- Transfer simple motifs onto the fabric and stitch with contrasting thread, building texture through varied stitches.
- Reinforce the inside of the mask to protect stitches and provide comfort against the skin.
- Finish edges with trim that complements the embroidered design for a cohesive look.
Mosaic tile mask with ceramic shimmer

Working with tiny mosaic tiles on a mask felt like composing a miniature landscape. The ceramic pieces reflected light at different angles, creating a lively surface that felt almost architectural.
There was a pleasing contrast between sharp tile edges and smooth grout lines, producing a rhythm across the face. The cool weight of the tiles under my palm made the mask feel grounded and durable, as if it carried a small, weathered history.
Colors arranged in curved bands suggested movement, like music frozen in color.
Steps
- Outline a mask base and plan tile placement to ensure balanced patterns and secure adhesion.
- Set small mosaic tiles into adhesive, keeping uniform spacing for tidy grout lines.
- Apply grout after tiles have set and wipe away excess to reveal crisp tile faces.
- Seal the surface if needed to protect grout and enhance ceramic sheen.
Origami-inspired folded paper mask idea

An origami-inspired paper mask felt like wearable geometry. Crisp folds created facets that caught light and shadow, turning a flat sheet into a sculptural piece.
The paper’s subtle creak and the clean edges gave a disciplined character that contrasted nicely with more flowing masks. When I tilted it, planes of color shifted and revealed new intersections, a small kinetic drama.
It was a reminder that clever shaping could make thin material feel sturdy and expressive, like wearing a wearable paper sculpture to a lively night out.
Steps
- Select firm origami or cardstock paper and score fold lines lightly to guide precise geometry.
- Fold along planned lines to create a sculptural mask shape with defined planes.
- Reinforce key seams with thin strips of tape or adhesive inside to maintain structure.
- Add simple accents such as metallic edge highlights to emphasize the fold architecture.
Recycled bottle cap mask with playful texture

A recycled bottle cap mask felt like crafting with found treasure. The caps’ metallic rims and printed logos created a quirky mosaic that clinked faintly with movement.
There was a nostalgic pleasure in repurposing familiar small objects into something new, and the uneven surface invited curious fingers. The palette leaned toward industrial tones with pops of color where labels showed through, giving the mask a spirited, almost punk sensibility.
It felt resourceful and celebratory at the same time, a tiny parade of reused bits.
Steps
- Collect cleaned bottle caps and flatten or shape them as needed for a smooth mask surface.
- Arrange caps on a sturdy base to explore patterns and secure each one with strong adhesive.
- Fill gaps with smaller recycled elements or beads for cohesion and texture.
- Seal the entire surface if desired to protect edges and reduce sharpness.
Marbled paper mask with fluid color swirls

A marbled paper mask felt like wearing a tiny, moving ocean. Swirls of color curved and looped unpredictably, each glance producing a new pattern.
The smooth glossy finish had a coolness under the fingertips, and there was a calming pleasure in the random elegance of the veins and eddies. The colors merged in places and kept crisp borders in others, creating a dance of contrast and harmony.
It was ideal for someone who enjoys organic patterns with a polished, slightly glossy finish.
Steps
- Create marbled paper by floating pigments on a water bath and transfer the pattern to heavyweight paper.
- Cut the marbled sheet to a mask shape and refine eye openings for a comfortable fit.
- Attach the marbled paper to a supportive backing for stability and finish edges with complementary trim.
- Add subtle metallic touches to highlight swirls and enhance the polished look.
Sugar skull mask with colorful Day of the Dead flair

Painting a sugar skull mask felt like honoring bright memories and lively traditions. Bold florals and ornate linework wrapped around the contours, and the jewel tones felt festive against a pale base.
The contrast of crisp black outlines with vivid pigments made each motif pop, and tiny painted dots added a rhythmic pattern that felt almost musical. Holding it up, I remembered walks through candlelit streets and the way cemeteries transformed into warm public rooms.
The mask carried both celebration and tenderness in its painted details.
Steps
- Prepare a smooth mask base and paint a light foundation to mimic the traditional skull canvas.
- Layer bold floral motifs and decorative linework around eye sockets and cheeks with fine brushes.
- Introduce jewel-toned accents and small dot patterns to enhance rhythm and contrast.
- Finish with a protective matte seal to preserve paint and prevent smudging.
Steampunk gear mask with industrial elegance

A steampunk gear mask felt like borrowing antique machinery for a costume. Brass gears, tiny cogs, and aged metal finishes suggested stories of clockwork streets and steam-lit workshops.
The metallic surfaces had a cool, tactile quality and a reassuring weight that contrasted with softer elements like leather straps. Patinaed edges and layered metal plates created a sense of age and usefulness, as if the mask had seen many nights of strange parades.
The overall effect was mechanically poetic, a balance between grit and refined ornament.
Steps
- Design a mask base that can support metal accents and plan gear placement for visual balance.
- Attach small gears, cogs, and metal plates with strong adhesive or rivets where appropriate.
- Distress metal elements gently with patina techniques to achieve aged character.
- Add leather or fabric straps to secure the mask and complement the industrial aesthetic.
Minimalist metallic mask with sleek lines

A minimalist metallic mask felt modern and quietly striking. Smooth, brushed metal surfaces reflected light in long, elegant bands, and the clean-cut shapes emphasized facial contours without fuss.
There was a cool, almost architectural presence about it that made a simple outfit feel intentional. The tactile sensation of metal at the edges was crisp under the fingertips, while the overall lightness surprised me.
It was the kind of piece that captured attention without loud ornamentation, a whisper of ceremony rather than a shout.
Steps
- Cut a thin metal sheet or metallic-coated material into a sleek mask silhouette with refined edges.
- Smooth and file any rough edges for comfort and polish the surface for an even sheen.
- Punch small holes for gentle elastic or attach discreet hardware for secure fitting.
- Optionally add subtle matte accents to create contrast against the polished metal.
Floral crown hybrid mask for romantic feels

Combining a mask with a floral crown felt whimsical in the best way. The blooms softened the silhouette and introduced perfume-like hints from dried petals, while tiny greenery wove through trim to create a living frame.
The tactile mix of petals, stems, and mask material created a layered sensory experience that was both delicate and bold. Wearing it felt like stepping into a midsummer evening, with petals brushing hair and colors harmonizing with beads.
It made even ordinary movement feel ceremonious and dreamy.
Steps
- Prepare a comfortable mask base and plan the floral crown placement to frame the face attractively.
- Select a mix of silk or dried flowers and greenery that balance color and scale.
- Secure stems to a flexible band and anchor the band to the mask for stability.
- Tuck in small decorative accents to integrate the crown and mask into a cohesive piece.
Mask with mixed media collage elements
A mixed media collage mask felt like a personal scrapbook worn on the face. Fragments of sheet music, ticket stubs, and patterned paper layered with paint and small trinkets created a narrative surface that invited closer inspection.
The edges of torn paper created soft ridges and the printed inks faded into painted strokes in interesting ways. It had a patchwork intimacy, like glimpsing someone’s memory map.
Each added piece carried a little story, and together they made a face-covering that was visually busy in a warmly familiar fashion.
Steps
- Gather paper scraps, ephemera, and small trinkets to build a cohesive visual story.
- Collage pieces onto a firm mask base with adhesive, layering until the composition feels balanced.
- Incorporate paint washes and small embellishments to unify disparate elements.
- Seal the collage with a suitable fixative to protect fragile paper layers.