Graduation Party DIY Home Decor Ideas are a fun way to mark the end of school with personality and a cozy, homey vibe. I love mixing handmade banners, photo displays, and clever table settings that echo the grad’s style — whether that’s bold school colors, soft pastels, or metallic accents.
These ideas work well because they lean on everyday materials: paper, ribbon, mason jars, and string lights.
They brighten living rooms, dining areas, and entryways, and they let friends and family chip in with small projects that feel meaningful and festive.
Giant Balloon Garland Above Dessert Table

A balloon garland above the dessert table makes the sweets feel like the main event. Mix matte latex balloons with a few metallics in the graduate’s colors, and add small confetti-filled balloons for shimmer. Anchor the garland with neutral ribbon and a strand of warm white fairy lights woven through the clusters. Textures come from glossy balloons against soft tulle or tissue tassels, creating a playful contrast that reads well in photos. I like tacking tiny paper rosettes along the base for a handcrafted touch and to hide attachment points.
Styling Tips
- Vary balloon sizes for depth and a natural look
- Use removable hooks to protect paint on the wall
- Weave slim fairy lights for gentle evening glow
DIY Photo Timeline Along the Staircase

A photo timeline along the staircase is a sweet way to trace the grad’s years. Clip printed photos to twine or thin ribbon and hang them along the banister, interspersing with small paper stars or numbered tags for ages or school years. Use a mix of glossy and matte prints to catch light differently, and keep the palette cohesive by matting photos on cardstock in the chosen color scheme. The vertical flow of the stairs naturally guides guests through memories; I often add tiny LED string lights for a soft evening highlight.
Styling Tips
- Alternate photo sizes to create visual rhythm
- Anchor both ends with decorative knots or bows
- Add a few handwritten notes between photos for warmth
Cap and Tassel Shadow Box Display
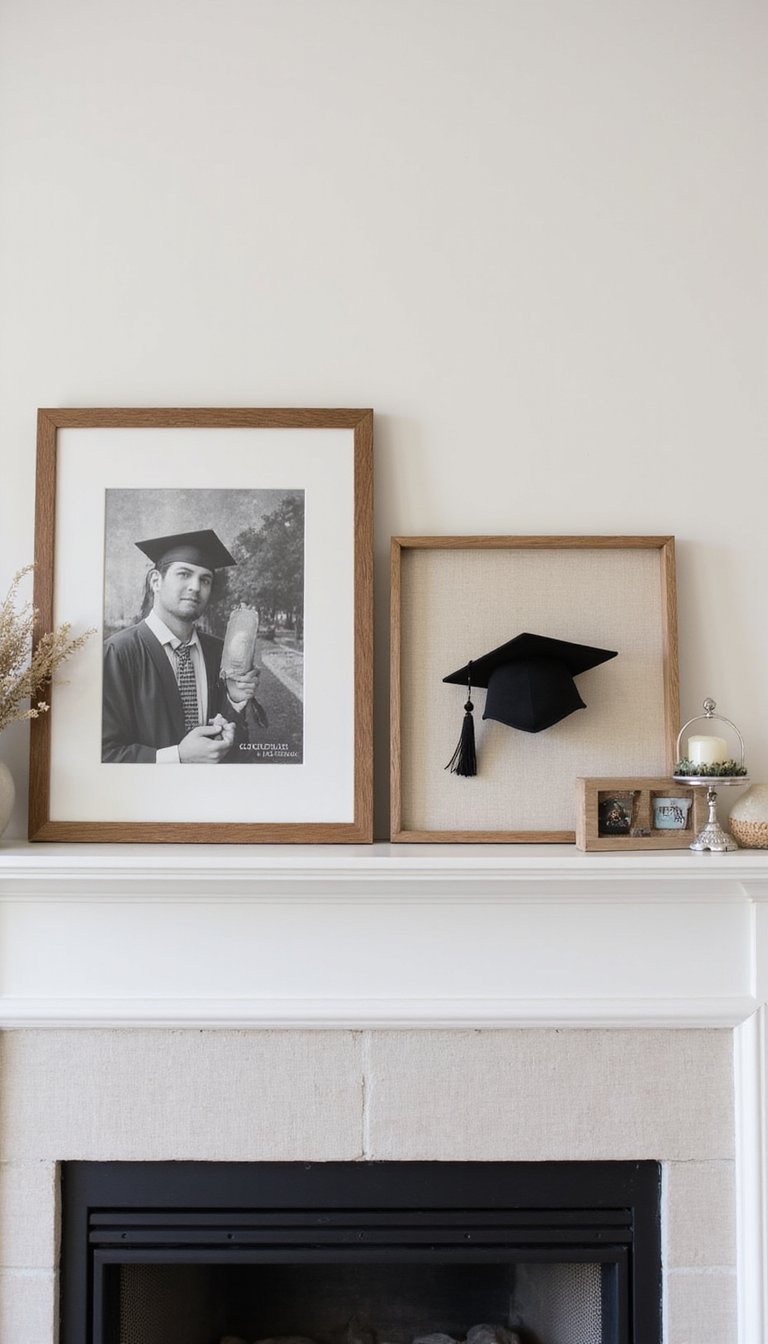
Shadow boxes turn graduation caps and tassels into artful keepsakes that double as decor. Arrange the cap flat inside a deep frame with the tassel draped diagonally, then surround it with small mementos like a class pin, a mini diploma scroll, or a pressed flower. Choose a shadow box with a neutral backing—linen or soft gray—to let metallic tassels pop. Group two or three boxes on a mantel or shelf for gallery effect. I like adding a tiny plaque with the graduation year in hand-lettered ink for a personal vibe.
Styling Tips
- Use acid-free backing to protect textiles
- Place shadow boxes at eye level for best impact
- Mix in small framed quotes or school patches for variety
Handmade Tassel Garland Over Entryway Table

Tassel garlands feel cheerful and are wonderfully customizable for school colors. Use tissue paper, metallic fringe, or felt tassels strung on jute for a textured look. Drape the garland above an entryway console or across a mirror; underneath, arrange a welcome tray with a small sign and a jar of confetti poppers. The contrast between the soft tassels and a wooden table provides a cozy, layered look. I enjoy mixing long and short tassels so the garland looks full without needing bulky materials.
Styling Tips
- Alternate textures—tissue, metallic, and felt—for richness
- Keep the console simple to avoid competing focal points
- Secure ends with removable adhesive to protect surfaces
Chalkboard Menu and Schedule Station

A chalkboard station gives guests a clear schedule and a charming farmhouse vibe. Use a large framed chalkboard or a chalkboard-painted panel and hand-letter the ceremony time, snack menu, and any games. Accentuate with small garlands or washi paper borders in the event’s palette. Combine the board with a small basket of chalk and a jar of pencils for guests who want to add messages. The matte texture of chalk contrasts nicely with glossy photo frames nearby; I like to leave a short blank line for people to write a congratulatory note.
Styling Tips
- Practice lettering on paper first to keep lines even
- Add small magnolia or eucalyptus sprigs for soft greenery
- Position where guests naturally gather for visibility
Cap Centerpieces with Floral Accents

Turn graduation caps into table centerpieces by placing them flat with a small floral cluster on top. Use low mason jars or bud vases with seasonal blooms and tie a coordinating ribbon around the jar. The matte mortarboard ties into fabric textures like linen napkins and burlap runners for a tactile table setup. Keep the color palette limited so the caps remain the focus: a neutral base with one accent color works beautifully. I like scattering a few confetti stars around each centerpiece to catch light and add playful detail.
Styling Tips
- Keep floral arrangements low to not block sightlines
- Match ribbon colors to tassels for a unified look
- Swap fresh blooms for paper flowers for longer events
DIY Photo Clipboard Wall Display

Clipboard walls are a casual, gallery-style way to show photos and announcements. Paint or stain cheap clipboards to match the party palette, then clip photos, handmade cards, or small streamers to each one. Arrange the clipboards in a grid on a dining room wall for an organized yet playful display. The wood grain and metal clips add mixed textures that play nicely against a plaster or shiplap background. I enjoy swapping a few images for hand-lettered quotes about the grad to create an emotional mix.
Styling Tips
- Use varying photo orientations for visual interest
- Add a single accent clipboard painted in metallic for sparkle
- Hang at different heights for a relaxed, lived-in feel
String Light Mason Jar Lanterns

Mason jars filled with battery-operated string lights make simple, warm lanterns for tabletops and mantels. Layer with tissue paper or translucent vellum in the event palette, or glue a ribbon around the rim for an uptown vibe. The glass provides a glossy texture against rustic wood or a soft linen runner, and the warm LED glow keeps the atmosphere cozy without overpowering other decor. I like grouping jars of different heights on a tray to create a miniature scene that anchors a space visually.
Styling Tips
- Use warm LED string lights for flattering light
- Group jars on a tray with greenery for cohesion
- Swap ribbons to reflect each table’s colorway
Paper Pom-Poms Hanging Cluster

Paper pom-poms in varying sizes read as fluffy clouds when clustered from the ceiling above a food area or dance corner. Use tissue paper in graduated shades of a color palette—ombre works beautifully—or mix metallic and matte for contrast. The delicate tissue adds softness to rooms with harder surfaces like wood floors and metal chairs. I hang pom-poms at different heights to create movement and to draw the eye upward; they double as a fun photo backdrop when placed in front of a neutral wall.
Styling Tips
- Vary sizes and heights for dynamic layering
- Attach with thin fishing line to minimize visibility
- Create a color gradient for a cohesive look
DIY Graduation Banner With Lettered Tassels

A handmade graduation banner with lettered tassels gives a festive headline over a buffet or mantel. Cut letters from heavyweight cardstock and back them with colored paper, then hang each on a twine strand with a small tassel between letters. Mix matte cardstock with a few metallic letters for a subtle pop. The layered paper textures pair well with wooden frames and ceramic vases nearby. I enjoy crafting a tiny banner that spells the graduate’s name for a personalized touch that guests can admire from the sofa.
Styling Tips
- Keep letter shapes bold for legibility across the room
- Alternate tassel colors to reflect school hues
- Use removable hooks to avoid wall damage
Mini Diploma Scroll Place Settings
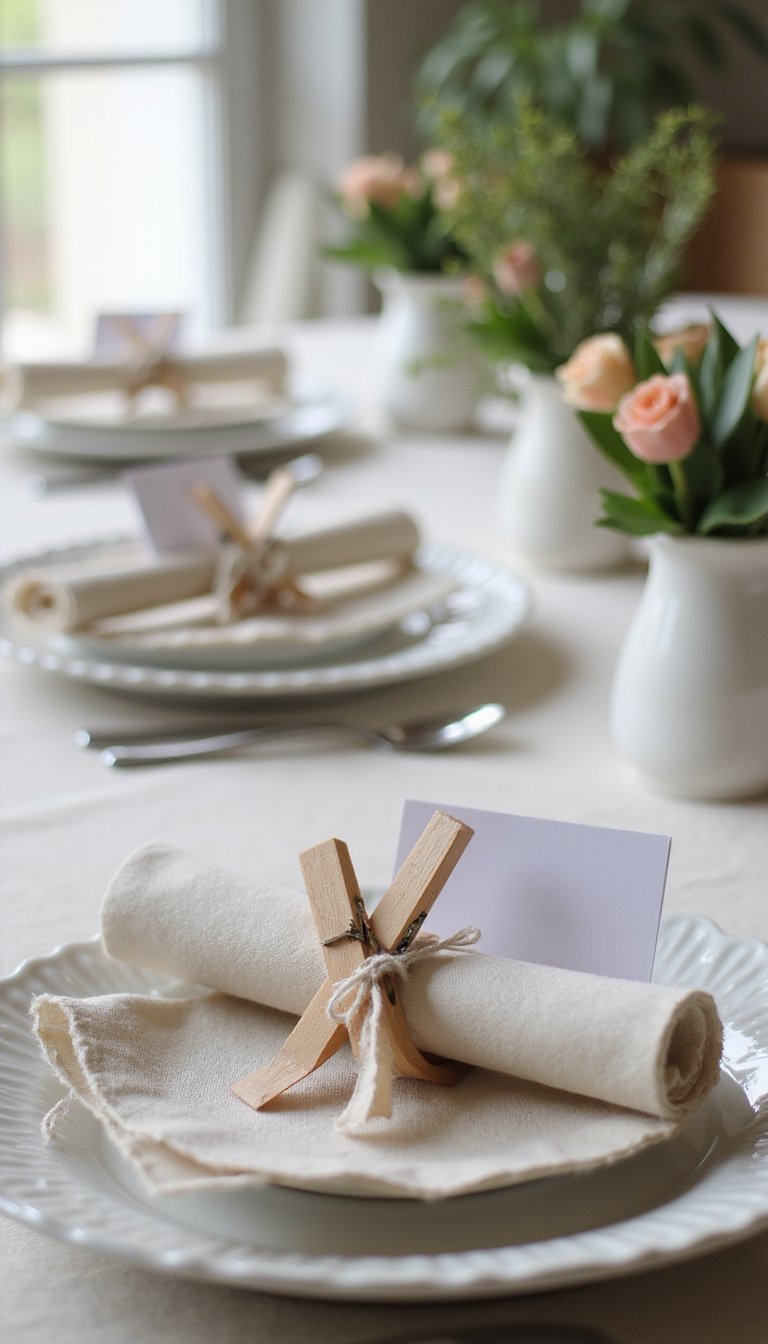
Mini diploma scrolls make charming place settings and double as favors. Roll printed certificates or patterned paper, tie with ribbon matching the table palette, and place next to name cards or on folded napkins. The smooth paper scrolls look elegant against textured linens and ceramic plates, and they add a small keepsake that guests can tuck into bags. I sometimes attach a tiny wooden clothespin with a handwritten guest name to keep things tidy and add a homespun, friendly element to formal tableware.
Styling Tips
- Use ribbon colors that complement the table runner
- Attach a small sprig of dried greenery for texture
- Print a brief quote on the back for a personal note
Memory Jar for Guests’ Notes and Wishes

A memory jar invites guests to write short notes or wishes and adds a warm, interactive element to the celebration. Provide colored cards, pens, and a labeled jar with a painted tag or chalkboard label. Place the jar on a small station with a stack of envelopes for privacy and a framed instruction card. Textures like glass against rough twine and soft paper create a tactile and inviting point of interest. I keep a decorative lid nearby so people can peek later, making the jar feel like a living keepsake.
Styling Tips
- Include pens in multiple ink colors for variety
- Keep the station uncluttered with one small vase of flowers
- Place near seating so guests can write comfortably
Class Year Number Balloon Display

A large foam or cardboard class year display painted in school colors looks great propped on a console or leaned against a wall. For a lightweight, DIY-friendly option, cover numbers in tissue fringe, papier-mâché, or metallic foil. Set the numbers on a small pallet of greenery or confetti to anchor them visually, and add a string of lights behind for haloing. The mix of smooth painted surfaces and shredded paper fringe provides playful contrast. I often place the number near the photo area so guests can use it as a marker for pictures.
Styling Tips
- Choose sturdy backing for freestanding displays
- Outline numbers with small LED lights for evening events
- Use a neutral base to keep focus on the numbers
Festive Drink Station With Labeled Carafes
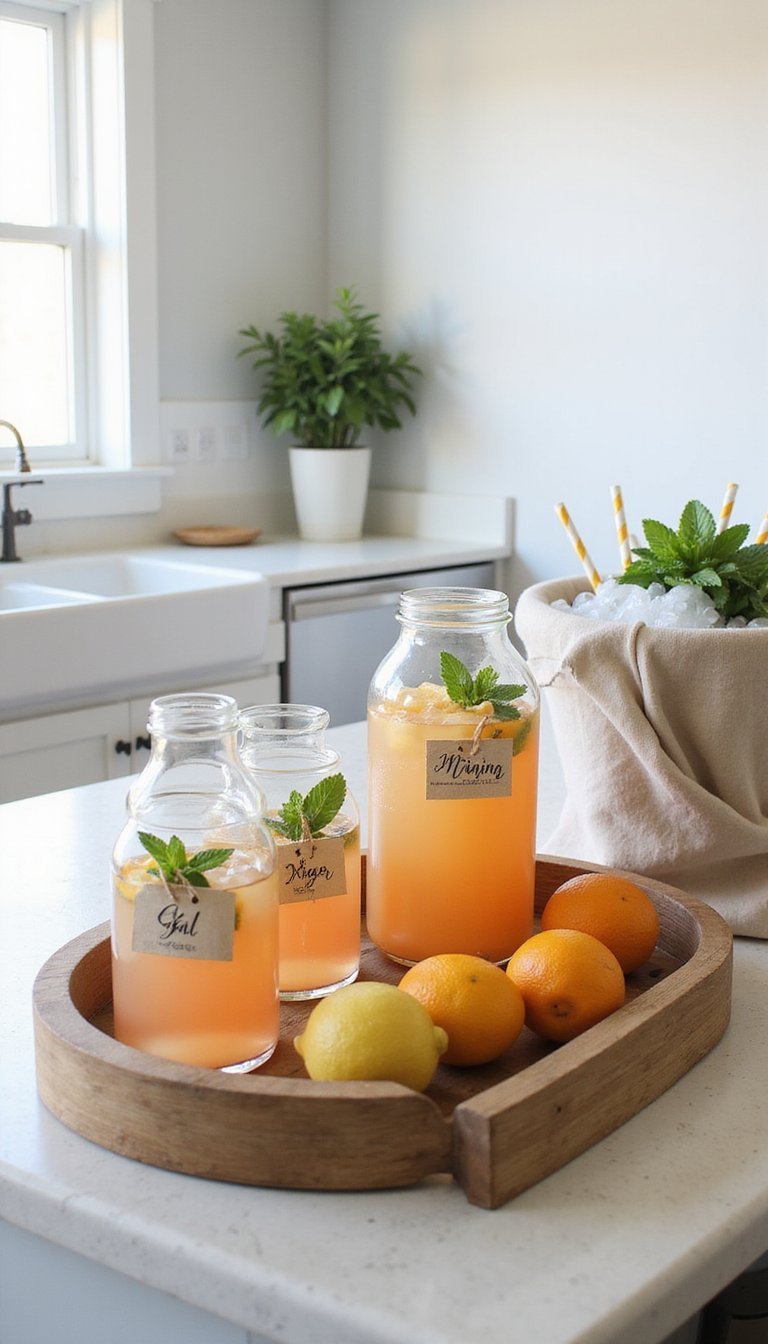
A drink station with labeled carafes keeps guests hydrated and adds an organized element to the party. Use glass carafes on a wooden tray and label each with hand-lettered tags or printable stickers. Add citrus slices, mint sprigs, and pretty paper straws for texture. Arrange the carafes against a subtle backdrop like a framed print or a simple garland so the station looks intentional. I like keeping a small bowl of ice covered with a linen napkin nearby—functional yet styled—so everything feels polished without being fussy.
Styling Tips
- Use clear labels or chalk tags for an elegant touch
- Group carafes by drink type for easy serving
- Include a pitcher of water with fruit for a bright option
Graduation Cap Photo Backdrop Wall

Create a dramatic photo backdrop by arranging miniature graduation caps on a painted plywood panel or fabric backdrop. Caps can be made from stiff felt or black cardstock with gold or silver tassels, and they read as a textured pattern from afar. Pair the backdrop with a bench or ottoman draped in a throw for guest photos. The contrast between matte caps and a glossy metallic banner or sequined runner adds energy to the scene. I find this setup encourages informal group shots and becomes a focal point in the main gathering area.
Styling Tips
- Secure caps firmly to avoid shifting during photos
- Stage a small stool or bench for seating variety
- Keep backdrop colors cohesive with the party palette
Confetti Station With Reusable Cones
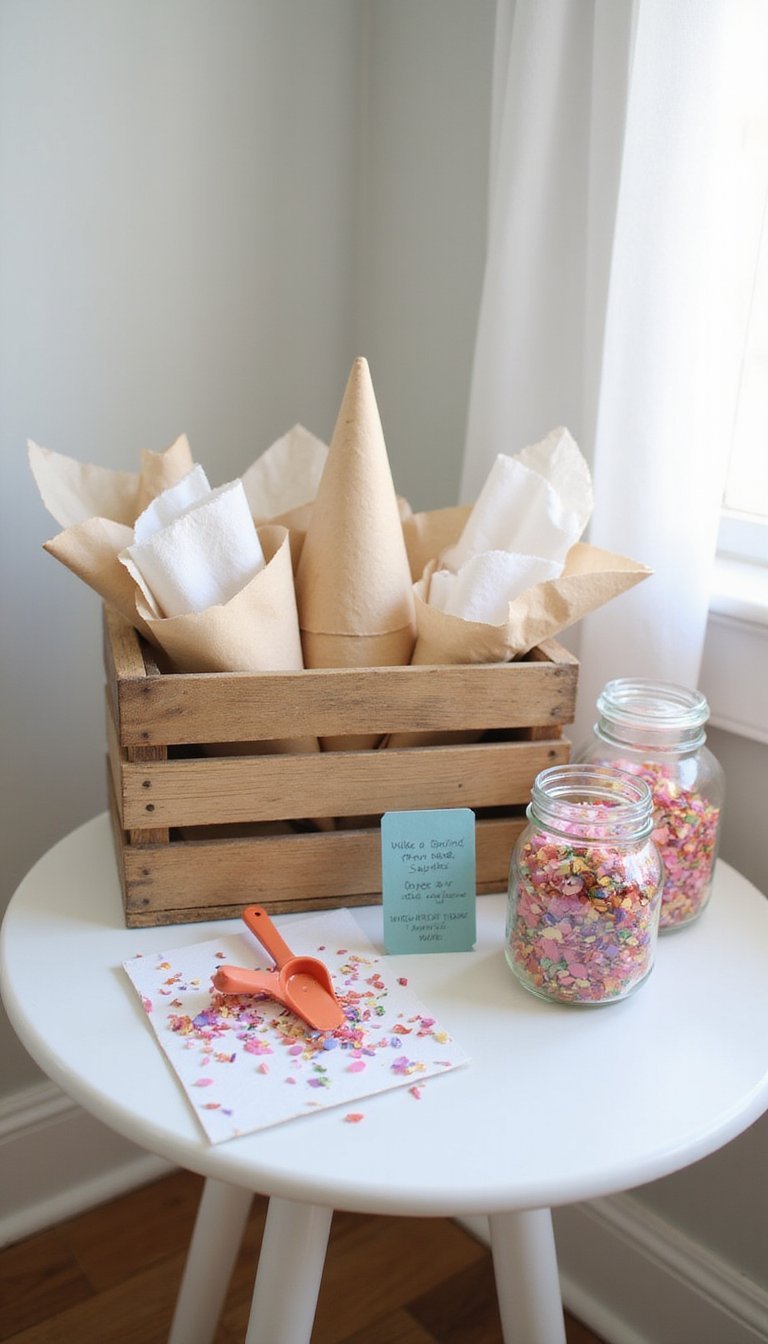
A confetti station with reusable paper cones offers a playful send-off without single-use clutter. Fold cones from heavyweight cardstock in chosen colors and display them in a wooden crate with jars of biodegradable confetti or tissue confetti. Add a small sign with short instructions and a brush for easy cleanup. Textures here mix the crispness of paper cones with the soft puff of tissue confetti and the rustic wood of the crate. I keep a few extra cones tucked away in case guests want to take one later for gifting or photos.
Styling Tips
- Choose biodegradable confetti for easy cleanup
- Store cones in a shaded spot to avoid fading
- Include small scoops or spoons for tidier filling
Ribbon Curtain Entrance for a Bright Welcome

A ribbon curtain at the doorway instantly frames the party entrance and adds movement as guests pass through. Use satin, organza, and grosgrain ribbons in coordinating widths and colors tied to a dowel or taped to a curtain rod. The mix of glossy satin and sheer organza plays beautifully against a painted door or white trim, catching light as people move. I like trimming ribbons to slightly uneven lengths for a whimsical, handmade feel, and adding a small sign above that matches the ribbon palette for continuity.
Styling Tips
- Anchor the curtain to a tension rod for no-drill installation
- Mix ribbon textures for added depth and sheen
- Trim ends with pinking shears to avoid fraying
Keepsake Guestbook Frame With Polaroids

A guestbook frame using Polaroid-style photos makes an interactive keepsake that doubles as wall art. Set up an instant-photo station with a camera or print station, and have guests add their picture with a short note around a framed mat. The glossy instant prints contrast nicely with a matte frame and textured mat board. Choose a frame that complements the room—light oak for Scandinavian vibes or black metal for modern interiors. I enjoy swapping the final assembled frame into the grad’s room as a lasting display after the party.
Styling Tips
- Provide a fine-tip marker for signatures on the mat
- Choose a frame size that fits many photos comfortably
- Arrange the station near good natural light for clearer shots
Hanging Paper Lantern Pathway Indoors

Paper lanterns hung from the ceiling create a soft pathway through a long hallway or above a dining table. Mix rice paper lanterns in round and oval shapes, and choose light-filtering shades that complement the palette—soft creams, pastels, or metallics. Combine with trailing eucalyptus or faux greenery for an organic feel that offsets the lanterns’ smooth surface. I like placing a few low floor candles or lanterns below to bounce extra light upward, creating a cozy tunnel effect that guides guests through the space.
Styling Tips
- Use LED bulbs inside lanterns for safety and warm glow
- Vary heights to avoid a monotonous line
- Secure wiring and battery packs out of sight for a clean look
Cap Wreaths for Doors and Wall Hooks

Small cap wreaths made from foam rings and black cardstock mortarboards offer an unexpected door or wall accent. Attach mini tassels, tiny bows, or small wooden year tags to each wreath for detail. The contrast of the matte black caps against a painted door or light wall brings a modern, graphic touch. Use different wreath sizes along a hallway for a curated look, or place one on the entry door as a celebratory nod. I sometimes tuck in a miniature bouquet of dried flowers for a softer silhouette.
Styling Tips
- Hang at eye level for immediate visual impact
- Mix wreath sizes for a collected feel
- Use removable adhesive hooks for damage-free hanging
Ribbon-Wrapped Gift Table With Coordinating Tags

Style the gift table with ribbon-wrapped boxes and coordinating tags to keep the area tidy and pretty. Use wrapping paper in a neutral base with ribbons in accent colors tied in neat bows. Add a small stack of thank-you cards and a decorative tray for envelopes. The smooth sheen of ribbon against textured wrapping paper and a wooden tabletop creates a polished contrast. I like adding a single statement floral stem or a cluster of paper stars to the corner of the table to draw the eye without crowding the gifts.
Styling Tips
- Place a small mirror or frame with ‘Gifts’ to label the area
- Use different ribbon widths for layered interest
- Reserve a decorative box for cash or gift cards