I’ve always been drawn to the quiet charm of embroidery hoop wall decor crafts — the way a simple wooden ring can hold tiny worlds of texture and color. Over many afternoons I found myself collecting scraps, threads, and small keepsakes, experimenting with layered fabrics and unexpected materials that looked charming on a sunlit wall.
These embroidery hoop wall decor crafts became a way to turn small moments into look-at-me details around the home.
Each piece feels like a little story hung at eye level, and sharing a few of my favorite ideas feels a bit like showing a friend what’s been on my work table lately.
Pressed wildflower blooms in an embroidery hoop

I kept a jar of tiny pressed petals on my shelf for months before deciding they deserved a frame. The petals look translucent when the afternoon light hits them, veins and faded pigments like miniature stained glass.
The wooden hoop gives a warm rim that contrasts with the brittle textures. I love how the scent of dried meadow seems to hang faintly for a week, then vanishes, leaving only visual memory.
Hung near a window, this hoop feels like a preserved little piece of a long, slow summer.
Steps
- Gather fresh blooms and snip stems short before flattening.
- Lay blooms between absorbent paper and compress under heavy books for several days until dry.
- Arrange dried petals on a light fabric backing until the composition pleases the eye.
- Adhere petals gently with small dots of clear adhesive and fit the fabric inside the hoop, securing the rim.
Mini woven wall tapestry inside a hoop

There’s something soothing about the slow rhythm of weaving that translates so well into a small hoop. Thick yarns and velvety boucle form low-relief ridges that invite the eye to travel across color bands.
I often find the textures pleasing to touch, though I resist handling them too much. The hoop frames the woven piece like a tiny landscape, and the fringe below adds movement when a draft passes.
In dim light, the pile catches highlights differently, turning an ordinary wall into a tactile, cozy vignette.
Steps
- Prepare a fabric or cardboard circle slightly smaller than the hoop as a base for warp threads.
- Stretch warp threads around the base and weave yarns through with a shuttle or needle until the design looks balanced.
- Add fringe by looping yarn at the lower edge and fastening knots to form a hanging skirt.
- Fit the woven piece into the hoop and secure the outer rim so the texture sits taut.
Stitched city skyline on a dyed fabric backdrop

A skyline stitched against a hand-dyed fabric often reads like a memory of a trip or a neighborhood stroll. I remember holding the hoop up to a window and smiling as the indigo wash deepened near the edges, forming a dusk-like gradient.
Tiny stitches define rooftops and spires, their matte thread catching a glint where light hits. The contrast between soft dyed cloth and crisp linear stitching creates quiet drama.
It’s the kind of piece that invites a closer look, revealing small imperfect stitches that feel human and lived-in.
Steps
- Create a fabric backdrop by applying diluted dye to a square of cotton and letting color settle into gradients.
- Transfer a simple skyline outline onto the dried fabric using a washable marker or tracing method.
- Stitch the skyline lines with dark thread, alternating stitch lengths for an organic feel.
- Mount the finished fabric in the hoop and tighten the rim so the cloth remains smooth.
Layered lace and vintage textiles for soft romance

A hoop filled with lace and aged textiles always feels nostalgic, like a soft whisper of other rooms. I find myself lingering over tiny embroidered motifs and faint tea stains that tell quiet stories.
Layers add depth, with scalloped edges peeking through translucent nets and linen. When light grazes the surface, shadows form between layers and give a sense of time-held texture.
Hanging it above a bedside or in a hallway it creates a gentle, romantic note without feeling fussy, like someone left a beautiful fragment for guests to notice.
Steps
- Gather vintage lace and small textile scraps with charming edges and textures.
- Layer pieces on a neutral fabric backing until the arrangement feels balanced and harmonious.
- Secure the layers with tiny stitches or narrow strips of fabric at inconspicuous points so they remain in place.
- Place the layered composition inside the hoop and tighten to frame the textiles neatly.
Geometric thread art across negative space

The simplicity of geometric thread art feels unexpectedly modern when set against empty fabric space. I like how taut lines create angles and intersections that play with perspective, almost architectural.
Bright threads on neutral ground become little constellations, and the hollow spaces invite the eye to rest. There’s a satisfying snap when a new line intersects an established one, and the tactile ridges of thread catch both light and curiosity.
Hung with a small group of hoops the repetition and variation read like a quiet study in pattern and balance.
Steps
- Choose a neutral fabric stretched slightly within the hoop to provide clear negative space.
- Plan intersecting geometric lines by marking connecting points lightly with a pencil or removable marker.
- Stitch straight lines of contrasting thread between marked points, varying tension for subtle relief.
- Trim stray threads and secure knot ends at the back before final hoop mounting.
Tiny hoop gallery: playful mix-and-match clusters
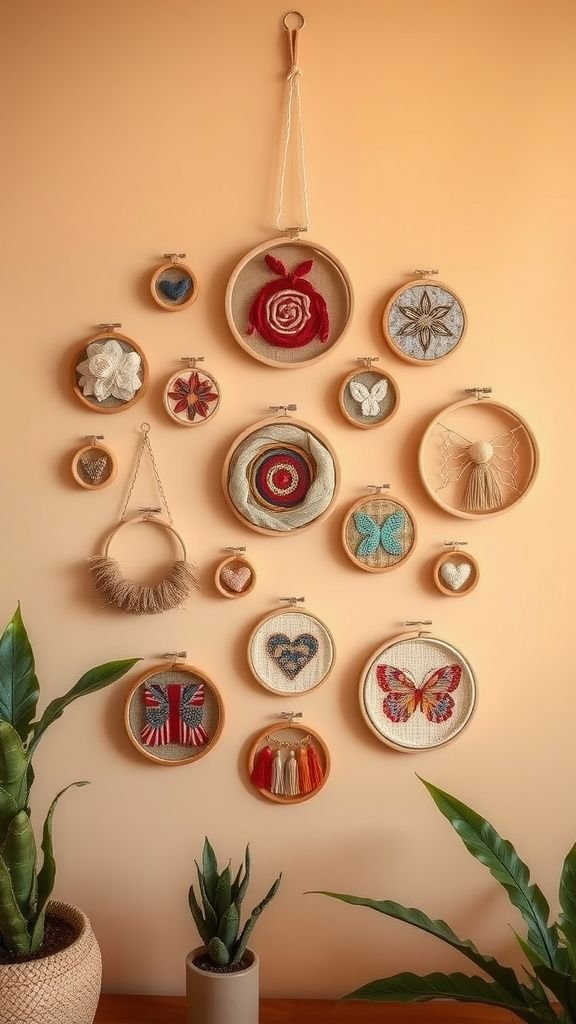
Creating a cluster of small hoops felt like collecting tiny windows to different moments. I mixed pale botanical sketches, a piece of woven yarn, and a miniature embroidered heart, each hoop telling a little story.
The varied sizes and slightly off-center placements made the wall feel informal and playful, as if someone had arranged keepsakes after an afternoon of crafting. I often switched pieces around for a fresh look, enjoying how the group dynamic changed.
It’s a friendly way to cover a small wall with personality without overwhelming the space.
Steps
- Select a range of small hoops and prepare varied artwork for each, such as mini embroidery, weaving, or fabric scraps.
- Lay the hoops on the floor and arrange them until the grouping feels balanced and lively.
- Mark wall placements lightly with removable marks and hang each hoop according to the floor layout plan.
- Step back and adjust spacing until the cluster reads as a cohesive collection.
Embroidered typographic quote with watercolor wash

A softly embroidered phrase over a watercolor wash carries emotional warmth without shouting. I remember stitching a short line of a favorite lyric on a lemon-washed background and feeling pleased at how the thread picked up tiny puddles of color.
The letters have personality — some imperfect loops, occasional uneven spacing — and those human marks make the piece feel intimate. Hanging it in a quiet corner, the words read like a gentle note to oneself.
It became a small daily reminder, visible from my chair, that made a morning smile more likely.
Steps
- Lightly wash a fabric square with diluted watercolor pigments and allow it to dry fully.
- Transfer a short, meaningful phrase onto the dried fabric using a removable marker or faint pencil.
- Stitch the lettering with backstitch or running stitch in a color that complements the wash.
- Fit the embroidered fabric into the hoop and secure the rim so the work hangs flat.
Macramé fringe halo around a wooden hoop

A macramé halo around a hoop feels both bohemian and restrained, the knotted cords forming a soft silhouette that plays with scale. I found delight in varying the cord thickness and mixing cotton with a few metallic threads to catch light.
The fringe dances gently when a window opens, edges blurring into motion. The hoop frames the knots like a crown, turning simple cord into a sculptural accent.
It brings a relaxed, tactile dimension to a wall and pairs nicely with woven pieces or a shelf of small plants.
Steps
- Cut lengths of cord appropriate to the desired fringe length and select a central hoop for the design.
- Knot cords around the hoop using square knots, lark’s head knots, or other preferred knot patterns.
- Vary cord textures and insert a few accent threads to create subtle highlights among the knots.
- Trim cord ends by snipping to even lengths and comb or rinse fibers for a soft fringe effect.
Seasonal felt garlands stretched within hoops

I began making small felt garlands for each season and placing them in hoops to create mini holiday altars. Little felt leaves, stars, and snowflakes arranged in a ring felt festive without being loud.
The soft nap of felt adds a cozy, hand-touched quality, and contrast between bright seasonal colors and a neutral hoop creates a cheerful nod to the calendar. Hung as a horizontal row they read like a rhythm across the wall, shifting mood subtly from pumpkin orange to evergreen with only a swap of a few tiny motifs.
Steps
- Cut felt into seasonal shapes such as leaves, stars, or snowflakes and prepare a string or narrow tape to hold them together.
- Lay the shapes along the chosen string and secure at intervals with small stitches or narrow adhesive at hidden points.
- Stretch the garland across the inner diameter of the hoop and fasten the ends so the shapes remain evenly spaced.
- Hang the hoop where the seasonal motif complements other room accents.
Herb bundles and dried stems inside an open hoop

A hoop with dried herbs feels like a kitchen memory captured and mounted. I like the muted greens and straw-gold stems that curve within the circular frame.
The scent lingers briefly after assembly, bringing a faint herbal whisper to the room. The contrast of a crisp wooden rim against the wispy stems gives a balanced, organic look.
Placed near a cooking area or a sunny breakfast nook, the piece reads both decorative and practical, as though someone paused a morning ritual to display a small, fragrant bouquet.
Steps
- Gather dried herbs and slender stems with pleasing silhouettes and group them into small bundles.
- Arrange the bundles within the hoop so stems radiate or overlap in a composition that feels natural.
- Fasten bundles at their base with thin twine or small stitched loops discreetly at the back.
- Mount the hoop on a kitchen or dining wall to enjoy the subtle herbal presence.
Hoop mirror with fabric rim and subtle embroidery

Turning a small mirror into a hoop accent added unexpected charm to my hallway. The mirror reflects light and movement, while a narrow band of embroidered motifs around its rim gives it personality without being precious.
The combination feels tactile and functional, a little stage where morning routines briefly play out. I often pass by and catch a glimpse that brightens a day.
The mirrored surface multiplies the hoop’s texture and color, creating a tiny dynamic focal point that reacts to whatever sits opposite it in the room.
Steps
- Choose a small round mirror sized to sit comfortably inside the hoop and prepare a fabric strip to frame its edge.
- Embroider a narrow decorative band on the fabric strip before slipping it around the mirror perimeter.
- Place the mirror wrapped with the embroidered fabric into the hoop and secure the hoop’s outer rim.
- Hang the hoop mirror at eye level so it reflects a pleasing area of the room.
Mixed-media hoop with beads, charms, and trim

Combining beads and charms in a hoop felt playful and a little like making a personal amulet. Tiny metallic accents catch light and create a faint tinkling when the piece moves, while small trims add rhythm across the surface.
I enjoyed pairing a rough linen background with polished beads for contrast; the irregularities felt deliberate and charming. The work reads like a small collage, each trinket holding an anecdote or memory.
Placed among other hoops it becomes a focal pick that invites close inspection for all the little treasures sewn in.
Steps
- Select a neutral backing fabric and gather small beads, charms, and trims that harmonize in color and finish.
- Arrange the charms and bead clusters on the fabric until the layout feels balanced and lively.
- Sew beads and charms onto the fabric with secure stitches, anchoring at multiple points for stability.
- Mount the embellished fabric into the hoop and ensure all elements sit flush against the surface.
Ombre yarn radiating from a hoop center
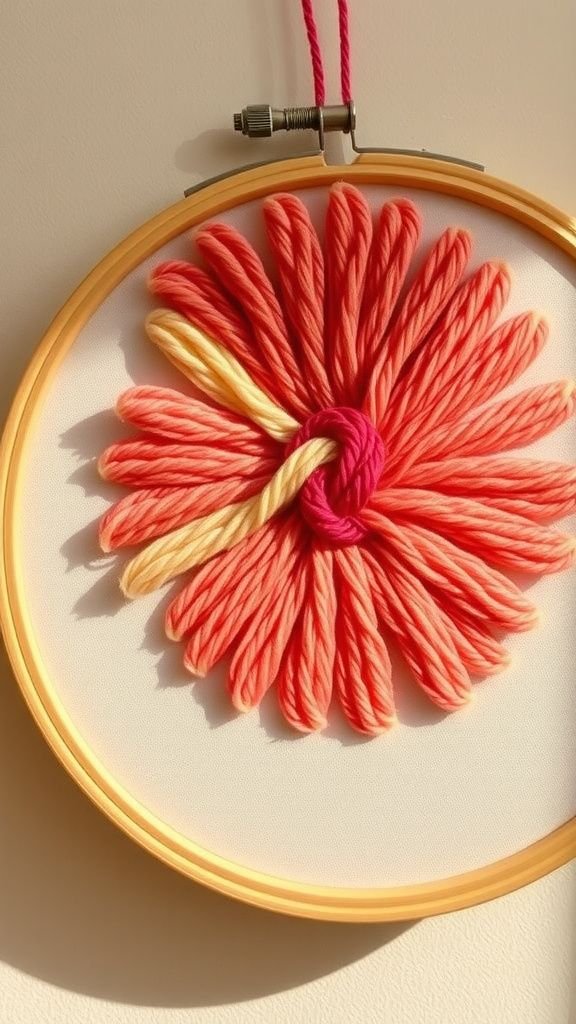
An ombre yarn radiating design felt unexpectedly meditative as I layered shades from pale to deep. The yarn’s gradual tonal shift gives a soft illusion of depth and a subtle sunburst effect when viewed from a distance.
I liked how the fiber’s halo caught light differently across the gradient, creating warm highlights where pile was thicker. The piece adds graphic color without heavy contrast, and neighbors in a living room admired the gentle movement of tones.
It became a small study in how shade changes can alter mood within a frame.
Steps
- Select several yarn shades ranging from light to dark for a cohesive ombre effect.
- Start at the center and wrap yarn outward in radiating lines, alternating colors to form a gradual gradient.
- Secure yarn ends with knots or small hidden stitches at the hoop’s rear to maintain a tidy finish.
- Adjust tension evenly so the radiating pattern reads smooth and continuous across the hoop.
Botanical shadowbox: leaf silhouettes wrapped in hoop
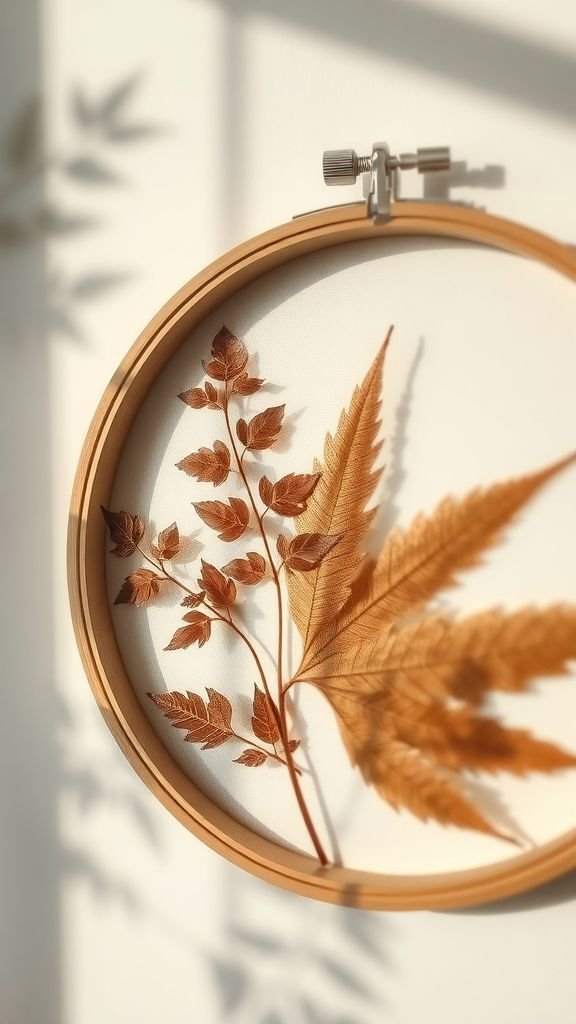
I enjoyed creating a shadowbox-like feel by layering translucent leaves against a pale backing inside a hoop. The leaf veins read like topography when side light hits, and the thin shadows add dimensionality.
The rim emphasizes the circular frame, making the arrangement feel preserved and careful without fuss. I liked placing it near other natural objects — a stack of books or a ceramic cup — so the composition felt part of a larger vignette.
It’s a piece that rewards quiet attention and encourages a slow, appreciative glance.
Steps
- Select translucent leaves with clear vein patterns and press them until moisture is gone and flat.
- Arrange the leaves on a pale backing fabric in overlapping layers to create depth and shadow.
- Anchor the leaves at a few subtle points with fine stitches so they remain in position.
- Seat the composition inside the hoop and finish by tightening the outer rim for a neat edge.
Hoop mobile with dangling mini hoops and beads

A hoop mobile made of tiny hanging hoops felt light and joyful above a reading nook. Each small hoop carried a different texture or color, and the little beads between them chimed softly with the slightest breeze.
Watching the pieces rotate slowly brought a calming, almost hypnotic pleasure during late afternoons. I found the scale important; too large and it lost intimacy, too small and it felt fussy.
When placed over a low chair, the mobile created a cozy moving canopy that shifted mood with morning light and evening shadows.
Steps
- Collect several small hoops, beads, and thin cord to link elements into a vertical mobile.
- Thread beads onto cords and loop small hoops at intervals to form a pleasing cascade.
- Secure knots at each element so spacing remains consistent and elements hang securely.
- Suspend the mobile from a tidy point above a chair or corner so it rotates freely.
Cross-stitch sampler refreshed with modern motifs

Updating a cross-stitch sampler with contemporary motifs felt both familiar and new. I stitched tiny geometric shapes alongside a small plant motif and a minimal skyline, creating a collage of modest icons.
The tiny X-shaped stitches formed a pixel-like surface that I found oddly satisfying and tactile. Contrast between classic sampler structure and newer imagery gave the piece personality, like an old friend wearing a new outfit.
It made me smile to see the small motifs read from a distance and reveal their handmade texture up close.
Steps
- Choose aida cloth or evenweave fabric and plan a compact design combining classic sampler blocks with modern icons.
- Count squares and stitch motifs with cross-stitch technique, working one color area at a time.
- Finish edges neatly and gently press the cloth from the rear to smooth any ridges.
- Mount the sampler inside the hoop and tighten the rim for a crisp presentation.
Clay ornaments inset as tiny focal points

Adding small clay ornaments into a hoop introduced sculptural contrast that felt delightful. The clay’s matte surface and subtle fingerprints offered a hand-modeled honesty against flat fabric.
I liked placing a trio of little discs offset from center so they read like punctuation marks across the textile. Shadows from the clay gave a three-dimensional effect and invited closer inspection.
The resulting piece felt modern yet handmade, a balance that made it suitable for both casual and more refined corners of the home.
Steps
- Shape tiny clay ornaments such as discs or leaves and allow them to firm until leather-hard or fully dry.
- Optionally add surface texture or glaze details and cure according to the clay type chosen.
- Position the ornaments on a sturdy fabric backing and stitch around their bases to hold them in place firmly.
- Seat the backed fabric with ornaments inside the hoop and secure the rim for display.
Needlefelted miniature scene nestled in a hoop
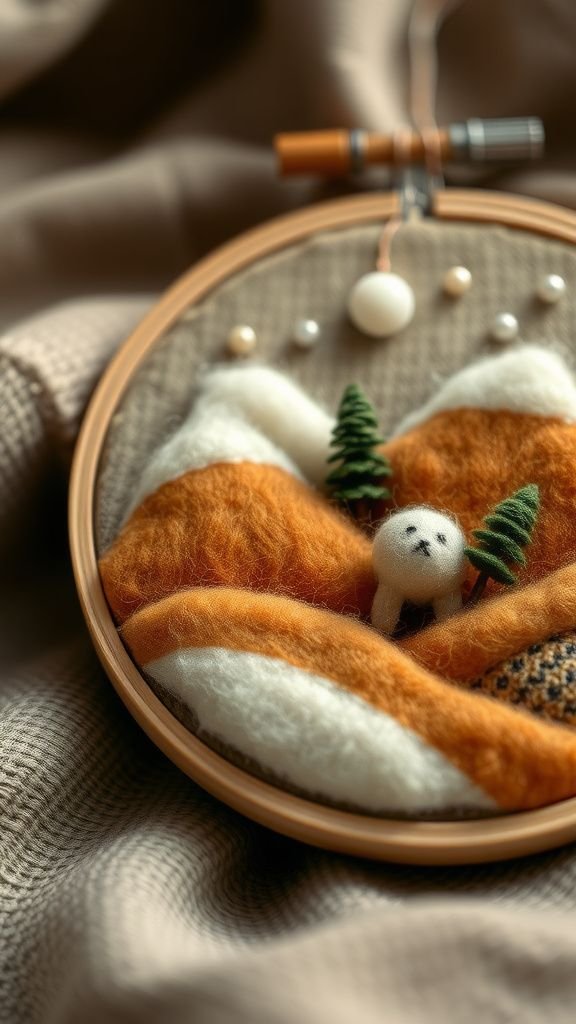
Needlefelting a little landscape for a hoop felt like making a soft, tactile painting. The fuzzy wool formed hills and tiny trees that invited a careful touch.
I appreciated how color blended seamlessly through poking, giving a painterly gradient without sharp edges. The resulting surface had a warm, velvety look that changed with viewing angle and light.
Displayed with a simple frame, the miniature felt scene read like a small pocket world, one that a visitor might crouch to examine and smile at for its cozy, handcrafted charm.
Steps
- Layer wool batting onto a firm fabric or foam base sized to the hoop interior.
- Shape landscape elements by repeatedly felting wool with a barbed needle until fibers bond firmly.
- Add small details such as trees or animals by felting tiny colored wool pieces into place.
- Fit the completed felted scene into the hoop and smooth edges for a neat finish.
Metallic thread starburst on dark cloth

A starburst stitched in metallic thread against a dark cloth reads like a tiny night sky. I enjoyed how thin shimmering lines caught morning light and offered small points of brightness on otherwise matte fabric.
The radial pattern felt energetic but controlled, and variations in stitch length gave a handcrafted irregularity that I liked. Hung above a desk or bedside it became a small, contemplative piece that reflected light differently across the day.
The metal thread gave a subtle luxe touch while keeping the overall feel quiet and minimal.
Steps
- Select a deep-toned fabric and mark a central point for the starburst layout.
- Stitch radial lines from the center outward using metallic thread, alternating lengths for rhythm.
- Reinforce thread endpoints with small knots or backstitches at the fabric rear to prevent loosening.
- Mount the stitched cloth into the hoop and make final tension adjustments so the design sits flat.
Photo transfer on fabric framed in an embroidery hoop
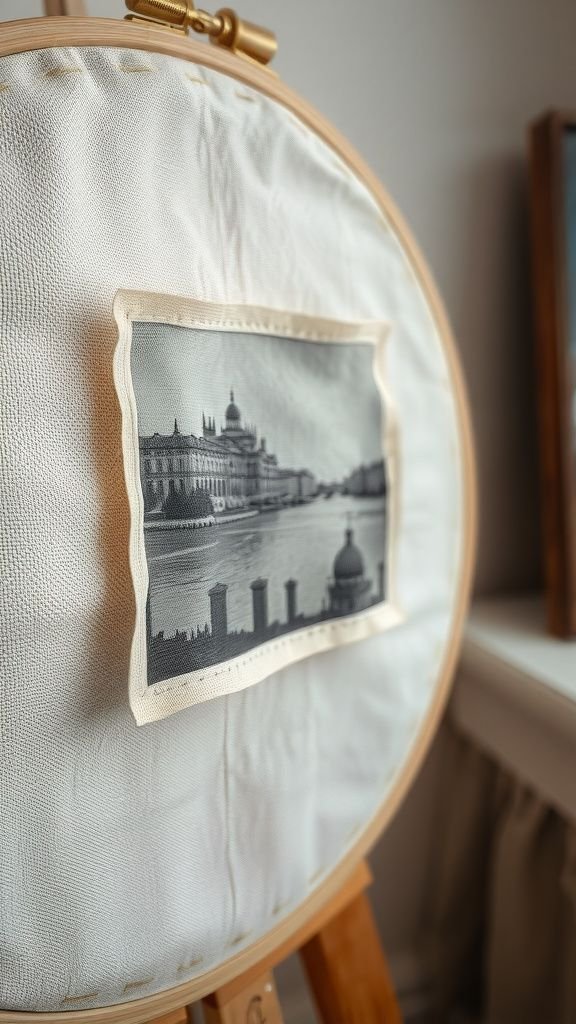
Transferring a cherished photograph onto fabric felt like making a memory portable in a tactile way. The printed image gained softness from the textile grain and the hoop offered a simple frame that emphasized intimacy.
I liked the way edges softened and tiny fabric irregularities added warmth, turning a crisp scene into something more personal. Placing it near other stitched pieces created a contrast between photographic clarity and hand-stitched detail.
It’s a gentle method to keep a familiar face or landscape close without leaning into overt display.
Steps
- Prepare a high-contrast photograph and transfer it to fabric using a preferred photo transfer medium following product guidelines.
- Allow the transfer to cure fully before handling and gently smooth any surface irregularities.
- Optionally add small embroidered accents to enhance elements within the image.
- Stretch the transferred fabric inside the hoop and secure the outer rim for hanging.
Patchwork quiltlet with raw edges nestled in a hoop

A tiny patchwork quiltlet inside a hoop felt like a miniature heirloom. The variety of fabrics — faded florals, checked linens, and plain cottons — read like pieces rescued from old shirts and napkins.
Raw edges softened after a gentle wash, giving a lived-in texture that I found comforting. The hoop compressed the composition into a focused circle, making small stitches and joins feel deliberate and charming.
It brought a domestic, handcrafted energy to a wall and seemed to invite recollection of hands that once handled these scraps.
Steps
- Select a range of small fabric scraps with complementary colors and textures for patchwork.
- Join fabric pieces together with small running stitches, aligning seams to create a compact quiltlet.
- Lightly fray exterior seams if a soft, worn edge aesthetic is desired and press from the rear.
- Seat the patchwork piece within the hoop and tighten the rim so the quiltlet lies flat and centered.