I always look forward to Teacher Appreciation week because those small, homemade gifts carry more warmth than anything bought from a store. A few years ago I left a little jar on a teacher’s desk and watched her smile at the handwritten note inside; that moment is why I keep making simple, thoughtful presents each year.
This list of DIY Teacher Appreciation Gift Crafts collects little projects that felt personal in my hands and easy to tuck into a bag.
Each idea has a cozy, handmade vibe that felt right for saying thanks without any fuss.
A gratitude jar with a handwritten note

I kept one of these on my own desk once and watched it become a tiny ritual. The jar glints under classroom lights and the lid has a friendly scuff from days of opening.
Each folded scrap of paper carries a quiet texture and a familiar scrawl that makes the whole thing feel personal. There’s a soft smell of paper and ink when the lid comes off, and the pile of notes grows like a warm little stack of memories.
It reads like a steady, tangible thank-you.
Steps
- Select a clear jar and clean it thoroughly so the glass is bright.
- Cut small rectangles of colorful paper and write short, heartfelt messages on each piece.
- Place the notes inside the jar and decorate the lid with ribbon or a simple tag.
- Add a handwritten label to the jar to indicate its purpose for uplifting moments.
Chalkboard-style painted mug for classroom coffee

I once found a mug with a matte, writable band that still smells faintly of ceramic glaze; it felt like the kind of thing that belongs under a stack of papers in a busy classroom. The chalky band invites little doodles and changing messages, which made it a playful companion over a week of early mornings.
The handle sits comfortably in the palm, and the mug’s weight has a reassuring presence. A hit of dark matte against glossy white gives the whole object a friendly contrast that draws casual notes.
Steps
- Choose a plain ceramic mug and clean the surface to remove any oils.
- Mask off the area that will remain white, then apply chalkboard paint in even coats.
- Let the paint dry fully and cure according to manufacturer instructions for a durable finish.
- Season the chalkboard area gently with chalk and wipe away to prepare for messages.
Personalized fabric pencil pouch with embroidered name
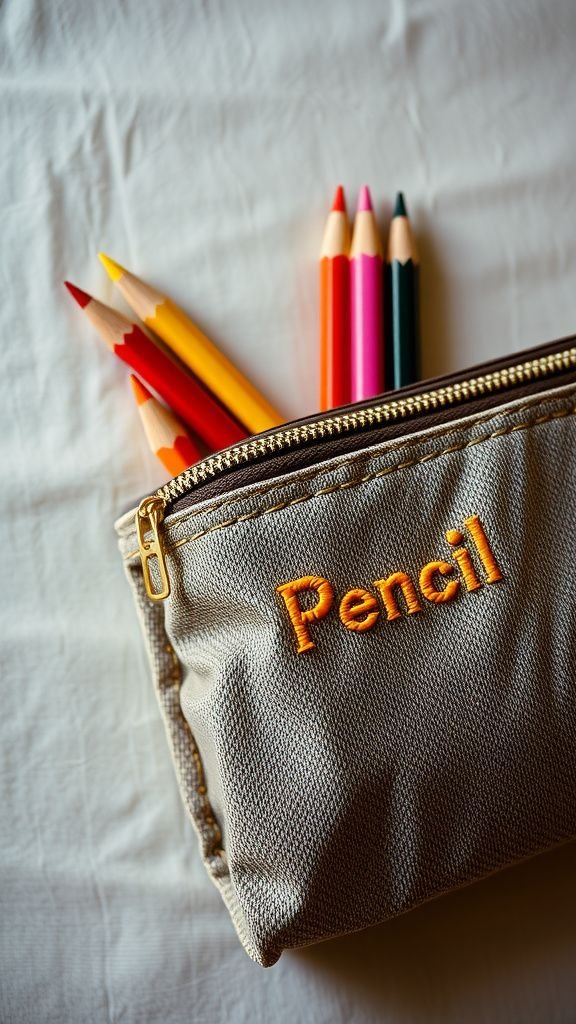
I stitched a name on a little pouch one rainy afternoon and was struck by how intimate that single line of thread felt. The fabric has a slight nap under the fingertips and the zipper hums quietly when opened.
The embroidered letters have tiny, shiny points where the thread catches the light, adding a subtle hand-done sparkle. The pouch folds gently when empty and settles into a flat, familiar shape when filled.
It seems to carry both practicality and a soft, domestic affection that a teacher might tuck into a tote.
Steps
- Select a durable fabric panel and a matching zipper that fits the intended pouch size.
- Transfer the chosen name onto the fabric with a removable marker and pick coordinating embroidery thread.
- Stitch the name with simple backstitch or satin stitch and sew the zipper in place along the top edge.
- Sew side seams to form the pouch and press gently for a neat finish.
Succulent planter in a repurposed tea tin
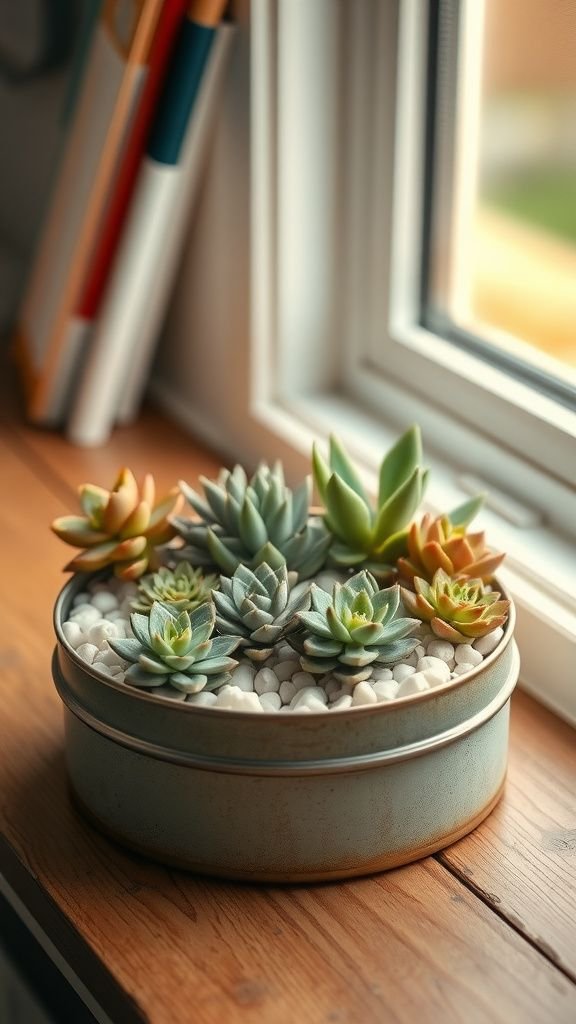
There’s a comforting clink when the lid lifts off a small tin, revealing a tiny landscape of succulents and pebbles. The metal has a gentle coolness and a faded label that tells a quiet history of evenings steeped in tea.
The plants themselves offer a firm, fleshy texture and a slow, patient growth that feels soothing. When placed on a windowsill the planter catches shafts of light and casts tiny, lively shadows.
It reads like a small, living keepsake that barely asks for attention but returns calm.
Steps
- Clean an empty tea tin and ensure small drainage holes are added if possible.
- Layer a bit of gravel at the bottom to help with moisture control for the succulent.
- Add potting mix suitable for succulents and nestle in small succulent plants.
- Top with decorative pebbles and place on a sunny windowsill for gentle light.
Hand-stamped wooden spoon set for cozy mornings

I admired a set of wooden spoons with tiny stamped letters at the ends; the grain of the wood carries a warm, tactile memory of countless breakfasts. The spoon bowls feel smooth and a little warm to the touch, as if they already remember stirring something fragrant.
Each stamped initial has a slight indent and a darker mark where the ink settled, giving them a humble charm. The set leans together in a ceramic jar like quiet companions, making a simple kitchen feel more personal and cared for.
Steps
- Choose unstained wooden spoons that have a smooth finish free of splinters.
- Select small metal alphabet stamps and a soft mallet to imprint initials or short words.
- Position each stamp carefully and strike with controlled force to form clear impressions.
- Finish with a food-safe oil rubbed in lightly to protect the wood and bring out the grain.
Clipboard turned into a decorative classroom organizer

I once saw a clipboard dressed up with patterned paper and a strip of cork at the bottom; it seemed to perform two roles at once. The hardboard has a reassuring stiffness and the clip makes a soft metallic click that sounds very official.
The decorated surface has layers of pattern and texture that invite a second glance, and the cork shakes gently under the weight of a few pushed pins. Hanging near a classroom door it offered a tidy, tactile landing spot for notes and little reminders that felt calm rather than frantic.
Steps
- Select a sturdy clipboard and remove any loose parts so the surface is even.
- Adhere decorative paper or fabric to the clipboard surface with a strong adhesive for a smooth finish.
- Add a strip of cork at the bottom to allow for pinned notes and small items.
- Reattach the clip and add a small label or charm for a personal touch.
Teacher-themed bookmark trio with bright tassels
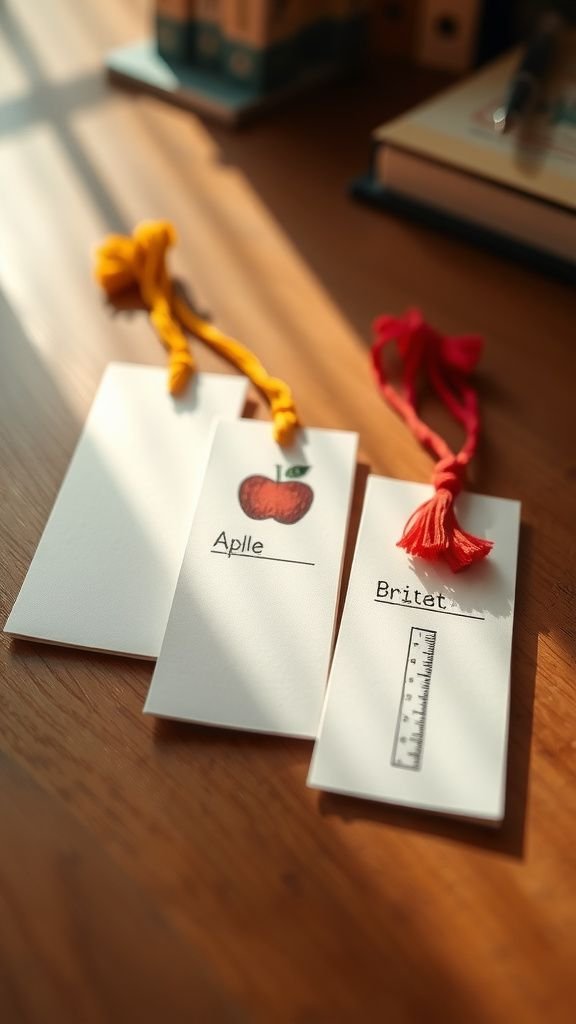
Bookmarks have a way of slipping into the margins of a day, and this trio felt like three small promises to return to reading. The card stock is pleasantly crisp when turned and the tassels whisper against pages with a silky rustle.
One bookmark had a little stamp of an apple, another bore a tiny ruler motif, and the third carried a short handwritten line that felt quiet and true. Lying together on a desk they offered color and a gentle invitation to pause and open a book.
Steps
- Choose heavyweight card stock and cut into three uniform bookmark shapes.
- Decorate each bookmark with stamps, small illustrations, or a short handwritten phrase.
- Punch a hole at the top of each and thread on colorful tassels secured with a knot.
- Package the trio with a small paper band or ribbon for presentation.
Classroom supply bouquet that’s playful and practical

A supply bouquet sits on a desk like a celebration of small, useful things. The pens and highlighters flare up like blossoms and the sticky notes curl like petals at their edges.
The holder has a sturdy weight and a cheerful mix of colors that seems ready for last-minute annotations. When I passed one along, the tinkling shuffle of supplies made everyone smile; it felt both whimsical and immediately handy.
The whole arrangement gives off a light, cheerful clatter and a feeling that someone is prepared for anything.
Steps
- Select a sturdy container and choose a mix of pens, highlighters, sticky notes, and clips.
- Arrange items by height and color to create a balanced, bouquet-like appearance.
- Add filler such as tissue paper or artificial greenery to keep items in place.
- Wrap the base with a decorative band or ribbon for a finished look.
Scented soy candle in a refillable glass jar

Lighting a gentle candle in a classroom office brings a hush that feels almost like a pause button. The glass jar collects a warm pool of wax that reflects light in soft, golden curves.
The scent is understated: a warm vanilla with a hint of citrus that doesn’t overwhelm a room. As the wick burns, the flame makes a tiny, steady glow and the glass warms to the touch.
The finished jar can find a new life as storage when the candle has dwindled, which keeps the memory going.
Steps
- Melt soy wax gently and blend in a few drops of a mild fragrance oil chosen for subtlety.
- Secure a wick centered in a clean glass jar and pour the wax at a safe, warm temperature.
- Allow the candle to cool and trim the wick to an appropriate length before gifting.
- Add a small label with scent information and a neutral decorative band around the jar.
Magnetic photo frame for the classroom board

A small magnetic frame stuck to a metal board becomes a tiny stage for a picture to brighten a hallway. The frame’s border has a faint matte finish and the photograph inside catches the eye with one familiar smile.
The magnet clings with a soft, steady strength and the whole unit can be shifted along the surface like a miniature scene. When I peeked at one, the frame held a snapshot of a messy classroom moment that made me laugh; it felt like a tiny portal back to a good day.
Steps
- Choose a lightweight frame and attach small but strong magnets to the back corners.
- Insert a favorite photo or printed note into the frame and secure it in place.
- Test the magnetic hold on a classroom board and adjust magnet size if needed for stability.
- Add a small decorative border or label to personalize the frame.
Custom stamped keychain with teacher initials

A metal tag swings softly on a keyring and catches light in quiet flashes. The stamped letters have a small, slightly uneven character that reads as very human.
When I held one up it made a faint, pleasant chime against my palm and the coolness of the metal felt reassuring. The edges are smooth from gentle finishing and the simple shape wears well on a bunch of daily keys.
It carries a modest weight and a private little personalization that seems to wink at the owner each time they reach for it.
Steps
- Select a metal blank and keyring that fits the desired size and style.
- Lay out initials or a short word and use metal stamping tools to create clear impressions.
- Darken the stamped areas with a permanent marker and wipe the surface clean for contrast.
- Attach the metal tag to the keyring and polish the edges for a smooth finish.
Mini dry-erase board with decorative fabric frame

A small dry-erase board framed in cheerful fabric lived on my kitchen counter for a while and made short notes feel a little festive. The board’s glossy surface has a quick, clean sheen that reacts instantly to marker strokes, while the fabric border adds a soft, tactile edge.
The whole piece sits lightly on a desk and the contrast between shiny white and patterned cloth brings a playful balance. When an idea appears it can be marked and wiped away, and the frame’s pattern keeps the object feeling domestically warm.
Steps
- Cut a piece of thin whiteboard or plexiglass to the desired mini size and smooth the edges.
- Wrap a strip of decorative fabric around a lightweight backing to create a padded frame.
- Secure the board into the framed backing and add mounting hardware on the rear if needed.
- Include a small marker and eraser tucked into a fabric pocket on the back for convenience.
Mason jar desk supply holder with painted rim
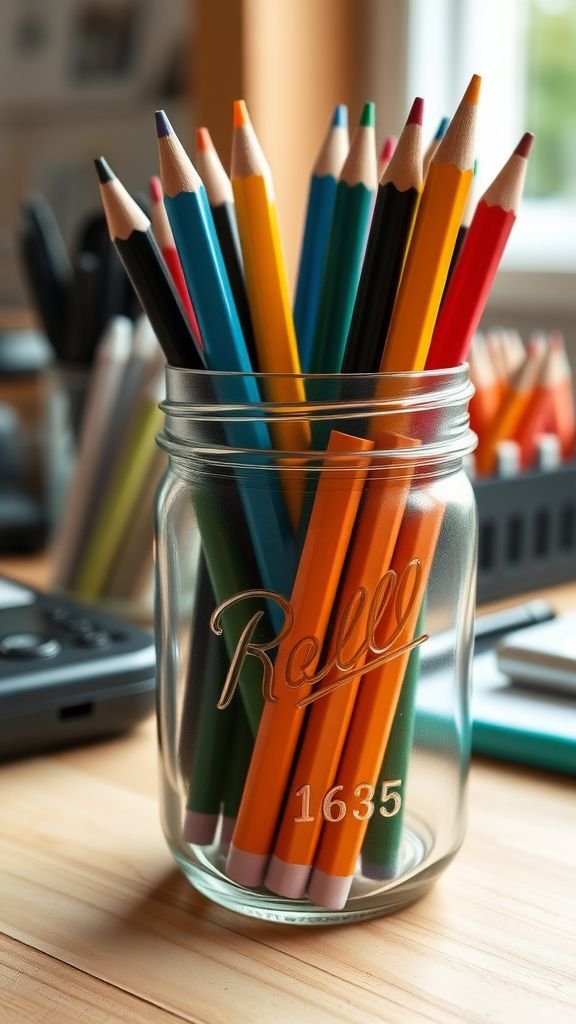
A mason jar feels familiar in the hand, with ridges that give it a tactile rhythm. The painted rim adds a pop of color that catches sunlight and makes the jar read as intentionally cozy.
Inside, pencils stand like a little forest, and the glass magnifies the colors of erasers and clips. The jar’s weight anchors it on a desk while the painted edge introduces a small, cheerful accent.
I kept one on my bedside table for a while and it carried pencils and a stray pair of scissors without fuss.
Steps
- Clean a mason jar thoroughly and allow it to dry completely.
- Apply paint to the rim in thin, even coats for a bright accent color and let dry.
- Add a label or a tied ribbon around the neck if desired for extra charm.
- Fill the jar with pens, pencils, and small supplies and place on a desk.
Personalized notepad with printed decorative cover
A slim stack of notepaper with a gentle design at the top made routine lists feel thoughtful for me. The paper has a soft hush when flipped and the printed cover offers a friendly first impression.
Each sheet bears a faint bleed of ink when written on in a hurried moment and the corners hold tiny marks from slipping into a tote. The pile sits neatly, waiting to receive everything from reminders to doodles.
That small presence on a desk seemed to encourage jotting down little moments rather than letting them drift away.
Steps
- Design a decorative cover with a name or motif and select a paper weight suitable for note-taking.
- Print the covers and interior pages using a high-quality home printer or local print service.
- Stack the sheets neatly and bind at the top with glue or a spiral binding for easy tear-off pages.
- Add a backing board for rigidity and wrap with a ribbon or paper band for presentation.
Cozy knitted mug cozy in soft yarn

I wrapped a favorite mug in a knitted cozy one chilly morning and it made sipping something hot feel slow and deliberate. The yarn has a slight give and its stitches show a charming rhythm under the fingertips.
The cozy clings to the ceramic and the texture softens the mug’s hard edge, offering a small, comforting insulation. When the hot cup rests between both hands the knit warms and the whole act of holding becomes a tactile comfort.
It reads like a small, handmade hug for beverage breaks.
Steps
- Choose a soft, washable yarn and knit or crochet a rectangular panel sized to fit a standard mug.
- Add buttonholes or a seam allowance to allow the cozy to wrap securely around the mug.
- Finish edges neatly and sew on a small button or snap for closure.
- Test the fit on a mug and tuck a small tag with care instructions into the seam.
Teacher appreciation coupon booklet with warm design

A small booklet of thoughtful coupons felt like passing along permission for tiny pleasures. The paper pages flip with a soft papery sigh and each coupon bears a playful phrase that suggests an easy favor or a moment of rest.
The cover has a calm color and a bit of texture that reads as inviting. I remember handing one to a colleague who tucked it into a drawer and smiled at the idea of redeeming one on a difficult day.
The booklet sits small and unassuming but carries a gentle promise.
Steps
- Design a set of simple coupons with short offers and print them on sturdy paper.
- Stack the coupons in a pleasing order and bind along one edge with staples or glue.
- Create a decorative cover and tuck the booklet into a small envelope or band.
- Add a handwritten note on the inside cover for a personal touch.
Washable fabric snack bag set with patterns
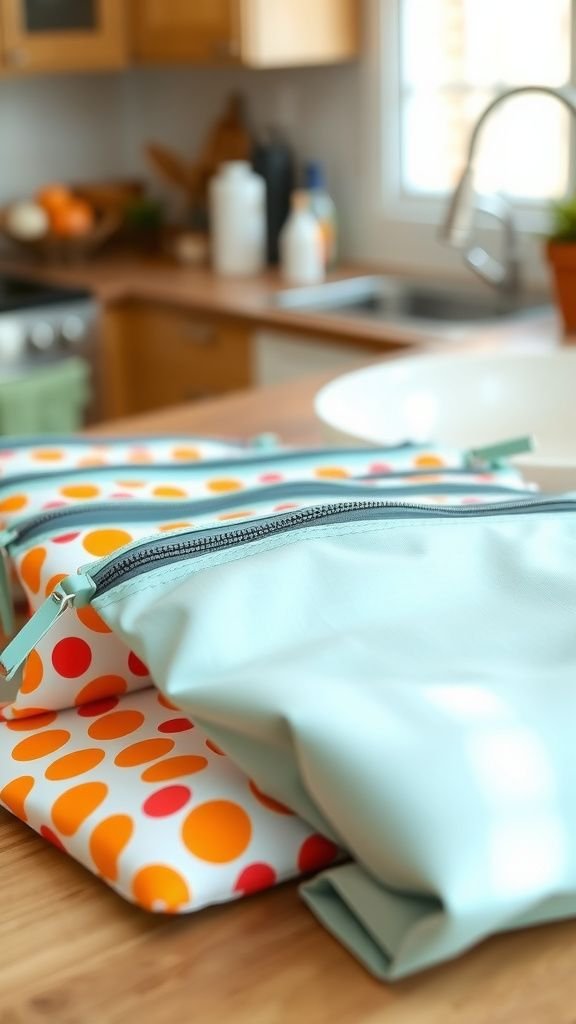
I carried a patterned fabric snack bag and liked how it softened a lunch box compartment. The textile has a crispness when fresh and a lived-in softness after washing.
The zipper glides with a faint, smooth sound and the inner lining has a slight sheen that keeps things tidy. A set of bags in coordinated prints makes packing feel a touch more cheerful and less utilitarian.
They fold small when empty and the bright patterns peek out from a tote like a promise of color during the day.
Steps
- Choose food-safe fabric and a coordinating lining material cut to desired snack sizes.
- Sew edges together neatly with a zipper or fold-over closure for secure storage.
- Finish seams with a clean topstitch and press the bags for a crisp appearance.
- Wash the set gently before gifting to ensure freshness and cleanliness.
Hand-lettered inspirational print matted for framing

A small hand-lettered phrase on crisp paper can feel like a quiet companion on a busy wall. The ink has slight variations where the pen paused and the letters lean with personality.
The mat gives the print a calm margin, and the whole piece breathes on a shelf or a bulletin board. I remember a framed line that made me take a breath in the middle of a long day; it had a gentle cadence that settled the space.
The tactile quality of paper and ink made the sentiment feel rooted and personal.
Steps
- Choose a short phrase and create a hand-lettered design on high-quality paper with archival ink.
- Trim the artwork to size and select a mat that provides a balanced border for framing.
- Place the matted print into a frame with clean glass and secure the backing.
- Add a small note on the reverse with the date and a short message for a personal touch.
Classroom survival kit in a cheerful little box

There’s a quiet humor in a tiny box labeled with playful notes and filled with small comforts. The lid lifts to reveal neatly arranged items that tinkle and crinkle with a light, reassuring sound.
The textures range from soft tissues to crisp snack wrappers, and the color palette inside is unexpectedly cheerful. I once carried a version of this in the back of my car and felt oddly reassured during a hectic afternoon.
The kit felt practical and kind, like a handful of small mercies waiting to be borrowed.
Steps
- Choose a sturdy box or tin and line the interior with tissue or fabric for a tidy look.
- Fill the box with compact items such as a small packet of tissues, mints, hand lotion, and a note.
- Arrange items so they are visible and pleasant to open, and close the box securely.
- Add a simple label or tag that explains the contents in a lighthearted way.
Painted pebble name holders with gentle curves
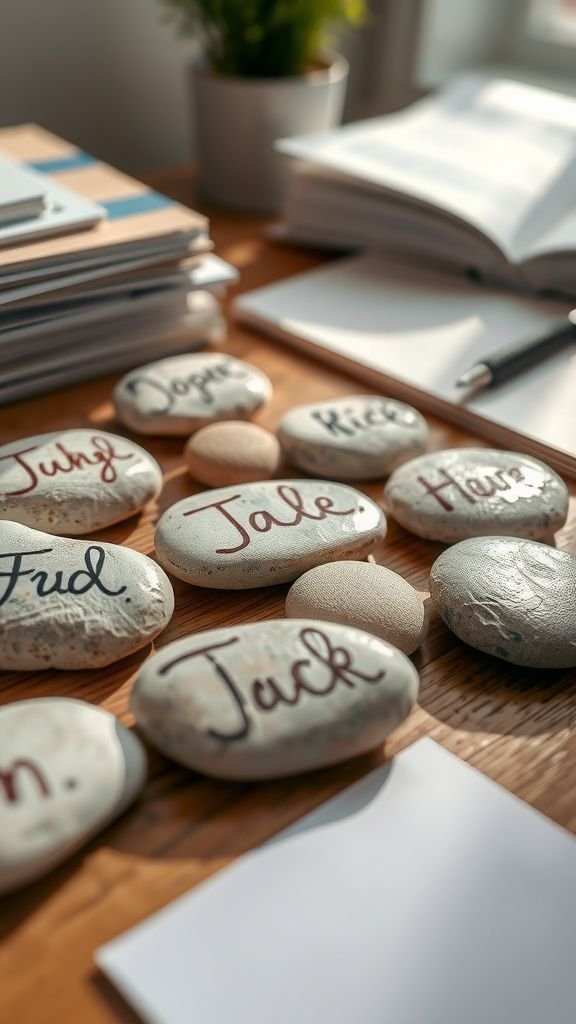
Smooth pebbles warmed in the palm make small, quiet bookends for papers and cards. Each stone bears a tiny painted name or icon that sits like a little signature against the grain of the rock.
The paint has a soft gloss that contrasts with the matte natural surface, and the pebble’s weight feels grounding when placed on a stack of worksheets. I spotted one on a desk and loved how it anchored the space without claiming attention.
It’s a small, earthy presence that quietly marks a spot.
Steps
- Select smooth, flat pebbles and clean them well to remove any dirt or dust.
- Apply a base coat of paint if desired and allow it to dry completely.
- Paint names or small icons with fine brushes and seal with a clear varnish for durability.
- Allow the sealant to cure and place the pebble on a desk as a name holder.
Reusable teacher tote with neat interior pockets
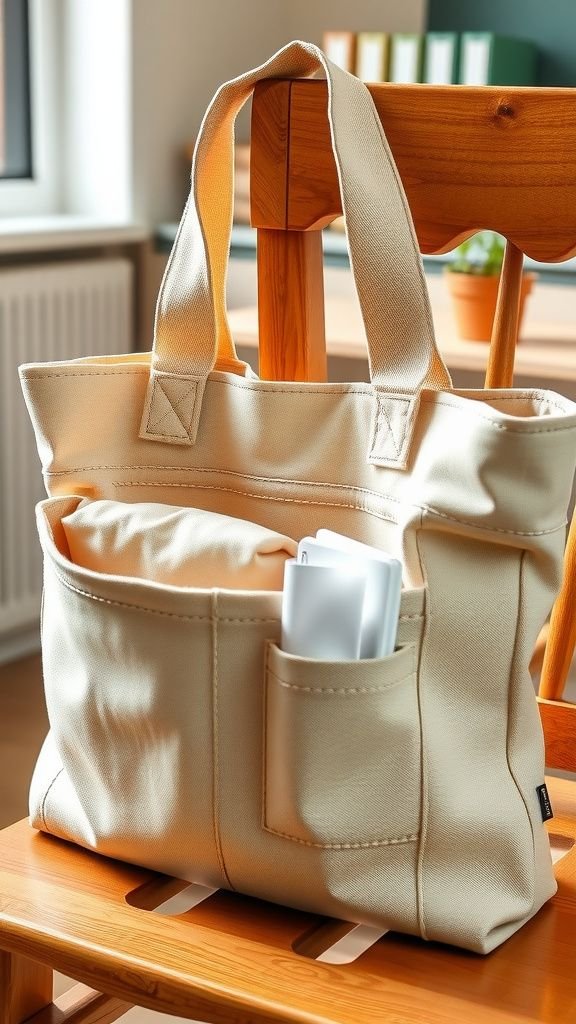
A tote with pockets seems to collect little fragments of a day: a stray marker, a lunch note, a folded schedule. The canvas has a pleasant firmness and the straps sit comfortably over the shoulder.
Inside, the pockets offer small havens for a phone or keys, and the reinforced bottom gives the bag a grown-up readiness. I carried one to meetings and it folded into itself when empty, but when filled it held an honest amount with quiet dignity.
The overall effect is both useful and quietly reassuring.
Steps
- Choose a sturdy canvas tote and plan the placement of interior pockets for phone and supplies.
- Cut pocket panels from matching fabric and sew them securely to the tote interior.
- Reinforce the bottom with an inserted board or double layer of fabric for added structure.
- Add a small decorative tag or embroidered initial for personalization.