I started making tiny planters years ago when an apartment windowsill felt like prime real estate. DIY Seed Starter Pot Crafts became a small hobby that turned kitchen scraps and thrifted bits into a lineup of hopeful green beginnings.
That gentle ritual of arranging little pots made waiting for sprouts feel less like patience and more like anticipation.
Sharing a few favorites here feels like swapping notes with a friend. Each project carries textures and smells that are oddly comforting—the papery hush of newspaper, the citrus brightness of hollowed peel, the cool smoothness of glass.
Egg carton seedlings: a nostalgic cardboard nursery

I kept egg cartons on the counter for months, enchanted by the way each cup cradled a tiny mound of dark soil. Damp cardboard absorbs light softly, and there was a subtle papery scent whenever I watered.
The seedlings seemed to grow in a miniature village, their stems leaning toward the window as if in silent conversation. Watching the edges darken and the carton soften felt like reading a slow, satisfying story; every green tip looked more at home against that plain brown backdrop.
Steps
- Separate the egg carton into individual cups or keep the whole tray intact.
- Spoon potting mix into each cup and press in the seeds at a shallow depth.
- Mist the soil gently and cover the tray with a clear lid or wrap for humidity.
- Set the carton on a sunny windowsill and water when the surface dries slightly.
- Transplant seedlings when roots peek through the bottom and cups begin to break down.
Toilet paper tube pots with rustic charm
A stack of brown tubes became unexpectedly comforting; their hollow centers felt like little caves waiting for life. The edges have a certain roughness that softens as moisture settles in, and the scent of damp paper brings back rainy afternoons.
Tiny roots send fine threads through the base over time, gripping the cylinder walls with delicate determination. Setting a ring of these tubes on an old tray created an improvised nursery that looked cheerful and slightly ragged in a way that suited my cluttered windowsill perfectly.
Steps
- Cut tubes to the desired height and make small flaps at the bottom to form a closed base.
- Add a loose, airy seed-starting mix into each tube until nearly full.
- Nestle seeds into the surface and gently tamp down the soil.
- Group tubes on a shallow tray and keep the soil evenly moist with light watering.
- Transfer seedlings with their tube into larger containers when roots hold the tube shape.
Newspaper pots that feel like paper gardens

Rolling up strips of newspaper once felt like a small ceremony. The print patterns show through wetness in a faded, ink-streaked way that always makes me smile.
The paper holds a gentle crispness at first and then becomes pliable and soft under watering, with edges curling like petals. The weight of a tray full of these paper cups, slightly damp and full of dark soil, is oddly satisfying.
Each pot looked handmade in a warm, slightly imperfect way and fit perfectly into a crowded sill of experiments.
Steps
- Tear newspaper into long strips and wrap each around a small jar or can to form a cup.
- Tuck and roll the ends tightly to secure the shape and fold the base inward to create a bottom.
- Fill with seed-starting mix and press seeds into the surface at the appropriate depth.
- Arrange cups on a tray to catch excess moisture and keep them in bright light.
- Plant pots directly into larger beds or containers when seedlings are sturdy enough.
Eggshell halves for tiny delicate seedlings
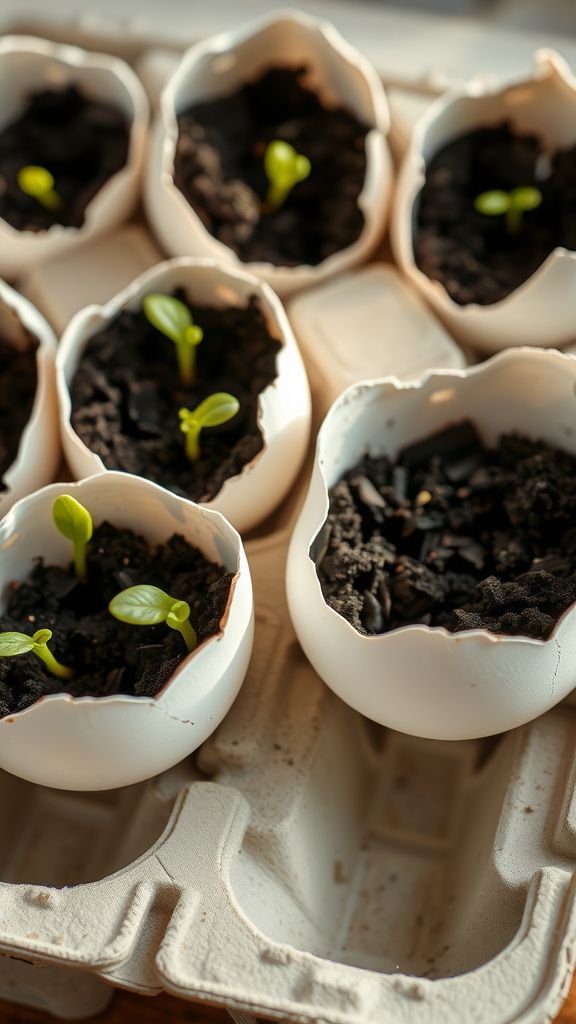
Saving shells felt a little indulgent, like preserving a morning memory. The white porcelain interior holds soil in a tiny curved bowl that catches sunlight in a gentle gleam.
There’s a faint mineral scent when the shell is damp, and watching a hairline root wind inside that tiny cavity always makes me grin. The fragile nature of the shell contrasts with the robust insistence of emerging leaves, and a tray of halved eggshells looks like a collection of small white moons dotted with green ambition.
Steps
- Rinse eggshell halves and let them dry thoroughly before handling.
- Spoon a small amount of fine seed-starting mix into each shell and add one or two seeds.
- Place shells in an egg carton or shallow tray to keep them upright.
- Keep soil lightly moist with gentle misting and provide bright, indirect light.
- Crack shells gently and transplant seedlings into larger pots when roots become noticeable.
Citrus peel planters with a lively scent
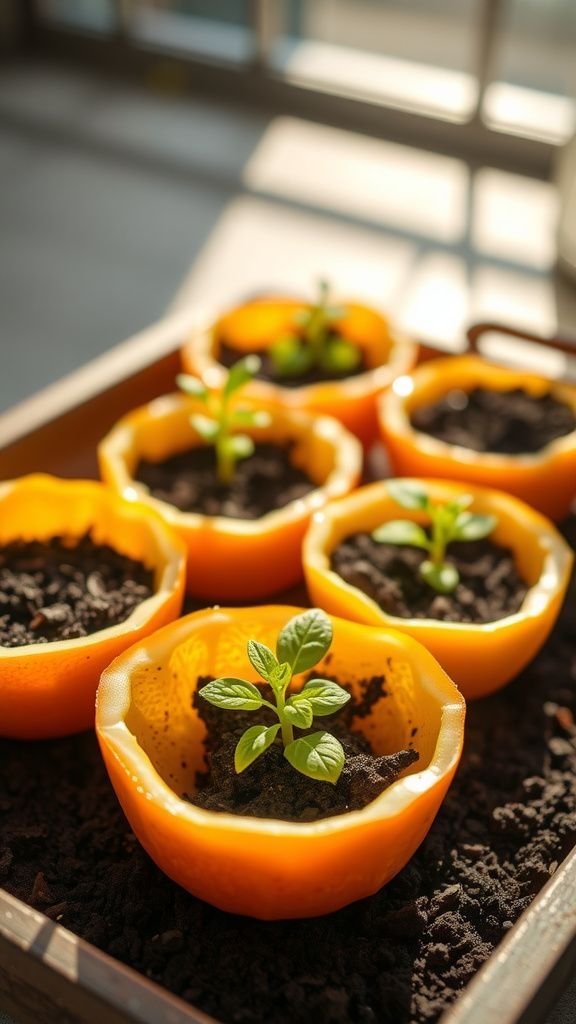
Hollowed orange halves smell like a burst of summer, and that bright citrus aroma blends with damp soil to create an energizing little corner. The inner pith holds moisture and softens into a cushy bed, while the peel’s glossy exterior keeps things contained.
Small seedlings seemed to perk up under the cheery orange rim, and the compostable nature of the peel added a pleasant impermanence. A tray dotted with these tiny citrus bowls looked festive and smelled like breakfast, which made tending the seedlings unexpectedly enjoyable.
Steps
- Cut citrus fruit in half and scoop out the flesh, leaving a hollowed shell.
- Fill each peel with a loose seed-starting mix and press seeds into the surface.
- Arrange halves in a muffin tin or shallow tray to steady them.
- Water gently to maintain moisture and keep in bright light.
- Plant the whole peel directly into soil when roots begin to show, allowing it to break down.
Muffin tin grid for tidy tiny gardens

An old muffin tin became a tidy map of potential: each cup held a different seed like a color swatch. The metal surface picked up light and created small highlights around the dark soil, and the tin’s coolness balanced the warm indoor air.
The contrast between the hard, smooth metal and the soft, crumbly earth was oddly pleasing. Rows of seedlings marching in neat columns felt reassuring, and the whole piece came across as both practical and slightly whimsical—an industrial tray made domestic and green.
Steps
- Clean a muffin tin thoroughly and place a small layer of drainage material in each cup if desired.
- Add seed-starting mix into each cup and press it down gently.
- Plant seeds at the recommended depth and label varieties with small tags.
- Keep the tin on a flat surface with adequate light and water carefully to avoid overflow.
- Move seedlings to individual pots once roots fill the muffin cups.
Tin can planters with a bit of shine

Empty cans felt like small urban planters, their reflective rims catching slivers of light at dawn. The cool metal contrasted with the warm dampness of the soil and produced a faint metallic tang in the air after watering.
Labels peeled back in honest strips and the interior bore fingerprints and memories of their prior contents. Setting a cluster of these on a balcony created an industrial-meets-homestead vibe, and I liked how the sun played off the curved sides, turning a humble kitchen scrap into a miniature display.
Steps
- Remove labels from clean tin cans and smooth rough edges at the top.
- Drill or punch small drainage holes in the bottom to prevent waterlogging.
- Add a layer of coarse grit or small stones if desired, then fill with seed mix.
- Plant seeds and place cans in an area with bright light and airflow.
- Re-pot seedlings into larger containers once they outgrow the can.
Coffee filter cups for soft, breathable starts

Folding coffee filters into tiny cups felt unexpectedly elegant. The thin paper drank in moisture and gave the soil a comforting, breathable cushion.
There was a faint aroma of brewed coffee still clinging to some filters, which added a cozy morning vibe to the seed tray. Seedlings seemed to breathe easier against that soft white wall, and the whole arrangement looked almost like a miniature tea service.
The lightness of the filters made handling the cups gentle and forgiving, which suited my impatient attempts at germination.
Steps
- Open each coffee filter into a cup shape and set them into a shallow tray or muffin tin.
- Fill with seed-starting mix, leaving room at the top for seeds to sprout.
- Sprinkle seeds onto the surface and press them lightly into the soil.
- Keep the tray in bright, indirect light and maintain even moisture.
- Transfer seedlings to pots when roots start to circle the filter base.
Coconut coir disks: earthy, fibrous starters

I warmed to the earthy scent of coir the first time it expanded under water, a mild, almost herbal fragrance that felt grounding. The fibrous texture held moisture like a sponge and offered a dense resting place for tiny roots.
Seedlings rose out of the dark brown puck with a certain sturdiness, and the natural fibers gave the root system something to cling to. Stacking a handful of these pucks on a tray made for a compact, almost tidy nursery that smelled faintly of the outdoors even inside the apartment.
Steps
- Place compressed coir disks in a shallow tray and add warm water to let them expand.
- Fluff the expanded coir to a loose consistency suitable for seeding.
- Spoon coir into small pots or trays and press seeds into the surface gently.
- Keep coir evenly moist and provide bright indirect light for germination.
- Pot seedlings into larger containers when root mass is established.
Biodegradable peat pots for an earthy look

Peat pots carried a damp, woodsy scent that felt right for starting herbs indoors. The rough outer surface took on a softened tone as moisture seeped in, and the thin walls showed tiny root hairs pressing against them like curious fingers.
There was a satisfying weight to a bench lined with these little brown cylinders, as if a future garden had been condensed into neat containers. Transplanting seemed gentler knowing the pot could go into the soil and quietly become part of the earth.
Steps
- Arrange peat pots in a tray and moisten them slightly to prevent crumbling.
- Fill each pot with a light seed-starting mix, leaving the rim visible.
- Plant seeds at the recommended depth and label varieties if desired.
- Maintain steady moisture and ensure bright, indirect light for germination.
- Plant pots directly into the garden or larger containers when seedlings are ready.
Mini greenhouse jars for humid little worlds

Glass jars with lids created tiny humid habitats that felt almost otherworldly. Condensation beaded on the glass, refracting light into speckled patterns across the soil.
The smooth, cool container made colors pop: green against dark earth, a glossy rim catching highlights. Sitting back and watching a little ecosystem breathe inside a jar was unexpectedly calming; the sealed environment kept moisture like a secret.
A row of these muted glass domes on a sunny shelf looked like a collection of delicate ecosystems, each quietly developing its own microclimate.
Steps
- Fill clean glass jars or small terrariums with a thin drainage layer and seed-starting mix.
- Plant seeds at the recommended spacing and lightly mist the surface.
- Close lids or cover jars with clear plastic to trap humidity.
- Open covers briefly each day for air exchange and monitor moisture levels.
- Remove lids gradually once seedlings are established to acclimate them to normal humidity.
Cork planters from upcycled wine stoppers
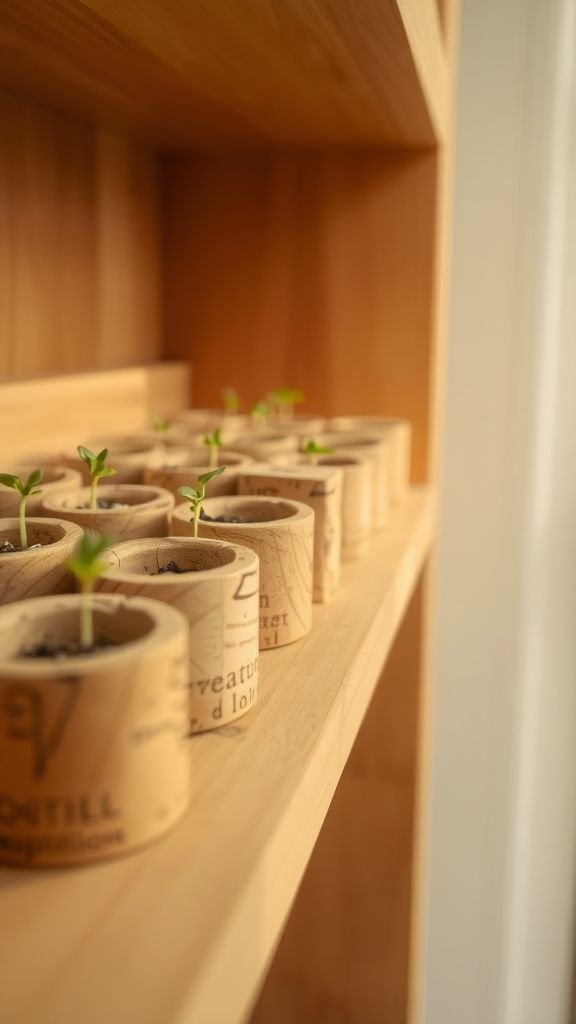
A cluster of hollowed wine corks felt charmingly small, each one like a tiny ceramic pot in disguise. The dense, spongy cork absorbed a hint of moisture and smelled faintly woody, adding a cozy suggestion of cellar and supper.
Small roots explored the cylinder interior with inquisitive persistence, and the texture of the cork provided a tactile backdrop that contrasted nicely with glossy leaves. Arranged on a narrow window shelf, the cork planters read as a playful, low-profile experiment in conserving both materials and space.
Steps
- Hollow the center of wine corks carefully to create a small cavity for soil.
- Fill each cork cavity with a fine seed-starting medium and add a tiny seed.
- Arrange corks in a shallow tray or on a strip of damp moss to keep them steady.
- Maintain gentle moisture with a spray bottle and provide bright light.
- Transfer seedlings when root systems are large enough to handle.
Matchbox starters for the tiniest seedlings
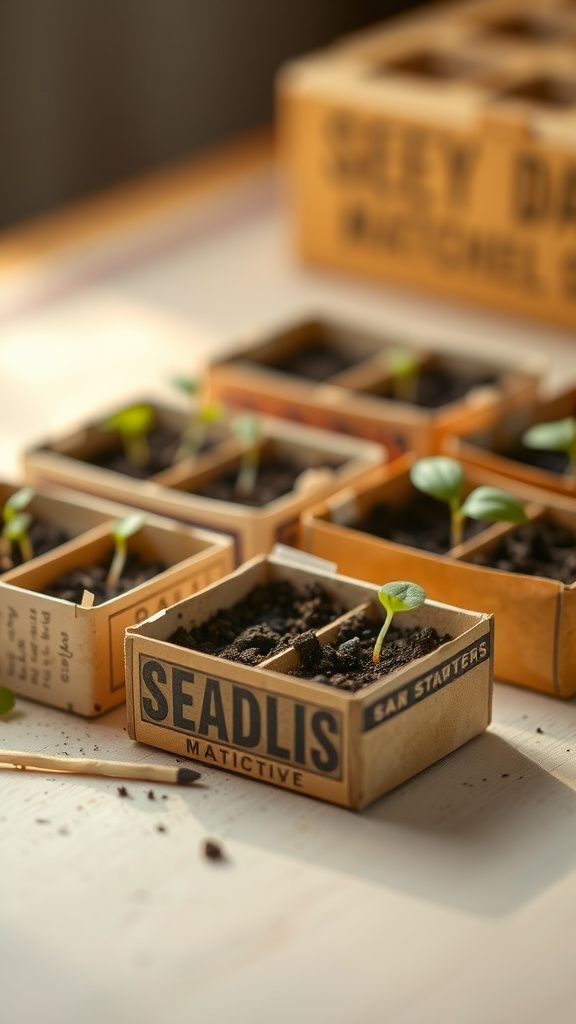
Empty matchboxes became tiny theatres for seeds, each drawer offering a snug, sheltered spot. The paper lining absorbed a modest amount of water and the smell of damp cardboard felt comforting in a small way.
Popping a seed into one of these miniature drawers made the whole act of starting herbs feel like a quiet, private ritual. Rows of matchbox nests looked charming and almost ludicrously small, and yet, when a green tip appeared, the scale suddenly felt just right for a windowsill with limited space.
Steps
- Remove inner drawers from matchboxes and line them with a small square of tissue or paper.
- Add a tiny amount of seed-starting mix into each drawer and place a seed on the surface.
- Close the outer sleeve loosely to allow some air movement while retaining humidity.
- Keep the drawers on a bright windowsill and mist lightly as needed.
- Carefully move seedlings to larger containers once roots and leaves are established.
Paper cup starters with cheerful patterns
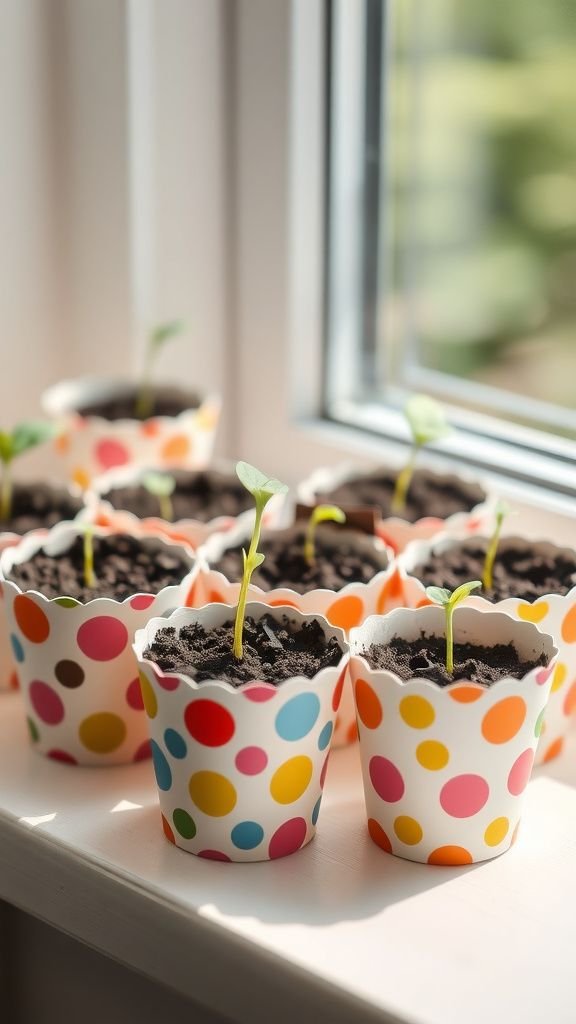
Patterned paper cups brightened a cluttered sill like confetti. The printed designs peeked through dampness in charming smudges, and their thin walls took on a slightly translucent quality under bright light.
The cups felt lightweight and disposable in the good way, like a carnival turned domestic. Planting a few cups of different colors created a playful patch of promise, and the sound of tap against ceramic when I set the tray down carried that small domestic satisfaction that comes from simple things arranged with care.
Steps
- Select sturdy paper cups and punch small drainage holes in the bottom if desired.
- Place cups on a tray and fill with seed-starting mix to near the rim.
- Sow seeds according to package guidance and firm soil gently around them.
- Keep cups moist and in bright light until germination occurs.
- Replace paper cups with pots or plant directly into garden beds when roots develop.
Terracotta shards as rustic little planters
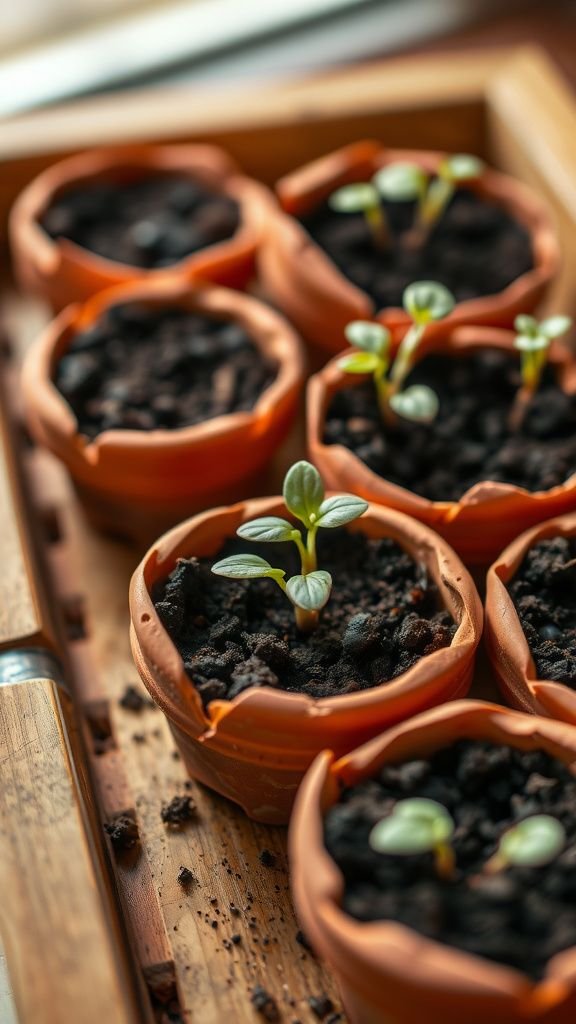
Fragments of terracotta felt unexpectedly tender once the edges were smoothed, their porous surfaces taking on a dusty, ancient look when watered. The orange-brown hue created a warm backdrop for the bright green of new leaves and the clay drank moisture in a way that moderated watering rhythms.
Lining a tray with shards of varying sizes produced an earthy mosaic that invited casual rearrangement. There was a comforting solidity to terracotta that made seedlings seem like small artifacts rather than fragile experiments.
Steps
- Choose terracotta shards with stable bases and smooth any sharp edges carefully.
- Place shards on a shallow tray and add a little gravel for drainage if desired.
- Fill each shard with seed-starting mix and sow seeds into the surface.
- Provide bright light and moderate watering to keep the clay from drying out completely.
- Transplant seedlings into larger pots once they have established a decent root system.
Bamboo tube starters for a natural aesthetic

Sections of bamboo felt almost ceremonial, each hollow cylinder acting like a miniature planter. The smooth inner walls held moisture with a quiet reliability and the outer knots added sculptural interest.
There was a faint, grassy aroma that made the whole arrangement smell of the outdoors, and the tall narrow shape encouraged roots to grow vertical and strong. A row of bamboo tubes on a balcony rail looked like a slice of a distant garden, bringing a clean, natural rhythm to the small space and pleasing the eye with simple geometry.
Steps
- Cut bamboo into short sections and seal the bottom with biodegradable fabric or a small plug.
- Add a small amount of seed-starting mix into each tube and lightly press it down.
- Place seeds into the mix at the appropriate depth and label the tubes if needed.
- Arrange tubes upright on a tray to catch excess water and provide bright light.
- Move seedlings into larger pots or plant directly when roots fill the bamboo section.
Wooden match crate with tiny pot compartments

A repurposed wooden match crate brought structure and warmth, its little compartments each cradling a miniature pot. The wood smelled faintly of smoke and old drawers, and the grain created a cozy backdrop for glossy leaves.
The crate’s compact form made moving a whole set of seedlings effortless and it looked like a tiny cabinet of curiosities. Seeing labels tucked into each slot added a nostalgic touch, and the whole piece begged to be tended to over a slow afternoon with a cup of tea.
Steps
- Clean an old wooden match crate and line compartments with small cups or paper to protect the wood.
- Fill each compartment’s cup with seed-starting mix and press seeds lightly into the surface.
- Arrange the crate on a stable surface with bright light and water carefully to avoid drips.
- Rotate the crate occasionally for even light exposure and monitor moisture.
- Transfer seedlings out when they have established a healthy root system.
Seedling flats made from old takeout containers
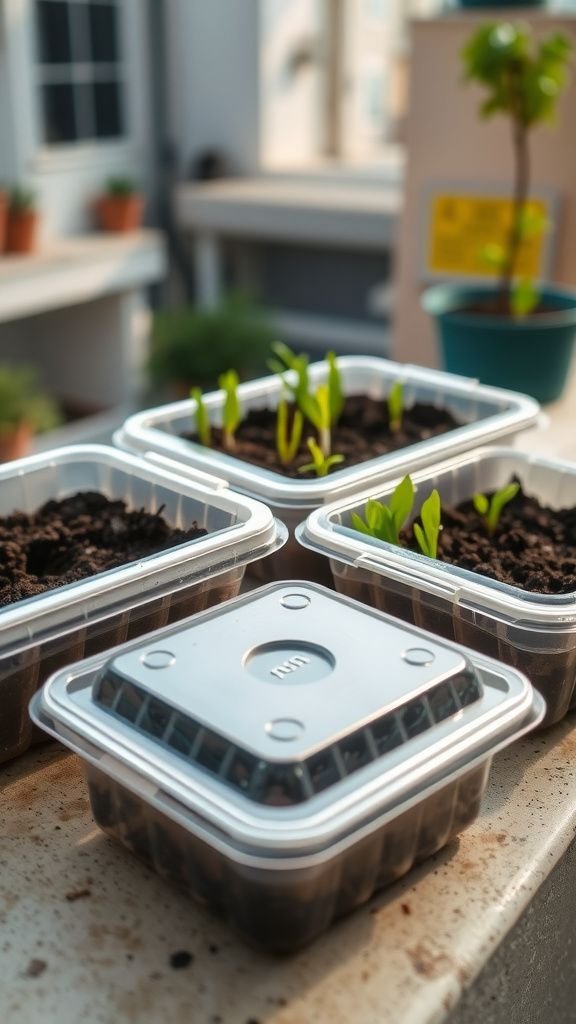
Clear plastic takeout boxes made for an efficient mini nursery, their transparent lids catching condensation in soft circles. The faint scent of prior meals sometimes lingered, which gave the setup an oddly lived-in feel.
The shallow depth promoted even light across the young leaves and the rigid walls kept trays tidy and portable. When a stack of these was set on the balcony rail, the sunlight created playful reflections, and the whole arrangement read as practical and slightly improvised, which fit a small-space city gardener well.
Steps
- Clean clear takeout containers thoroughly and punch or drill drainage holes if needed.
- Fill the bottoms with seed-starting mix and press seeds into the soil surface.
- Cover with lids to maintain humidity until germination occurs.
- Place containers in bright light and open lids periodically for ventilation.
- Transplant seedlings into larger pots when they are ready to grow.
Cinder block nooks for a rugged miniature nursery

A cinder block’s cavities felt unexpectedly cozy when lined with peat or liners. The rough concrete held temperature steadily and the industrial grey made greens appear almost luminous by contrast.
The weight of the block anchored a table-top display and created a small modular garden that could be reconfigured easily. There was a pleasing roughness underfoot for roots and the edges collected drips of water like tiny terraces.
The aesthetic leaned toward the rugged and permanent, which gave the transient seedlings a sense of gravitas.
Steps
- Clean cinder block cavities and line with landscape fabric or biodegradable liners.
- Add potting mix into each cavity and level the surface gently.
- Plant seeds according to depth recommendations and water lightly.
- Position the block in a location with bright, indirect light and adequate drainage.
- Move seedlings to larger containers or transplant into the garden as they mature.
Plastic bottle cut planters for vertical setups
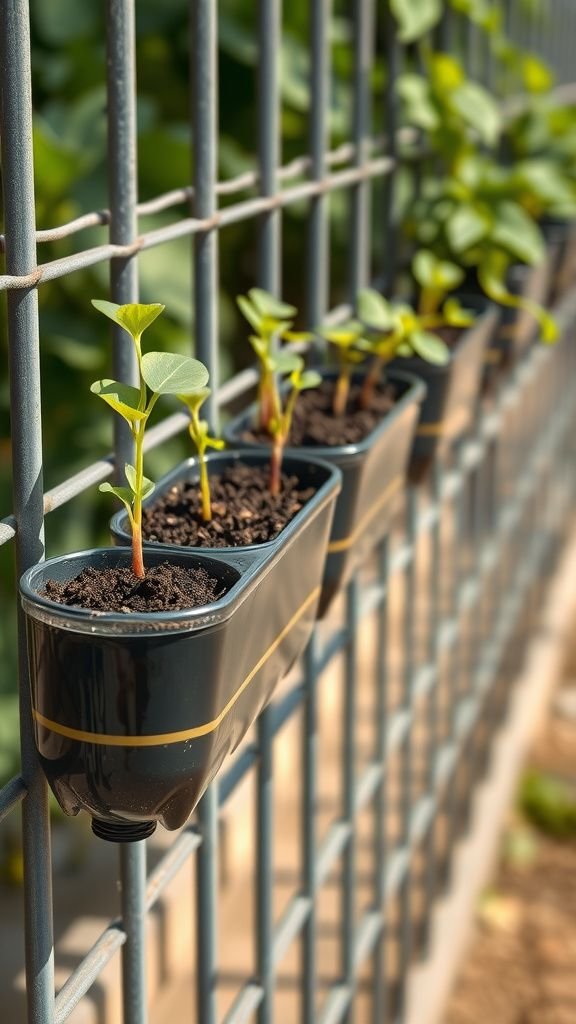
Slicing a plastic bottle into a little trough felt oddly resourceful; the glossy rim caught light and the curvature reflected sky in small arcs. The thin plastic warmed quickly in the sun and made a cozy microclimate for seedlings.
Arranging several in a hanging row created a cascading ribbon of green that made a plain fence feel intentional. The sound of water running from one trough in an overwatered moment was a tiny domestic percussion, and the whole thing read as playful, thrifty, and surprisingly decorative.
Steps
- Cut the side of plastic bottles to form open troughs and smooth rough edges.
- Add small drainage holes if necessary and mount bottles horizontally or at a slight angle.
- Fill with seed-starting mix and plant seeds at the recommended depth.
- Water carefully to avoid runoff and ensure even moisture across the trough.
- Transplant seedlings into larger pots or beds once roots develop.
Repurposed yogurt containers with cheerful lids

Bright yogurt pots felt like small containers of optimism; their colorful lids flashed like tiny flags when stacked. The smooth interior made measuring soil neat and the thin plastic warmed under sunlight to the right degree for seeds.
There was a playful, thrift-store charm in assembling a patchwork of mismatched cups, and each lid offered a way to retain moisture briefly on chillier mornings. A row of these on a sill always felt approachable and friendly, as if every cup had a small personality waiting to show itself.
Steps
- Rinse yogurt containers and poke a few drainage holes in the bottom if desired.
- Fill each container with seed-starting mix and press it lightly to remove air pockets.
- Sow seeds and top with a light dusting of soil, then close lids loosely for humidity control.
- Keep containers in bright light and adjust lids to regulate moisture.
- Pot up seedlings into larger containers when roots are established.