Easter basket filler crafts are the kind of small, joyful projects I reach for when I want hands-on fun without fuss. I remember a rainy afternoon when a pile of pastel yarn and leftover felt turned into tiny treasures that felt more thoughtful than anything store-bought.
That habit of finding cozy little projects has made DIY Easter basket filler crafts a go-to for gifts that feel personal and cheerful.
These ideas are the sort I share over coffee with friends, the simple things that tingle pleasantly when pulled from a basket. Each item here came from moments of playful tinkering and curiosity about colors, textures, and tiny surprises.
Tiny pompom chicks with soft pastel fluff
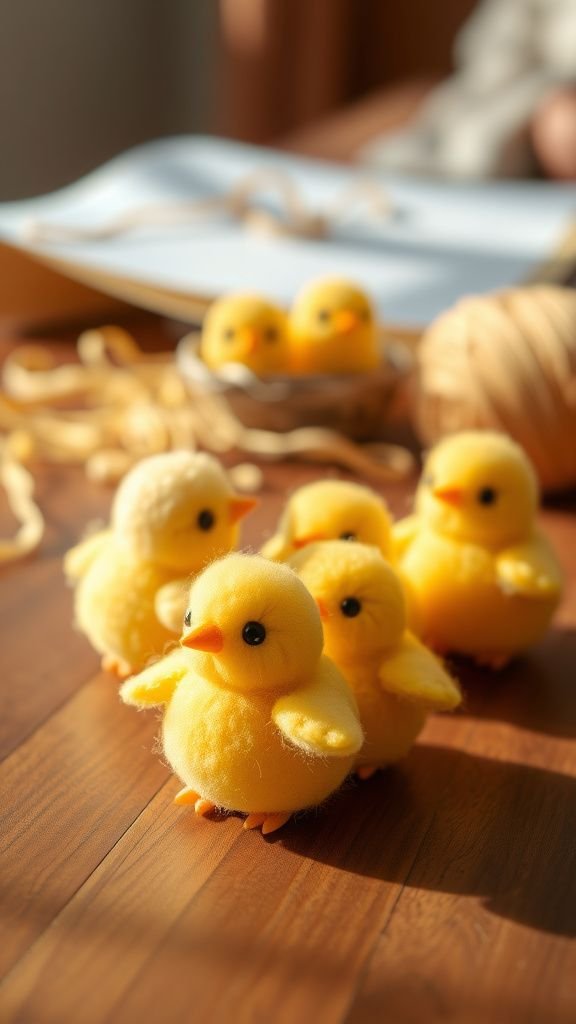
I loved the way the pompom chicks looked clustered together on my table, their fuzzy bodies catching light in a spring window. The little beaks and round eyes lent each one a personality, from mischievous to sleepy.
Holding one felt like holding a cloud of yellow and peach tones, and the faint tug of fuzz between my fingers had a comforting, tactile quality. They smelled faintly of craft room paper and past projects, bringing a cozy, nostalgic warmth to an otherwise ordinary afternoon.
Steps
- Gather yarn in pastel shades, small safety eyes, orange felt for beaks, and a pompom maker or cardboard.
- Wrap yarn around the pompom tool until dense, tie securely, and trim to shape a round chick body.
- Attach safety eyes and felt beak with a small dab of glue, fluff the pompom for an even silhouette.
- Trim stray fibers for a neat look and tuck into a tiny nest of shredded paper for gifting.
Felt bunny bookmarks with embroidered whiskers

There was something quietly satisfying about slipping a felt bunny bookmark into a favorite paperback and seeing its ears peeking out. The felt had a gentle matte texture that contrasted nicely with the glossy pages, and the tiny embroidered whiskers added a homespun touch.
I liked choosing contrasting thread colors and imagining which book each sweet face would keep company with. The soft heft of the felt made the bookmark feel comforting to hold, a small companion that brightened reading breaks with its earnest expression.
Steps
- Cut two identical bunny silhouettes from felt for each bookmark, leaving a flap for the ear portion.
- Embroider whiskers and nose on the front piece using a simple backstitch or running stitch.
- Place the two pieces together and secure the edges with a tidy whipstitch, leaving the ear region slightly open for page sliding.
- Gently press and trim any loose fibers for a neat finish.
Swirled egg-shaped crayons with bright swirls
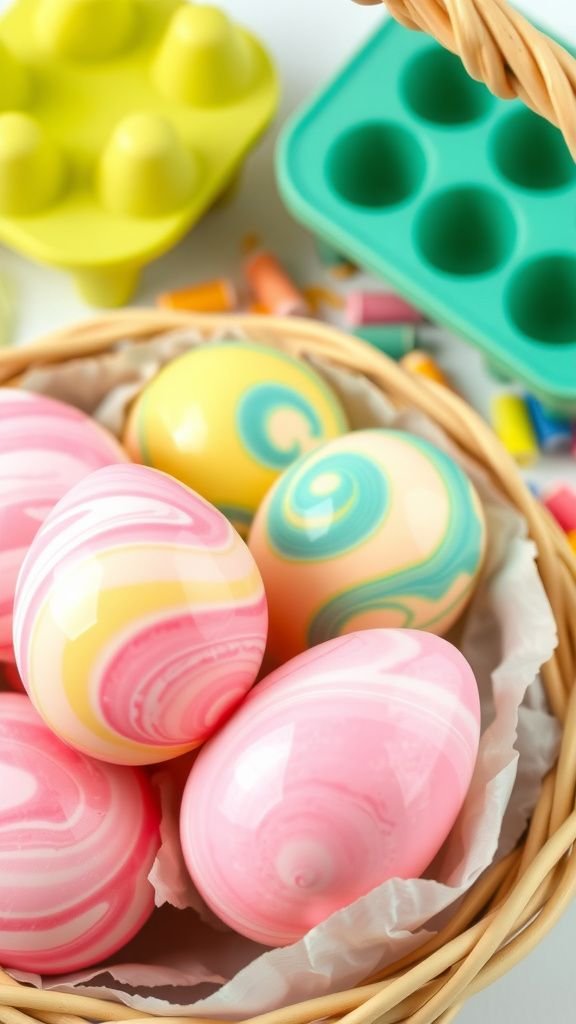
Making egg-shaped crayons felt playful in a way that brought out my inner child. The swirls of color created marbled patterns that change when held up to light, and they sat nicely in a small hand.
The wax had a faint sweet scent and a glossy sheen that caught on fingers a little, which only added to the tactile pleasure. When a few were piled inside a basket, their cheerful edges and soft clinks made a lively, almost musical presentation that begged to be drawn with.
Steps
- Break old crayons into small pieces and sort by color intensity for desired swirl effects.
- Melt the crayon pieces gently in a heatproof container, stirring until smooth and slightly blended.
- Pour molten wax into an egg-shaped silicone mold, layering colors for a marbled look and allowing them to mix slightly.
- Cool completely before removing the crayons and brushing off any residue for smooth edges.
Citrus-scented carrot bath bombs in bright orange

There was a quiet delight in the citrus scent that filled the room when the carrot-shaped bath bombs were nearby. The slightly gritty surface invited a fingertip touch, and the orange hue seemed sunnier than the weather outside.
When one lived in a small muslin bag, it felt like a fragrant treasure in the palm. The aroma lingered on hands and linens just enough to recall a lazy afternoon, and the fizzy memory of them in bathwater felt indulgent in a soft, low-key way.
Steps
- Combine dry bath bomb base ingredients in a large bowl and whisk to an even texture.
- Add oils and citrus fragrance, mixing slowly to maintain a crumbly but cohesive feel.
- Pack the mixture firmly into a carrot-shaped mold and let set until dry.
- Unmold gently, dust off excess, and wrap in a small muslin bag for gifting.
Painted river rock Easter eggs for pocket treasure

I kept a tiny painted rock on my desk for weeks, a simple egg shape in teal with speckled dots that made me smile during emails. The cool weight of the river stone and the faint gritty pattern beneath the paint felt grounding.
Little imperfections in the paintwork added character, like tiny freckles, and when a kettle hummed in the kitchen the colors seemed to glow a bit more. Tucked into a basket, these stones read like quiet tokens rather than flashy gifts, each one somehow personal.
Steps
- Select smooth river rocks shaped roughly like eggs and wash them clean before drying.
- Apply a base coat of acrylic paint and let it dry fully between layers.
- Add speckles, stripes, or tiny motifs with a fine brush and allow all paint to cure.
- Seal with a clear varnish to protect the finish and set aside to dry completely.
Plantable seed paper hearts for spring blooms

There was a tiny thrill in pressing the seeded paper between my fingers, thinking about the patch of wildflowers that might grow from it. The paper had a grainy texture, flecked with tiny dark seeds that made each sheet feel like a miniature landscape.
A faint earthy scent rose when the paper was moistened, reminding me of backyard soil after rain. Handwriting a small note on the heart turned it into a sentimental keepsake that seemed to promise a quiet, living surprise when it found a sunny spot.
Steps
- Blend recycled paper pulp with flower seeds and create an even slurry in a basin.
- Spread the mixture thinly over a screen and gently press to remove excess water.
- Once partially dried, press heart-shaped cutters lightly into the pulp and allow shapes to dry fully.
- Smooth edges if needed and pair each heart with a tiny instruction card for planting.
Tiny terracotta pots with eggshell succulents
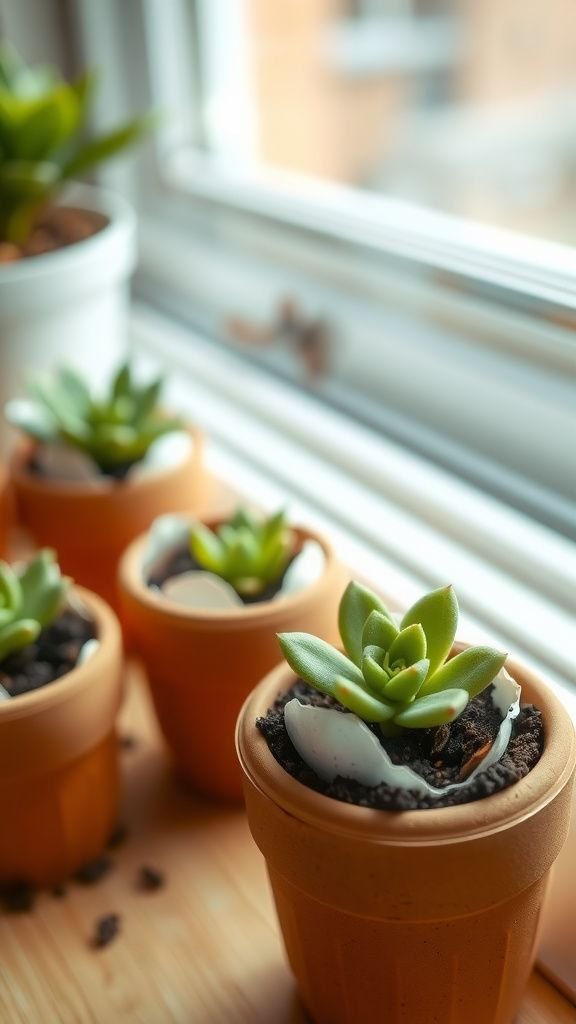
A single eggshell cradling a tiny succulent felt like a miniature world, fragile and alive at once. The cool curve of the shell contrasted with the matte terracotta of the pot below, creating a pleasing visual rhythm.
The succulents’ plump leaves had a waxy shimmer, and the faint dampness of soil carried a faint mineral scent. Placing a few on a sill made the space feel gently tended without fuss, like a soft nod to spring growth that required minimal attention but offered steady cheer.
Steps
- Gently empty eggshells and rinse, letting them dry completely before use.
- Fill each eggshell with a small pinch of succulent soil and place a miniature succulent inside.
- Nest the filled shells in tiny terracotta pots with a loose filler for stability.
- Mist sparingly and place in bright, indirect light while preparing baskets.
Beaded charm bracelets with pastel glass beads

Stringing beads became a calm ritual that let me listen to the quiet clink as each glass bead met the next. The bracelets rested lightly on the wrist with a gentle weight, and the translucent beads picked up glints of light, casting tiny reflections on my desk.
A single charm added personality, a small metallic rabbit or a tiny bloom that felt like a wink. Offering one felt intimate, the sort of small adornment that encourages a smile when put on before a day out.
Steps
- Choose an assortment of pastel glass beads and a few small metal charms for accents.
- Cut a length of jewelry cord and thread beads in a pleasing color order, sliding charms intermittently.
- Secure the ends with a strong knot and a dab of jewelry glue, then hide the knot with a crimp bead.
- Trim excess cord and attach a clasp if desired for a polished finish.
Washi-tape decorated wooden eggs with texture

The patterned strips of washi tape introduced playful rhythms to plain wooden eggs, turning them into tiny canvases. I enjoyed the layered effect where edges overlapped and the subtle sheen of the tape caught the light differently than matte wood.
The surface had a pleasant tactile contrast, slick tape against warm grain, and the designs ranged from tiny florals to geometric dots. Building a small collection of these felt like curating a miniature gallery, each egg offering a small mood or favorite color combination.
Steps
- Select unfinished wooden eggs and an assortment of washi tapes with complementary patterns.
- Wrap strips of tape around the eggs, smoothing carefully to avoid air bubbles.
- Trim excess tape with small scissors and tuck edges for a clean seam.
- Optionally sand lightly for a subtle blended look and present in a paper nest.
Marshmallow chick lollipops in pastel wrappers

There was a cozy nostalgia to the marshmallow chick lollipops sitting in a jar on the counter, their pastel wrappers reflecting a shy shine. They made small, soft sounds when shifted, and unwrapping one released a sugary scent that immediately felt like childhood afternoons.
The lollipop stick gave a satisfying length to hold, and the marshmallow had a pillowy resilience that yielded with a gentle bite. Sharing one at a kitchen table invited smiles and small conversations about favorite candies from long-ago holidays.
Steps
- Skewer marshmallow chicks onto lollipop sticks and arrange them on parchment to steady.
- Warm clear candy melt slightly and dab a tiny bit at each chick base to secure to the stick.
- Wrap each lollipop in pastel cellophane and tie with a ribbon or baker’s twine.
- Place the wrapped lollipops upright in a jar filled with shredded paper for display.
Felt carrot keychains with jingling bell charm

A felt carrot keychain felt cheerful swinging from my keys, its plush surface soft against fingertips. The tiny bell added a faint, pleasant jingle whenever the keys moved, and the stitched ridges suggested a handcrafted quality that made it feel personal.
The bright orange felt contrasted with a crisp green top, and the stitching line gave the piece a rhythm that pleased the eye. Each time the keys shifted in my bag, the little charm felt like a small, friendly presence nudging at the day.
Steps
- Cut two identical carrot shapes from orange felt and a small green tuft for the top.
- Sew the edges together with a neat running stitch, leaving a small gap for filling.
- Gently fill with fiberfill, close the gap, and stitch securely before attaching a small bell and keyring.
- Trim threads and fluff the felt slightly for a finished look.
Origami paper bunnies in pastel patterned paper

Folding a tiny origami bunny from patterned paper became a meditative break where paper creases felt like small breaths. The pastel patterns added personality to each rabbit, some floral, some dotted, and the ears sometimes leaned in amusing directions.
I liked tucking one into the corner of a card so it peeked out with a mischievous tilt. The paper edges had a crispness that contrasted with the soft shapes, and collecting a handful felt like hosting a miniature hop of paper companions on my shelf.
Steps
- Choose lightweight patterned paper squares and smooth them to remove creases.
- Follow a simple origami sequence to form the rabbit base, shaping ears and body with precise folds.
- Tuck in flaps neatly and flatten creases for a crisp silhouette.
- Arrange the finished bunnies in a small box or scatter them among basket grass.
Lavender-scented sachets in tiny linen pouches

Sachets filled with dried lavender had a calm, floral scent that followed me from drawer to drawer. The linen pouches were soft and slightly textured, cool to the touch when first picked up, warming with the feel of hands.
I enjoyed the faint rustle of the dried buds inside and the muted purple peeking through a loosely woven fabric. Tucking one into a sock drawer felt like an old-fashioned comfort, a whisper of garden air that lingered and made linens smell quietly fresh and well cared for.
Steps
- Sew small linen pouches, leaving an opening for filling.
- Fill each pouch with dried lavender buds and a small pinch of a complementary dried herb if desired.
- Close the opening with a neat stitch and add a decorative ribbon loop.
- Press gently to distribute the scent and place in baskets or drawers.
Mini chalkboard eggs for secret messages

Mini chalkboard eggs were a playful way to leave a tiny note tucked in a basket. The matte black surface invited a quick scribble, and the chalk left a soft powdery trace that wiped away cleanly.
Holding one felt pleasantly cool, like a pebble with a secret. I enjoyed imagining small messages that would fit into the oval space, little jokes or one-word wishes that read like miniature postcards.
When clustered together, the black ovals created a graphic contrast against shredded paper and pastel candies.
Steps
- Paint small wooden eggs with chalkboard paint, applying multiple thin coats for an even surface.
- Allow the paint to cure fully before chalking.
- Season the surface by rubbing chalk and wiping it off to prevent ghosting.
- Write tiny messages with chalk and tuck the eggs into baskets with a small chalk shard for rewriting.
Easter-themed hair scrunchies in soft fabrics

Creating hair scrunchies from soft fabric felt instantly gratifying, and the way they gathered light made them feel almost jewel-like on a shelf. The fabric loops had a gentle bounce and held a curl without pinching, ready to be slipped on a wrist like an accessory bracelet.
Patterns with tiny bunnies or delicate florals added a seasonal charm, and the soft cotton against skin felt pleasant and familiar. Seeing a small stack of them in a basket suggested casual style plus a hint of nostalgia for days of colorful, easy accessories.
Steps
- Cut fabric strips to a comfortable length and width for scrunchie casing.
- Sew the long edges together with right sides facing, turn the tube right side out, and insert elastic.
- Secure the elastic ends with a tight stitch and close the opening with an invisible seam.
- Gently distribute fabric around the elastic for an even gathered look.
Button-studded bunny magnets with playful faces

Button-studded bunny magnets had a cheerful eccentricity when scattered across a fridge. Each face was slightly different depending on the buttons chosen for eyes and the stitch that suggested a mouth.
The cool magnet backing contrasted with the warm buttons and plush fabric, creating a pleasing tactile mix. I liked how these small faces watched over grocery lists and drawings, turning practical surfaces into a tiny gallery.
They felt like little friends who could hold a note steadfastly while offering a bit of whimsy to daily routines.
Steps
- Cut bunny shapes from sturdy fabric or felt and layer with a backing for stability.
- Sew or glue buttons for eyes and embroider small mouths for character.
- Adhere small magnets to the back with strong adhesive and allow to set fully.
- Trim edges and arrange on a magnet-ready surface for display.
Mini confetti poppers for playful basket surprises

Holding a mini confetti popper felt like holding a promise of a tiny celebration, the paper tube cool against my palm. The confetti inside rattled gently when shaken, hinting at the small burst to come.
The paper colors were bright without being loud, and the sound they made when released had a quick, surprised joy. After the moment passed there was a sparkling scatter that dissolved into laughter and a brief cleanup that felt worth the brief burst of delight.
Steps
- Roll decorative paper around a small cardboard tube and secure both ends with tape, leaving one end slightly looser for filling.
- Fill the tube with lightweight paper confetti and a small streamer if desired.
- Seal the open end and decorate the exterior with ribbon or stickers.
- Pull the outer tube sharply to release the confetti in a cheerful burst.
Tiny lip balm tins with creamy citrus balm

A small lip balm tin fits into pockets and palm alike, its cool metal casing giving a satisfying click when opened. The balm inside glowed with a soft sheen, and the citrus scent lifted the mood like a breath of sunlight.
Applying a touch felt soothing, leaving a thin, silky layer that made lips feel cared for on a windy day. Giving one felt practical and cozy at once, the kind of small comfort that turns an ordinary moment into something a little gentler.
Steps
- Melt a blend of beeswax, butter, and carrier oil until smooth and homogeneous.
- Stir in a few drops of citrus essential oil and any coloring if desired.
- Pour the warm mixture into small tins and allow to cool and solidify.
- Label and seal each tin for gifting once fully hardened.
Eggshell candle votives with soft flicker

Watching a tiny flame nestled in an eggshell felt quietly comforting, the flame reflected in the glossy pool of wax. The shells carried their natural curvature and slight translucence, letting the light play in delicate patterns.
The scent of the wax mingled with a faint egg-white mineral note from the shell, creating an oddly tranquil mix. I liked placing one on a bedside table where its small glow read like a gentle goodnight, modest and calm rather than dramatic.
Steps
- Prepare cleaned eggshell halves and set them in a stable holder like an egg carton.
- Melt candle wax and mix in a few drops of a gentle fragrance oil.
- Pour wax carefully into each shell and insert a small wick centered in the molten wax.
- Let the wax cool fully before trimming the wick and moving the votives to their resting spots.
Tiny story scrolls tied with pastel ribbon

I wrote a few micro-stories and rolled them into miniature scrolls, then tied each with a pastel ribbon. The paper had a slight tooth that made the ink feel intentional and grounded, and unrolling a tiny tale felt like opening a pocket-sized secret.
Some of the lines were silly, others sentimental, and the hand of the writer was visible in small ink blotches and hurried cursive. Tucked into a basket, the scrolls invited curiosity and a small, private smile when read away from prying eyes.
Steps
- Write short micro-stories or notes on thin cream paper, trimming to a neat rectangle.
- Roll each paper tightly into a small scroll and secure with a dab of glue on the seam.
- Tie each scroll with a pastel ribbon or baker’s twine in a small knot.
- Slip a scroll into mini envelopes or place directly in baskets for a charming surprise.
Miniature cookie cutters with spiced sugar mix
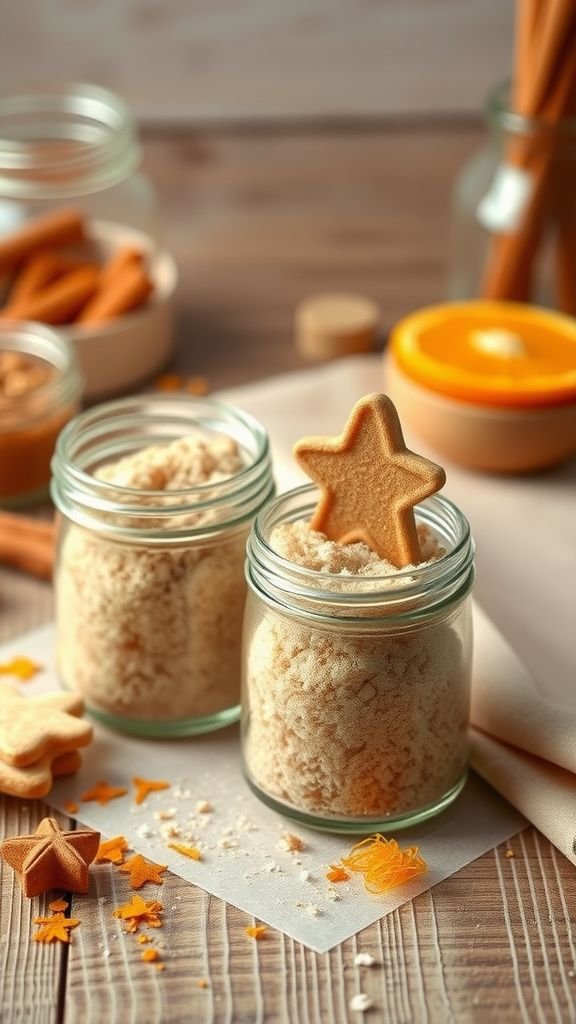
I filled little jars with a fragrant spiced sugar blend and nestled a tiny cookie cutter on top like a promise of baking to come. The sugar smelled warmly of cinnamon and citrus peel, a scent that felt almost edible before any oven heat.
The metal cutter had a cool touch and a crisp silhouette that promised shapes and indulgence. Giving this felt like offering an invitation more than a finished treat, a hint of hearth and hospitality wrapped compactly for a hopeful afternoon baking session.
Steps
- Layer a spiced sugar mix in small glass jars, pressing gently for an even appearance.
- Top each jar with a miniature cookie cutter and secure the lid tightly.
- Add a decorative label with suggested measurements and a short note.
- Finish with a ribbon or twine around the lid for a homely presentation.