I always find myself drawn to small, joyful projects when the weather softens and the calendar nudges toward spring. Cute Easter Egg Decorating Ideas have a way of turning a quiet afternoon into something playful, with pastel drips, tiny patterns, and that little thrill when an egg reveals its finished look.
I remember a rainy afternoon when a mismatched set of eggs brightened the whole kitchen counter and made tea taste like a celebration.
Talking about Cute Easter Egg Decorating Ideas feels like sharing a secret with a friend who likes color and texture. Each idea here came from trying things out, laughing at surprises, and keeping what felt right for a simple, cozy holiday table.
Soft Pastel Watercolor Swirl for Easter Eggs
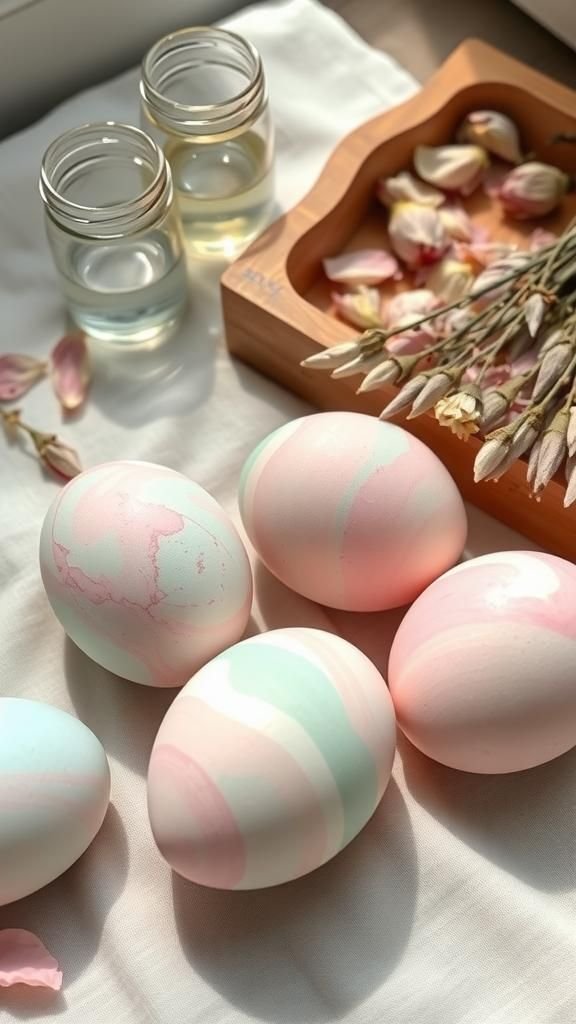
There was something tender about watching colors melt into one another across a smooth shell. The effect looked like tiny clouded skies, with edges that blurred and shimmered when light touched them.
The shells carried a faint coolness from the dyes and a faint scent of vinegar that always reminds me of old kitchen experiments. I loved holding an egg and seeing subtle bands of color, each one whispering a different mood.
The finish had a quiet glow, like a watercolor that paused mid-breath.
Steps
- Prepare a shallow bowl of lukewarm water and add dye to create soft pastel tones.
- Stir gently to form faint currents and lower an egg into the swirled dye for a muted wash.
- Lift the egg and let excess color drip before placing it on a soft cloth to dry.
- Repeat with different pastel mixtures for layered, cloudlike color depth.
Speckled robin egg effect with natural tones

The speckled look always brings to mind quiet nests and early mornings in the yard. Tiny contrasting flecks scatter across a pale blue field, as if a little bird had sprinkled stardust.
I remember holding an egg that felt like a miniature landscape, the tiny spots catching the light and offering a pleasing irregularity. The surface had a matte softness, not glossy, and the color palette felt earthy and restrained.
It was the kind of decoration that read like a gentle wink rather than a shout.
Steps
- Arrange a shallow tray and place an egg on a soft support to keep it steady.
- Mix a darker dye into a small container and flick it with a stiff brush toward the egg to create fine speckles.
- Rotate the egg to achieve an even distribution of spots and let it rest on tissue until dry.
Minimalist monochrome eggs with matte finish
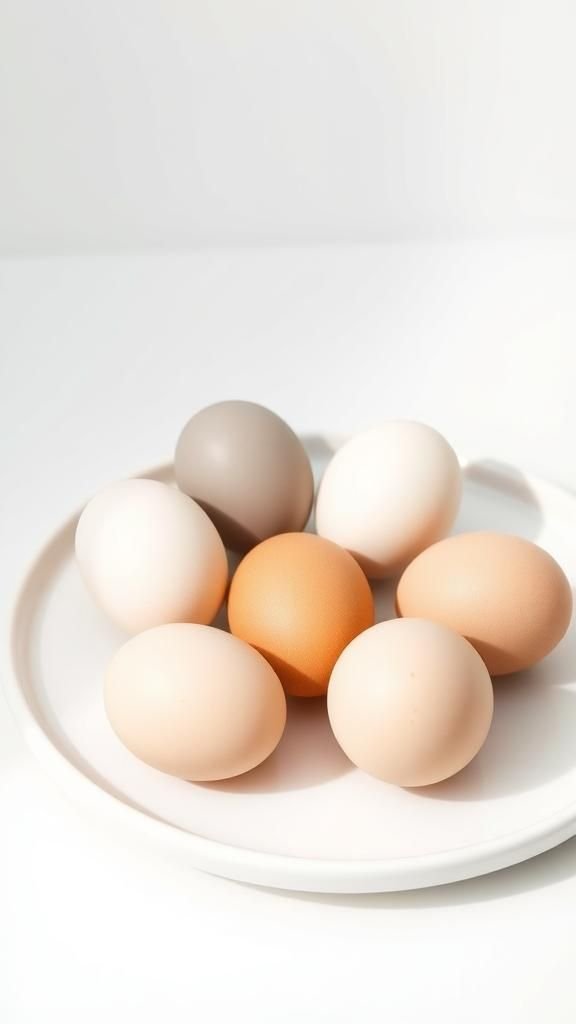
Sometimes simplicity feels like a small luxury. A single muted tone across a smooth shell carries an elegant calm that contrasts well with busier decorations.
I liked arranging a row of eggs in graduated shades, each one quiet but intentional. The matte finish wipes away glare and invites touch, making the eggs feel almost textile-like.
There was a meditative pleasure in seeing clean, unbroken color on such an organic shape, and the collection looked lovely on a plain ceramic plate where the color spoke without competing details.
Steps
- Select a muted dye shade and prepare a bowl for dipping with gentle agitation to ensure even color.
- Immerse an egg until it reaches the desired depth of hue then remove and let excess drip.
- Place the egg on a soft rack to dry naturally and repeat for a set of matching tones.
Delicate gold leaf accents for a luxe touch

I remember the first time a speck of metallic caught my eye among pastel hues; it felt like discovering a small secret. Thin glints of gold traced gentle lines or tiny dots, catching light and elevating an otherwise humble object.
The metallic bits gave a tactile contrast to smooth shells, and the shimmer introduced a little drama without feeling overdone. Holding one of these eggs felt almost ceremonial, like passing a keepsake across the table.
The gold added warmth and a hint of celebration to a cozy display.
Steps
- Prepare a clean egg surface and a tiny brush for delicate application of metallic leaf fragments.
- Gently press small pieces of gold leaf onto areas of the shell to create irregular highlights.
- Finish by softly patting edges to ensure the fragments rest flat and allow the egg to settle undisturbed.
Pressed flower eggs that feel like spring
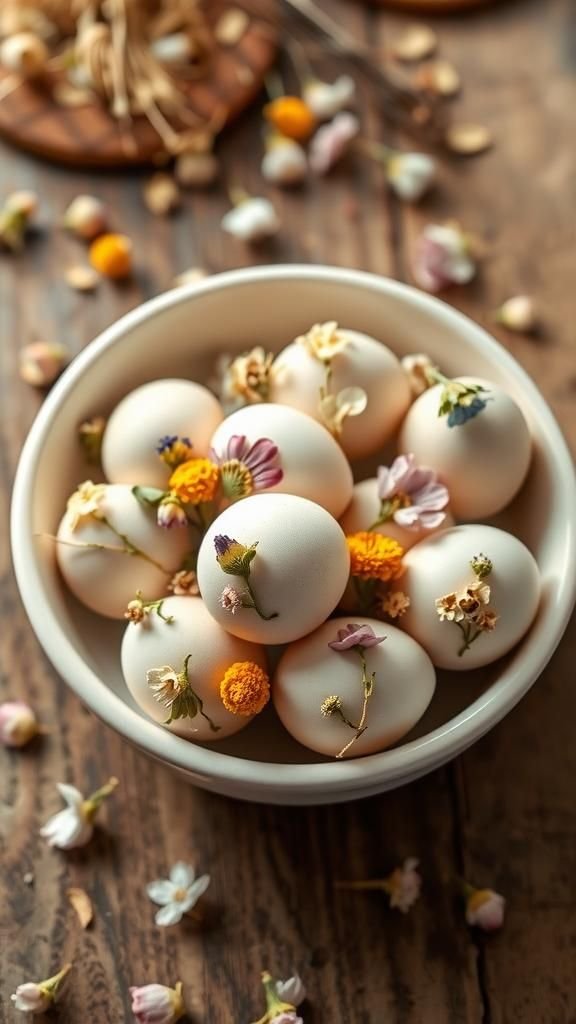
Tiny petals and leaves pressed flat against a smooth shell create an intimacy that felt like carrying a piece of garden into the kitchen. I enjoyed the mix of muted floral tones against pale backgrounds, each bloom bringing its own shape and story.
The texture was slightly raised where the petal met the shell, a gentle reminder of things found on walks and tucked safely. When arranged in a shallow bowl, the eggs read like a miniature meadow, inviting close inspection and a small sense of wonder.
Steps
- Gather delicate dried petals and choose eggs with pale, even surfaces to showcase the blooms.
- Position each petal on the shell and press gently with parchment to set it into place.
- Allow the eggs to rest until secure and arrange them together for a soft floral display.
Chalkboard eggs for handwritten messages

There was a nostalgic thrill in writing little notes on a dark, velvety surface. The chalky texture invited short messages, tiny doodles, or little names that felt personal and playful.
I liked how the contrast between the dark background and crisp white strokes made each line pop. The eggs became interactive, each one offering a friendly prompt to smile or pass along a quick sentiment.
Grouped together they read like a conversation at the table, informal and unexpectedly warm.
Steps
- Prepare eggs with a matte, dark base to create a chalkboard-like surface and let them dry fully.
- Scribble short messages or small drawings with a white chalk or chalk marker for clear contrast.
- If desired, gently wipe to alter the message and refresh the surface for new notes.
Ombre gradient eggs that melt from light to dark
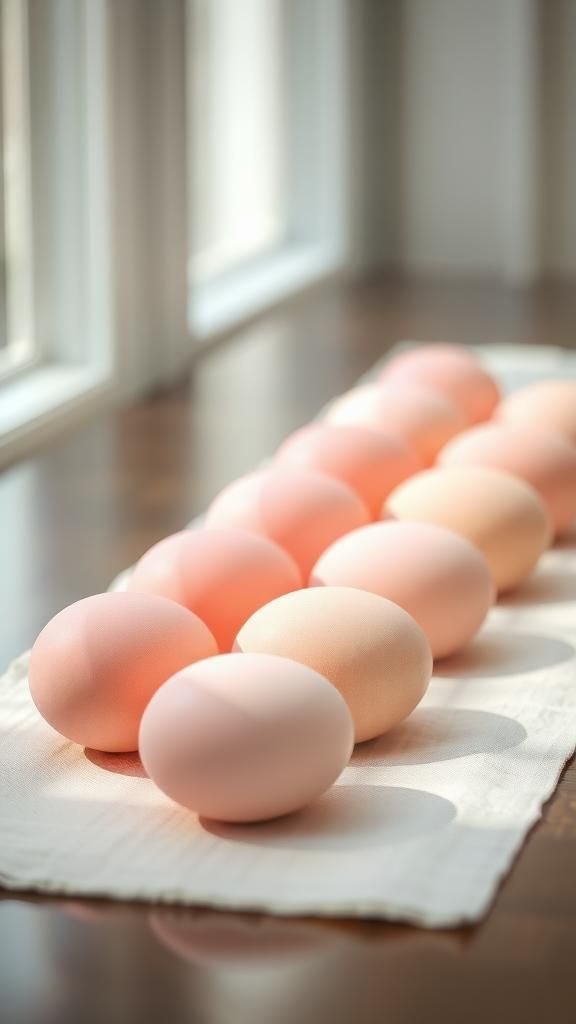
Seeing color shift gently across a curved surface felt almost hypnotic, like watching a sunset miniaturized. The eggs showed seamless transitions from pale tones into deeper hues, and the curves enhanced the effect by creating soft bands of shadow and light.
The finish had a serene rhythm, each egg carrying a subtle drama depending on how it faced the light. Lining them up in gradient order made the collection feel cohesive and thoughtfully arranged, like a small mood board for the season.
Steps
- Prepare dye bowls with graduated intensities of the same hue for a smooth color transition.
- Move an egg through the bowls progressively, allowing the top to remain lighter and the bottom to pick up richer color.
- Rest the eggs on a soft surface to dry and admire the gradual shading that forms across the shell.
Tiny doodle eggs for playful table accents

Scribbles, small faces, and whimsical shapes brought a lightheartedness that felt irresistible. The contrast of fine dark lines against pale shells made each tiny drawing read clearly, and the imperfections added personality.
I found myself smiling at a tiny mustache or a sleepy-eyed creature sitting among greens and pastels. The tactile sensation of drawing with a fine marker on a smooth surface had a quiet satisfaction, like passing a private joke at the holiday table.
These eggs felt informal and friendly, perfect for a casual gathering.
Steps
- Gather a selection of fine-tip permanent markers and clean eggs with smooth shells for clear lines.
- Sketch small faces, simple shapes, or abstract doodles directly onto the shell surface with light pressure.
- Allow the ink to set before arranging the eggs in a basket or on the table.
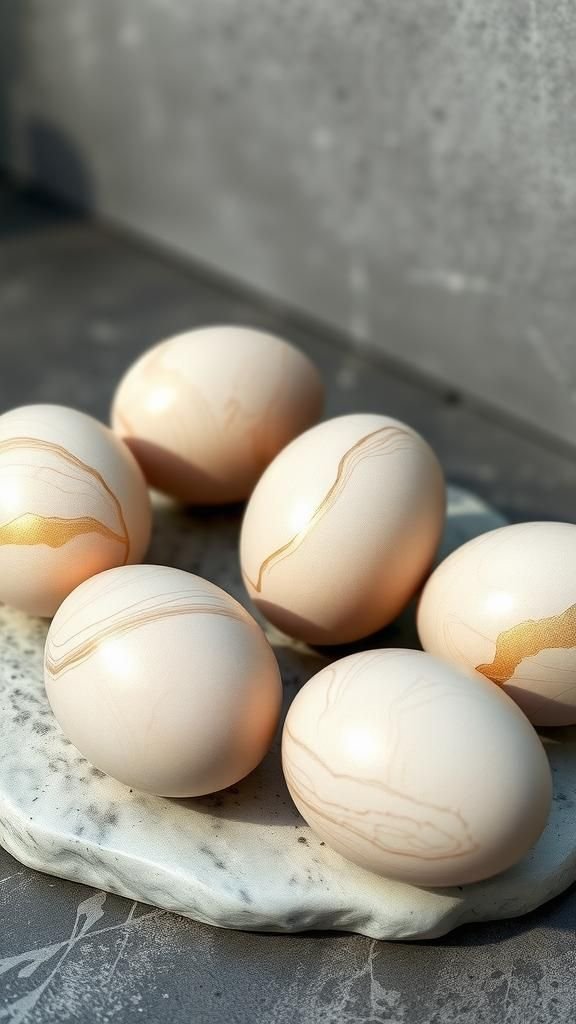
Marbled onion-skin eggs with antique charm

There was a cozy, old-world quality to eggs that carried the imprint of spices and skins. The mottled swirls and faint veins suggested kitchens that smelled of simmering stock and slow afternoons.
Each egg had a history in its appearance, with darker veins stepping across lighter fields, creating a patina that felt both rustic and refined. The surfaces absorbed light in interesting ways, and the tones blended into warm browns, deep ambers, and subtle russets that read like a faded photograph.
Steps
- Collect natural onion skins and place them close to cleaned eggs to impart rich, layered color.
- Simmer gently to encourage the skins’ pigments to transfer and create marbled veining across each shell.
- Remove the eggs and let them cool slowly, revealing warm, antique-inspired patterns.
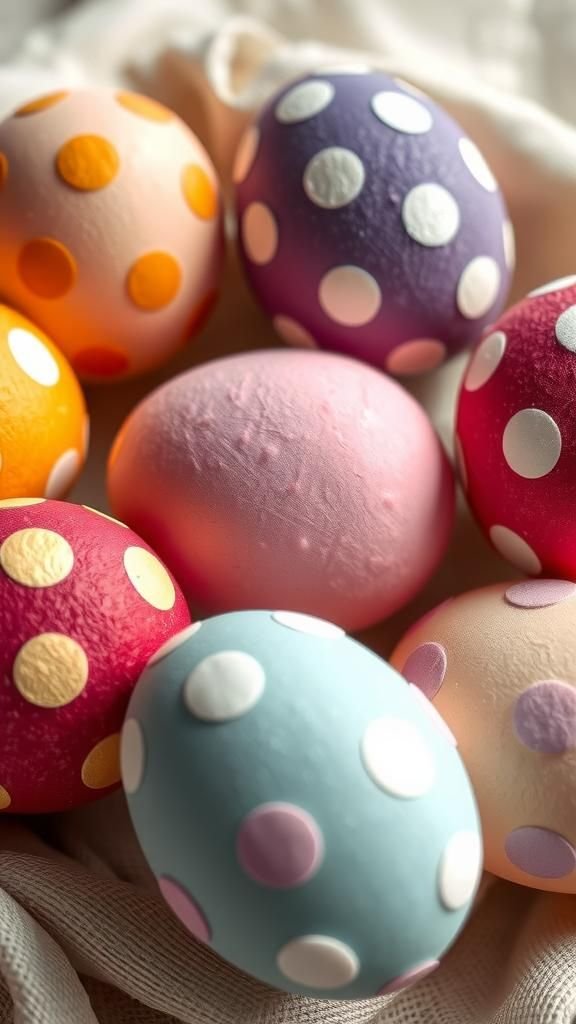
Confetti dot eggs with playful, layered specks
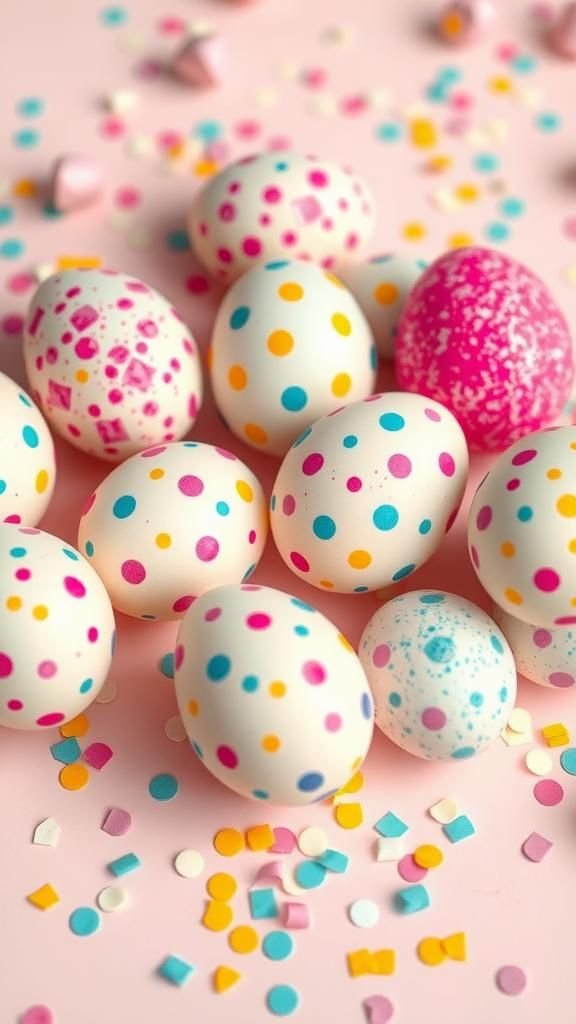
The tiny pops of color felt joyful in a quiet, childish way. Dots landed irregularly across the shell, creating a lively surface that drew the eye to every curve.
I liked how the colors overlapped occasionally, producing fresh mixes where one speck met another. The overall effect was festive without being loud, like a memory of party streamers tucked into a pocket.
Holding these eggs brought a smile, as the small imperfections and random placement felt like genuine, unplanned cheer.
Steps
- Prepare small jars of contrasting dye colors and access to a stiff-bristled brush for flicking.
- Flick the brush toward each egg to scatter tiny droplets of color across the shell surface.
- Rotate and repeat with different hues until the desired playful density of dots appears.
Lace-imprinted eggs with vintage elegance
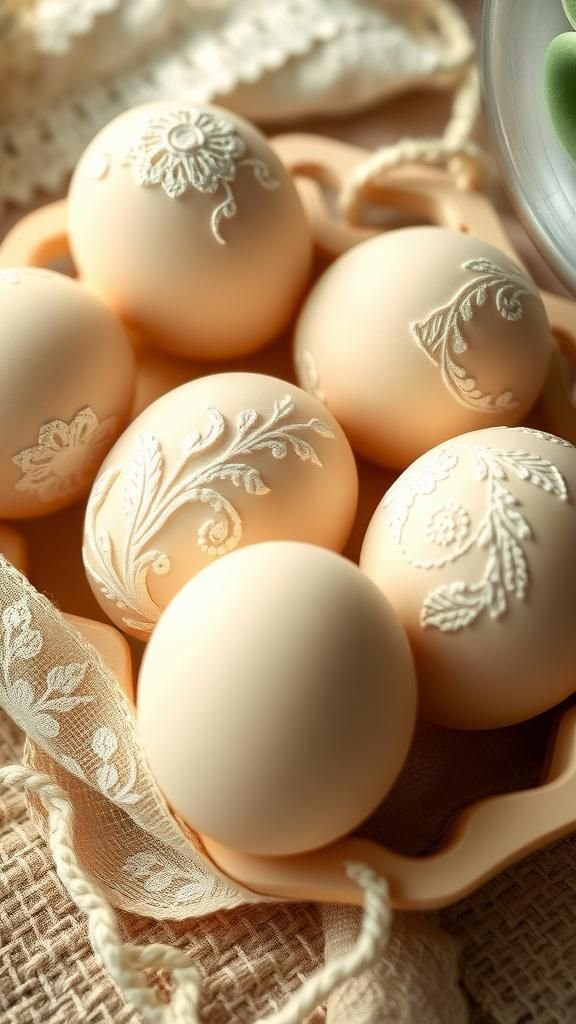
Pressing delicate lace patterns against a round surface brought unexpected grace. The filigree lines left faint, exquisite impressions that suggested heirlooms and afternoons spent near sunlit windows.
I remember the way the patterns wrapped around curves, creating miniature wallpaper for each egg. The contrast between the soft textile and the smooth shell made each motif feel precious.
When grouped together, the eggs formed a tapestry of tiny motifs, each one unique yet part of a gentle, cohesive set that felt suitable for a quiet brunch.
Steps
- Choose fine lace with interesting negative space and lay it gently over a clean egg surface.
- Apply gentle pressure with a soft cloth to imprint the lace texture into the shell’s dye or pigment.
- Remove the lace carefully and allow the pattern to set as the egg rests undisturbed.
Rustic twine-wrapped eggs with earthy appeal

Wrapping eggs in natural fibers added a tactile rusticity that felt like something found at a countryside market. The texture of coarse twine contrasted with the smooth shell, creating bands and knots that caught shadow and light.
I enjoyed how the neutral tones harmonized with wooden bowls and wildflower stems, producing a handcrafted, homespun look. The feel of the twine under the fingers and the visual rhythm of repeating coils offered a pleasing simplicity, like a small craft that celebrated texture over ornament.
Steps
- Select natural twine and begin coiling it gently around the egg, ensuring even spacing for a tidy look.
- Tuck the ends securely under neighboring loops to maintain the wrap without excess bulk.
- Trim any loose fibers and nestle the wrapped eggs in a shallow wooden bowl for display.
Bright watercolor ombré with metallic edges

Vivid washes blended into brighter zones while thin metallic rims added a crisp accent that caught attention. The sparkle traced the contours and seemed to follow the shell’s silhouette, lending a refined edge to otherwise playful color.
I liked how the contrast between glow and matte created a dynamic that felt both joyful and composed. Handling these eggs revealed subtle differences in sheen where the metallic touched the hue, giving each piece a tiny flash of personality when tilted toward light.
Steps
- Apply a gradient wash of bright dyes across the egg to form a lively color transition.
- After the wash dries, apply a narrow metallic accent along selected edges to add a defined shine.
- Let the shell rest until all elements settle and the metallic gleams consistently.
Geometric tape-resist patterns for crisp lines
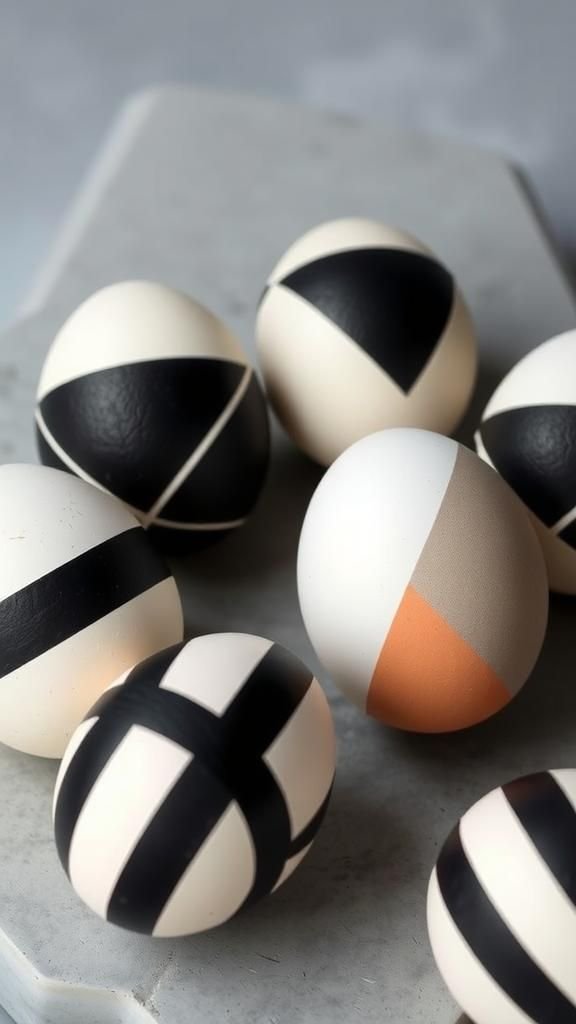
Clean, angular shapes on a curved shell created an appealing tension. The crisp negative spaces contrasted strongly with painted areas, offering a modern, graphic feel.
I enjoyed how the shell’s curvature softened sharp corners, producing pleasing visual juxtapositions. The finished eggs had a composed energy, like little sculptures with clear language.
Placing them among more organic decorations emphasized the geometry and made each piece stand out. The simplicity of shapes felt contemporary and quietly bold at the same time.
Steps
- Mask off triangular or linear areas with narrow adhesive tape to define crisp geometric boundaries.
- Apply color over the exposed shell areas and allow the hue to set completely.
- Remove the tape carefully to reveal stark, clean lines contrasting the shell’s curve.
Sun-kissed citrus dyed eggs with zesty hues
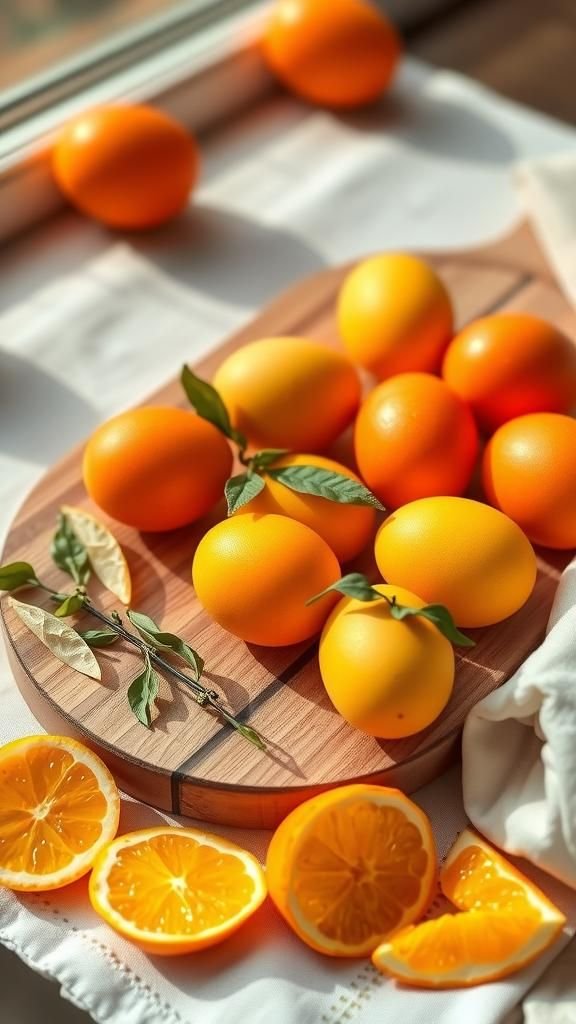
Warm, citrusy tones felt like late morning sun captured in miniature. The mix of bright orange, lemon yellow, and soft tangerine produced a cheerful palette that made the table feel sunnier.
I liked how the colors seemed to glow from within, especially when placed on a wooden surface that reflected their warmth. The scent of citrus peels left a faint impression during the process, reminding me of summer kitchens.
These eggs read as bold but friendly, bringing a playful energy to a spring spread.
Steps
- Prepare natural citrus dyes from peel infusions for warm, zesty color baths.
- Submerge eggs briefly and allow pigment to settle into the shell for vibrant hues.
- Rest the eggs on paper to dry and enjoy the sunny palette they provide.
Tiny bead-studded eggs for tactile sparkle
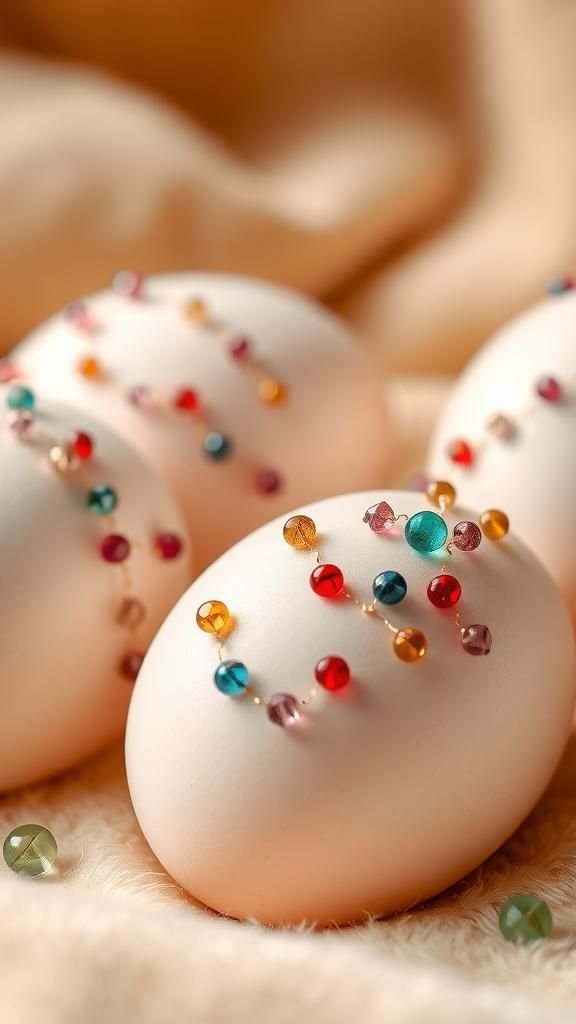
The little beads brought a playful glint and a satisfying tactile contrast to the shell. Tiny rounds caught light and created jewel-like moments that turned each egg into a miniature treasure.
I enjoyed the random rhythm of beads clustered and spaced, each placement creating its own small punctuation. The texture invited fingers to trace patterns and linger a moment longer than usual.
When displayed with neutral elements, the beads read like accent details that added a celebratory whisper rather than overwhelming the scene.
Steps
- Select an assortment of small beads and plan their placement across the egg’s surface for balanced sparkle.
- Press beads into place gently to create clusters or linear accents according to the envisioned design.
- Allow the decorative accents to set and arrange the eggs with soft fabric to protect their texture.
Felted wool egg cozies in bright, cozy colors
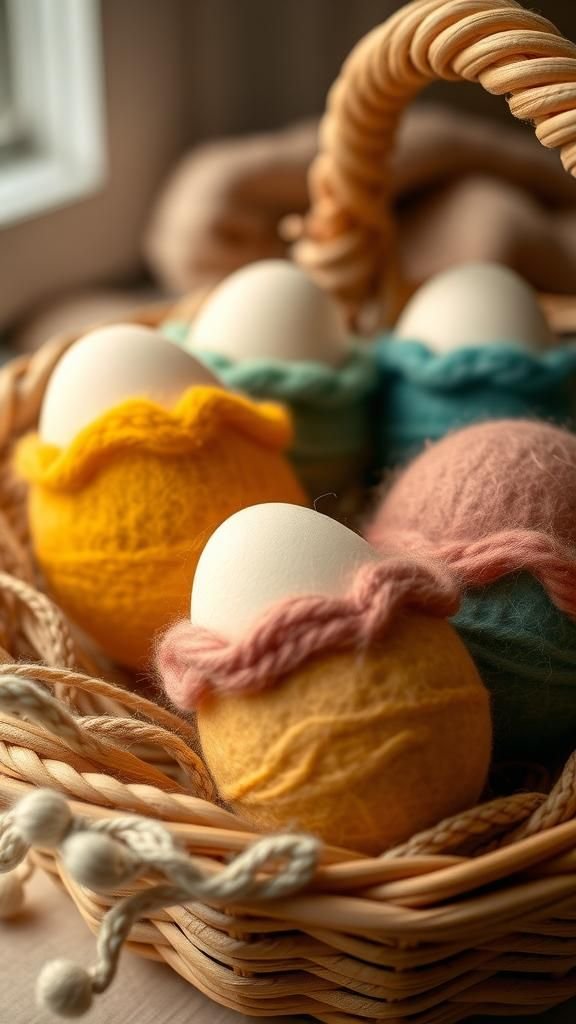
A small wool cover transformed a smooth egg into something snug and homey. The soft fibers muffled sound and added warmth to the hand, with little seams and fuzzy edges that felt comforting to touch.
I liked how the cozy colors—mustard, teal, rose—created a textile palette that contrasted with bare shells. Nestled in a basket, these eggs suggested a handmade tradition and offered a tactile invitation to pick one up.
They felt like miniature mittens, soft and protective, and added a layer of comfort to the table.
Steps
- Shape small wool pieces into snug covers and felt them until firm and cohesive for a cozy wrap.
- Slip each felted cozy onto an egg, adjusting the edge for a neat fit around the shell.
- Arrange wrapped eggs in a soft basket to highlight their textile warmth and color.
Marbleized metallic sheen with subtle veining
A barely-there metallic shimmer threaded through muted colors to create a refined metallic marble look. The veining moved like faint rivers of light, interrupting matte planes with a soft gleam that felt restrained yet luxurious.
I appreciated how the metallic caught reflections without demanding attention, offering quiet flashes when tilted. Placing these eggs among natural elements allowed the delicate shine to complement rather than compete.
The overall impression was of understated elegance, a harmonious mix of texture and faint luster.
Steps
- Prepare a base dye and apply subtle metallic washes to create delicate veining across the shell.
- Blend the metallic gently so that it integrates with the base color, forming soft marble patterns.
- Let the eggs rest until the metallic settles and the marbleized appearance becomes steady.
Patterned washi tape collage eggs that charm

Small strips of patterned paper added a collage effect that felt cheerful and approachable. The varied motifs met in unexpected ways, producing playful intersections and tiny color harmonies.
I enjoyed how the paper edges created a rhythm around the curve, and how different textures and patterns conversed when placed together. The eggs took on a collected feel, like bits found in a craft drawer assembled with an easy eye.
They were casual, colorful, and perfectly suited to a table where personality mattered more than perfection.
Steps
- Select coordinated washi tape patterns and tear or trim short pieces for varied collage elements.
- Apply the strips around the egg in overlapping arrangements to form lively patchwork designs.
- Smooth each piece so the collage sits neatly and present the eggs in a casual cluster.
Polka dot velvet eggs with soft, luxe texture
Matte velvet dots perched against a contrasting backdrop to create a plush, tactile surface. The texture invited fingers to linger and the soft pile absorbed light in a way that felt indulgent.
I liked the contrast between the smooth shell and the raised softness of the dots, which lent a velvety rhythm across the surface. When placed under warm light, the dots shifted in tone slightly, adding depth.
The overall effect was charming and a bit whimsical, like tiny velvet cushions in miniature.
Steps
- Create small velvet dot appliques and arrange them on a smooth egg surface in a pleasing pattern.
- Press each dot gently so it adheres securely and forms a soft raised texture.
- Let the eggs rest undisturbed to preserve the velvet nap and then display them on a soft cloth.
Botanical leaf rub prints with earthy greens
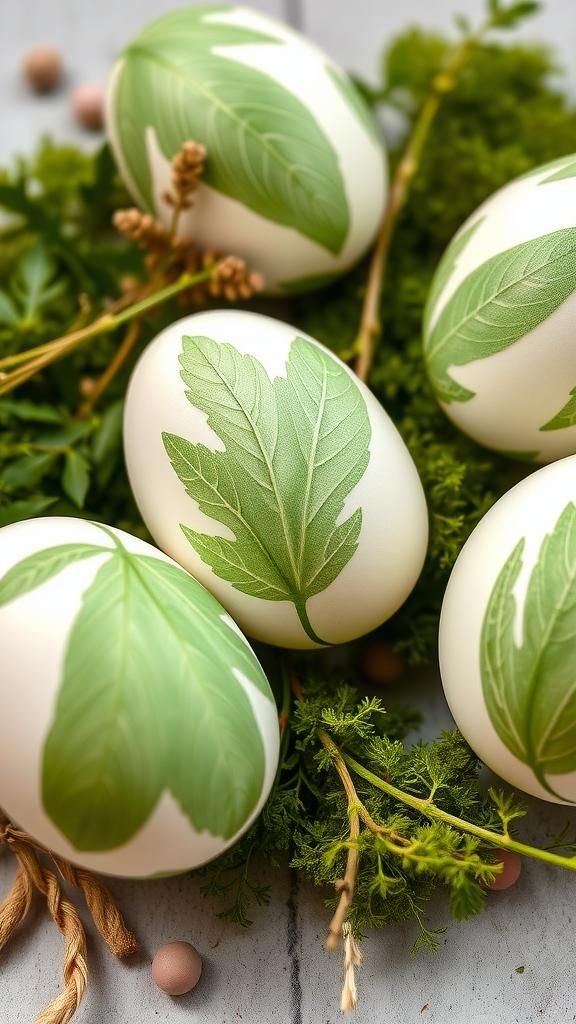
Rubbing small leaves against a shell captured the delicate vein structure in miniature. The prints read like fingerprints from the garden, each one unique depending on the leaf’s shape and pressure.
I enjoyed the organic asymmetry and the soft green tones that varied with each impression. The eggs felt like mementos of walks and quiet plant discoveries, bringing an outdoor freshness inside.
When arranged with small branches or moss, the botanical prints created a harmonious, nature-inspired vignette that felt gentle and calm.
Steps
- Select small, textured leaves and prepare them for gentle rubbing across an egg surface to transfer vein details.
- Apply even pressure while moving the leaf to create a clear imprint of its pattern.
- Let the impressions settle and arrange the eggs with natural elements for a garden-inspired presentation.