I still remember the first time I helped string colorful tissue banners across the backyard for a neighborhood celebration. The delicate paper catching the breeze, the way sunlight poured through tiny cut flowers, and the chatter as everyone admired them turned a simple afternoon into something warm and memorable.
That hands-on moment led me to try a handful of Cinco De Mayo Papel Picado Crafts that felt approachable and joyful.
Over the years I have mixed traditional patterns with playful experiments, creating everything from tiny table toppers to dramatic door swags. These Cinco De Mayo Papel Picado Crafts kept drawing people in; they made gatherings feel lighter and more festive in a way that photos seldom capture.
Bright traditional papel picado banners for entryway
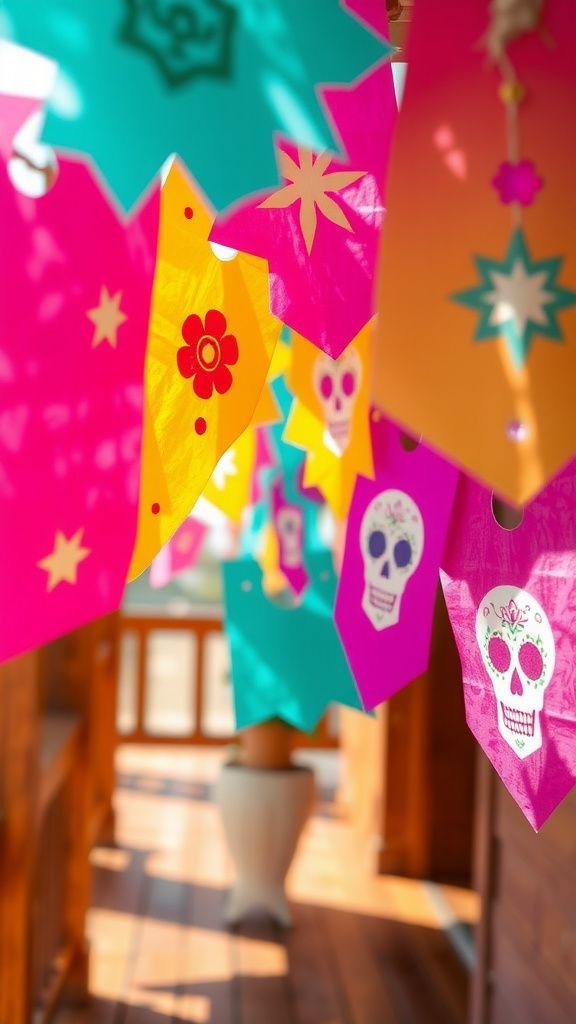
I love how a row of colorful banners at the entrance changes the whole mood of a space. The tissue paper rustles softly when a breeze passes and thin floral silhouettes send tiny sunlit shadows across the porch.
Working on a long string brings a quiet satisfaction, the way patterns repeat and alternate. When guests step inside there’s a light smile that shows up, a small moment that feels like a handmade welcome.
The palette of saffron, fuchsia, teal, and lime always seems to spark conversation and a few nostalgic stories.
Steps
- Gather sheets of tissue paper, a sharp pair of scissors, craft paper for templates, and a long length of twine or thin ribbon.
- Fold tissue paper accordion style, place a floral or geometric template, and snip along the design to reveal repeating silhouettes when unfolded.
- Hole-punch the top edges of each panel and thread them onto the twine with even spacing for a balanced banner.
Tiny tabletop garlands that whisper of fiestas

On a crowded table, small garlands feel like secret helpers that tie plates and glasses into a single scene. The mini panels sway slightly when someone reaches for salsa, and the thin paper edges throw playful patterns across napkins.
I often pick calmer colors for a daytime brunch, and bolder hues for evening gatherings; the glow of candles through the lace-like cutouts creates a flickering, cozy rhythm. It’s a subtle way to bring the essence of celebration down to tabletop scale without overwhelming the centerpieces.
Steps
- Trim tissue paper into narrow strips, fold and cut small motifs across the edges to form repeating shapes.
- Arrange panels on a short length of ribbon, overlapping slightly to make a continuous line of color.
- Tie or tape the ends under candle holders or table corners so the garland drapes gently across the surface.
Layered silhouettes for a dimensional wall display
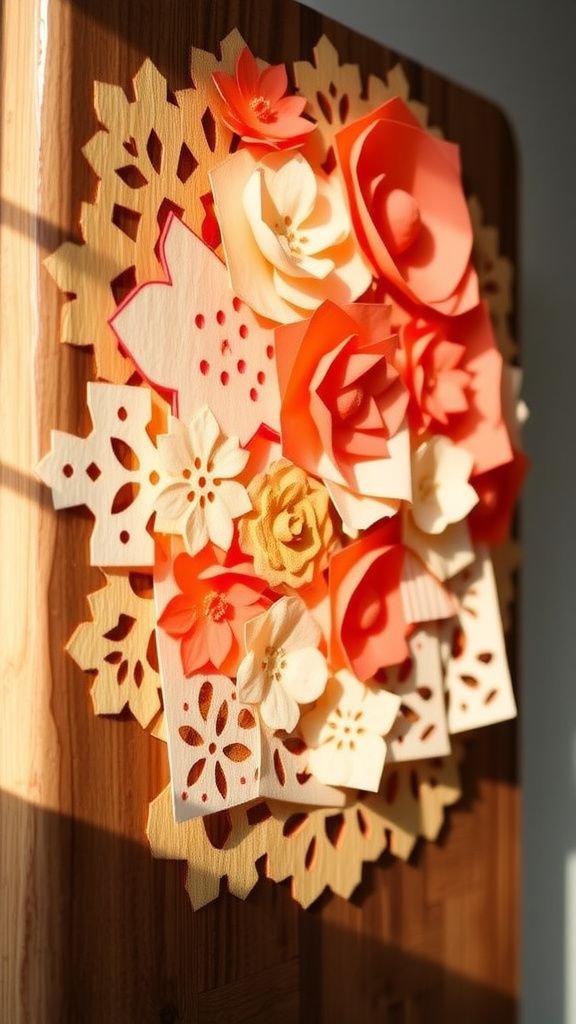
Creating a layered wall piece felt like composing a painting with paper. Thin panels with different cutouts stacked slightly askew catch light differently, giving a subtle three-dimensional effect.
I noticed how darker layers behind brighter ones made the foreground designs read more crisply, while sheer sheets softened the overall look. Mounted on a reclaimed wood backing, the whole installation has an artisan vibe that invites closer inspection.
There’s a quiet pleasure in watching shifting shadows as the sun moves across the room.
Steps
- Select several coordinating tissue paper colors and cut panels with complementary motifs, making one slightly smaller than the other for depth.
- Adhere layers with tiny dabs of low-tack adhesive spaced along the back so the edges lift slightly for shadow play.
- Mount the layered stack on a flat backing like thin wood or stiff board and hang securely on the wall.
Framed papel picado as keepsake art pieces

Framing a single panel felt like turning a festival memento into a personal heirloom. The delicate paper looks surprisingly elegant behind glass, where tiny tears and imperfect cuts read as evidence of human touch rather than flaw.
I remember choosing a deep frame that matched the paper’s hue and being pleased with how the cut edges cast faint lace-like patterns inside the frame. A few of these make great gifts that carry a tactile, handmade story – people tend to linger and ask where they came from.
Steps
- Choose a striking panel with a strong central motif and place it flat on archival backing to protect the paper.
- Center the panel in a frame with glass and add a mat for spacing so the paper does not press directly against the glass.
- Seal the frame and hang in a spot with indirect light to preserve color and paper integrity.
Metallic foil accents for evening shimmer

Adding a hint of metallic to tissue panels introduced a playful shine after sunset. Thin gold or silver sheets layered beneath cutouts catch candlelight and tiny string lights, producing a soft, reflective glow.
The contrast between matte tissue and gleaming foil felt festive without being showy, and the subtle sparkle turned an ordinary corner into a little stage. I enjoyed seeing guests slow down to look at the way light danced across patterns, as if the decorations had their own quiet heartbeat after dark.
Steps
- Place a sheet of metallic foil or mirror paper behind a punched or cut tissue panel so light can reflect through the openings.
- Secure the layers together at the edges with small adhesive tabs hidden behind the border.
- Hang the panels where soft lighting will hit them to enhance the reflective quality for evening settings.
Miniature papel picado for cupcakes and treats

Tiny banners resting above cupcakes brought a wink of celebration to dessert time. The small scale makes each piece look like couture for pastries, and the delicate lace-like edges cast fun little shadows over frosting swirls.
I recall making a handful in cheerful colors for a backyard picnic, where they made the sweets table feel planned and playful without being precious. The bite-sized decorations made dessert feel like a tiny party within the larger gathering.
Steps
- Cut small rectangles of tissue paper and create simple cutouts like hearts or stars along the bottom edge.
- Attach two toothpicks to opposite sides of the mini panel to form a tiny banner.
- Place each mini banner gently atop cupcakes or small treats for a festive finishing touch.
Papel picado place cards that double as decor

Turning name cards into tiny cut-paper panels made seating feel less formal and more playful. The paper flutters slightly when passed across a table and the hand-lettered names peek through lacy edges.
I enjoyed selecting coordinating tones so each guest’s card matched their napkin or plate, which gave a small sense of thoughtfulness without fuss. Seeing someone smile when they find their card tucked under a tiny banner is a simple pleasure that sets the tone for a friendly meal.
Steps
- Cut individual card-size rectangles from sturdy tissue-backed paper and fold to stand upright if desired.
- Add a small cutout or punched design along the edge and write each name clearly with a fine-tip marker.
- Place the cards at settings where the colors complement table linens and centerpieces.
Interactive pinwheel panels for playful motion

Panels mounted as tiny pinwheels added kinetic joy to a porch breeze. The folded sections turned lazily and threw different patterns as they rotated, almost like small wheels of color.
I remember lining a string of them along the fence and watching kids chase their shadows in the yard. The movement felt childlike in the best way, bringing a dynamic rhythm to the day.
The soft rustle and slow spin created a gentle, moving charm that kept drawing glances during the afternoon.
Steps
- Create square panels with radial cutouts and score lines for gentle folding toward the center.
- Pin each folded center to a thin dowel or skewer with a small bead spacer so the wheel can spin.
- Anchor the dowels in planters or lightweight holders so the pinwheels rotate freely in the breeze.
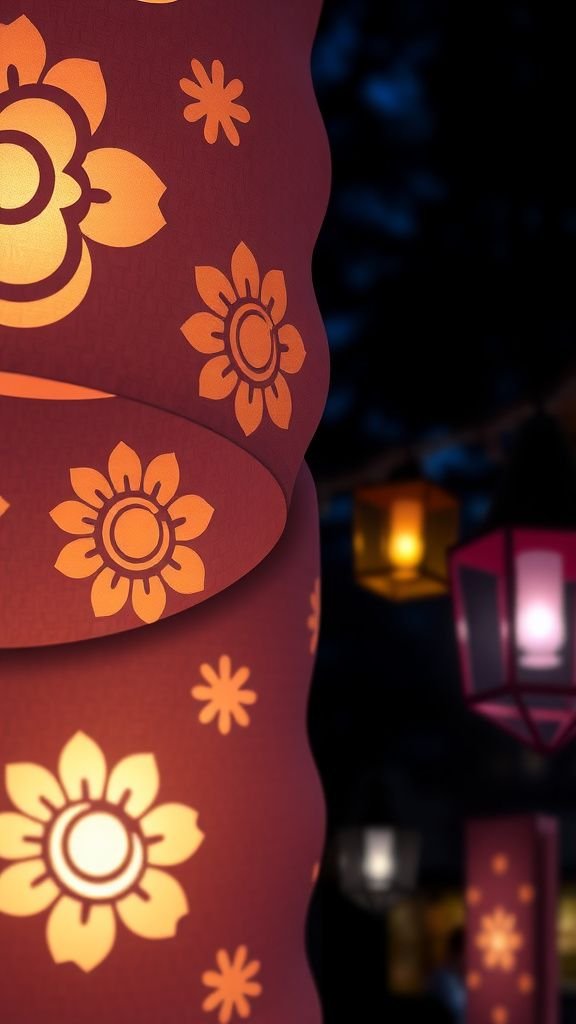
Paper-lantern hybrids with papel picado sleeves

Slipping cut-paper sleeves over simple lanterns created an illuminated lace effect that felt both festive and gentle. The warm glow through patterned openings vignetted the room in soft shapes, turning ordinary illumination into a decorative moment.
I tested a few combinations of shapes and colors, and preferred sleeves that allowed the light to bloom rather than overpower. Hung low over a dining area, they provided a cozy halo that invited conversation and slow laughter, like the lighting itself was part of the gathering’s personality.
Steps
- Construct or source plain paper lanterns and measure tissue paper sleeves that will slide snugly around them.
- Cut or punch decorative patterns into the sleeves and slide them onto the lanterns, securing gently at seams.
- Hang lanterns at varying heights with soft warm bulbs or LED candles to create layered ambient light.
Table runner made of interlocked papel picado panels

A long runner composed of interlocked panels felt like a textile made of paper. The repeating motifs guided the eye along the table and connected centerpiece elements into a coherent scene.
As people reached for dishes the panels shifted slightly, leaving traces of movement that made the surface feel alive. I found that alternating bright and muted tones created a pleasing rhythm, and the thin paper edges added a fragile, handmade quality that encouraged slower, more appreciative moments during the meal.
Steps
- Cut multiple rectangular panels of matching width and alternate colors to form a long sequence.
- Overlap the panels slightly at the edges and secure with small invisible tabs to create a continuous runner.
- Lay the runner down the center of the table, arranging it beneath centerpieces and dishware for coordinated styling.
Papel picado confetti pockets for favors

Folding small pockets from patterned sheets made favors that felt intimate and cheerful. The little pouches cradled confetti or tiny tokens, and the intricate fronts hinted at treasures inside without revealing them entirely.
I remember handing a few out at the end of a meal and seeing recipients linger, turning the pocket to admire the craftsmanship. The tactile quality of the paper plus the surprise of contents made these small gestures linger in people’s memories longer than a quick thank-you might.
Steps
- Fold rectangular pieces of thicker tissue or light cardstock into simple pocket shapes and secure side seams with small adhesive strips.
- Decorate fronts with cutout panels or punched motifs for a window into the contents.
- Fill pockets with confetti, sweets, or small keepsakes and tie a narrow ribbon at the top.
Child-friendly templates with simple shapes and stars

Working with kids on simplified panels led to lots of giggles and proud moments. Bold, straightforward shapes like stars, hearts, and suns were easy for small hands to trace and snip, and the bright colors kept attention steady.
I noticed how the process encouraged quiet teamwork as children compared patterns and helped each other line up holes. The finished pieces looked delightfully unpolished in all the right ways, full of personality and intent more than precision, which felt like a small festival of its own.
Steps
- Prepare template sheets with large, easy-to-follow shapes printed on sturdier paper suitable for little hands.
- Guide children to fold simple panels and snip along big, rounded shapes with safety scissors.
- Assemble their panels onto a short string or display board so everyone’s work can be admired together.
Monochrome panels for a modern elegant twist

A set in only one color felt unexpectedly refined and modern. The single hue allowed the cut patterns to read more like textiles than party decor, and the subtle variations in shadow added quiet complexity.
I tried a midnight blue collection that looked almost like lace against a pale wall, and the restraint turned heads in a pleasantly understated way. The monochrome approach proved that pared-back color can still be festive when pattern and placement do the storytelling.
Steps
- Choose one strong paper color and cut multiple panels with complementary patterns that vary in scale.
- Mount panels at consistent intervals on a matching ribbon or thin dowel to keep the presentation unified.
- Install the set in a prominent location where the single-color palette complements surrounding decor.
Recycled-paper designs with map fragments

Using old maps introduced patterns and stories into each panel. The faint printed lines and place names peeked through the lace-like cutouts, lending a sense of journey to every banner.
I enjoyed selecting map pieces for destinations that had meaning to friends and family; the subtle geography made guests smile when they recognized a coastline or town. The recycled feel paired well with earthy color choices and added an eco-minded twist without sacrificing the cheerful spirit of the paper decorations.
Steps
- Source old maps or atlas pages and reinforce them with a light backing so they hold up to cutting.
- Trace or freehand motifs into the map paper and cut carefully to preserve map details within the shapes.
- String panels together, alternating map panels with plain tissue ones for contrast.
Silhouette skyline panels for local pride

Cutting a skyline into a long strip felt like stitching a city into the party. The geometric silhouettes of rooftops and towers looked striking against a sunset, each notch and spire throwing clean, rhythmic shadows.
I made one for a hometown celebration and enjoyed how familiar shapes sparked quick conversations about favorite streets and memories. The skyline approach connected place and celebration, making the decorations feel rooted in local stories rather than generic festivity.
Steps
- Sketch a simplified skyline outline on a long strip of paper, marking key building shapes for negative-space cutting.
- Carefully cut out between the skyline peaks to create clear silhouettes and maintain structural integrity at the base.
- Hang the skyline strip stretched across a wall or between posts where backlight will emphasize the outline.
Fold-and-cut rosettes with framed centers

Rosettes made from layered papel picado panels felt ornate and playful, like little medallions. The folds gave structure and volume, while a framed central motif provided a focal whisper amid the ruffles.
I remember making a series in autumn tones that looked surprisingly mature and gallery-ready when clustered together. They have a celebratory gravitas that works well over mantels or as a focal wall element, offering both texture and a hint of theatrical flourish without feeling overdone.
Steps
- Create circular panels from tissue paper and accordion-fold concentric rings for volume.
- Layer the folded rings around a central cutout motif and secure the layers at the back with small tabs.
- Mount rosettes on a wall in an arranged cluster or hang singly for a sculptural accent.
Papel picado mobiles that drift over a table

Suspended mobiles introduced movement and lightness, where each dangling panel turned independently and created gentle choreography above guests. The combination of small shapes and open spaces let air pass through, producing a soothing, staccato rustle.
I assembled a few in graduated sizes so the mobile felt balanced and delicate, and enjoyed how the whole installation read like a slow, paper constellation. Over a dining area it offered an airy canopy that made the meal feel like part of an unfolding scene.
Steps
- Cut panels in graduated sizes and attach them to varying lengths of thin monofilament or ribbon.
- Arrange and balance the hanging lengths on a lightweight hoop or frame so the mobile hangs evenly.
- Suspend the mobile above a table or seating area where gentle air movement allows soft rotation.
Glow-accent panels for dusk and late-night sparkle
Adding phosphorescent accents to certain cutouts created quiet moments of surprise as dusk fell. Under dim light the glowing bits became tiny constellations within the paper, offering a gentle after-dark delight.
I tested blacklight-reactive paints applied sparingly behind cutouts; the effect was subtle and whimsical rather than neon-brash. When guests moved between lit and unlit spaces, the panels seemed to wake and fall asleep, giving the evening an ebb and flow that felt both playful and restful.
Steps
- Select small areas of the paper panels for glow paint or blacklight-reactive pigment and apply thinly behind open cutouts.
- Allow the pigment to dry completely and test under dim light to ensure the glow is visible without overpowering.
- Hang panels in areas that receive soft evening light or under discreet blacklight for a gentle nighttime effect.
Geometric modern cuts for clean contemporary feel

Sharp triangles, repeating hexagons, and crisp lines gave papel picado a modern edge that felt fresh. The geometry read like a graphic rhythm across a wall, and the tension between rigid shapes and fragile paper created an appealing visual contradiction.
I paired stark black and white panels with a single accent color to keep things restrained yet lively. The result was a set that fit easily into more modern interiors while still carrying the cheerful spirit of cut-paper craft.
Steps
- Draw bold geometric patterns onto stiffer tissue or light cardstock to hold sharp edges.
- Carefully cut shapes with a craft knife on a safe cutting surface for clean lines.
- Mount panels evenly on a contrasting backing or string them in a neat linear display for a contemporary look.
Papel picado crowns for playful wearable accents
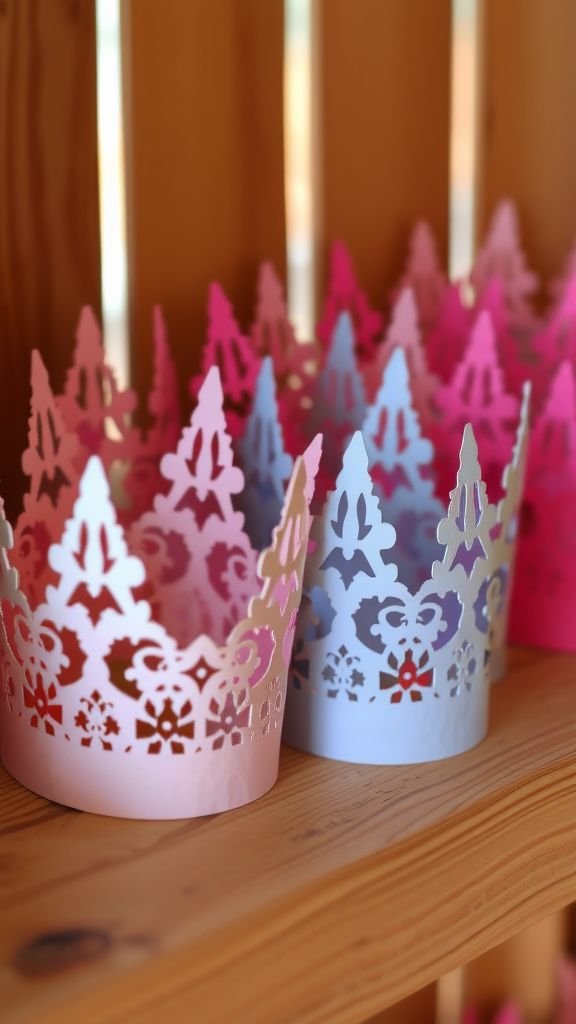
Tiny crowns made from reinforced paper felt delightfully ceremonial when placed on heads. They were light enough to stay comfortable and the cutouts lent an airy crown-like lace that looked charming in photos.
I once made a batch for a small birthday within a Cinco de Mayo picnic, and the sight of kids and adults alike wearing paper crowns added an element of make-believe that lasted well into the afternoon. It’s a lighthearted accessory that reads joyful without being over the top.
Steps
- Measure head circumferences and cut long strips of reinforced paper to the appropriate length.
- Decorate the strips with pointed cutouts and a central motif, then join the ends to form a crown.
- Add a narrow internal strip or soft padding at the base for comfort during wear.
Window hanging panels that catch morning light

Hanging panels in a sunny window felt like installing a seasonal stained glass made of paper. Morning sun revealed crisp shadows and the thin paper seemed to glow from within, filling the room with patterned warmth.
I appreciated how the panels softened harsh light while still letting the day feel bright and open. The effect drew quiet awe from early risers sipping coffee, turning a simple morning into a slow, decorative ritual that felt refreshingly domestic and celebratory at once.
Steps
- Cut panels sized to fit window panes and reinforce edges lightly so they hang flat.
- Attach small suction hooks or slim rods to the top of each panel for neat suspension.
- Arrange panels at varying heights to create layered light and shadow effects during morning hours.