I always get pulled toward anything with tassels and fluffy pom poms. There’s a warm, tactile joy in running my fingers over yarn bundles and watching colors mingle, and Boho Tassel And Pom Pom Crafts have become my favorite small creative escape.
I keep a little basket of leftover yarn and beads by the sofa, and making a quick tassel or stringing pom poms feels like a tiny pause in a busy day.
These boho projects bring texture and a handmade feel to ordinary corners. Playing with thickness, fringe length, and color combinations has led to some of my favorite cozy accents around the house, from soft wall pieces to playful garlands that lift a shelf or doorway.
Layered tassel wall hanging with soft textures
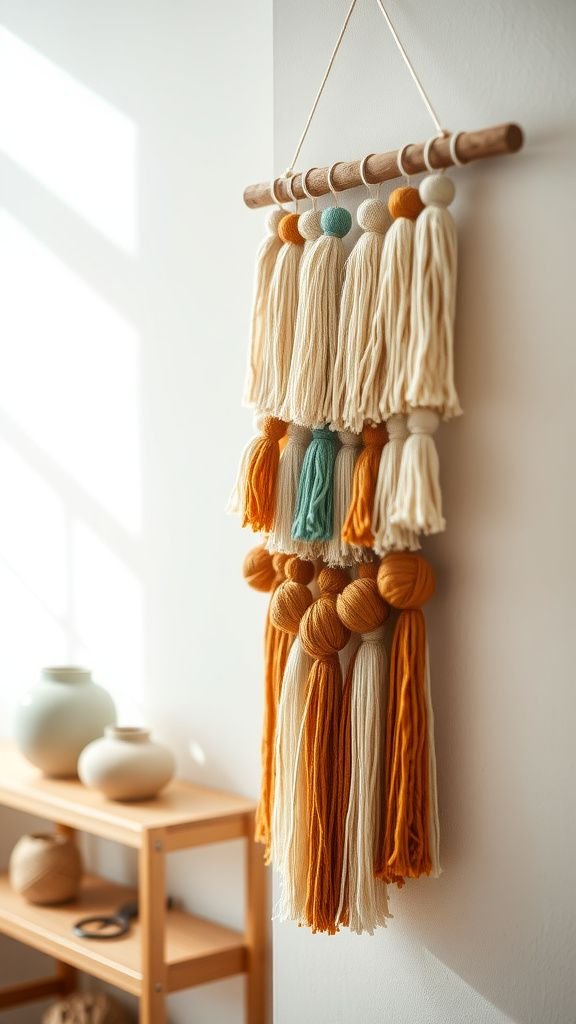
I remember making my first layered tassel wall hanging on a rainy afternoon, fingers sticky with glue and yarn fibers clinging to the table. The finished piece had a quiet rhythm, long tassels swaying slightly when the heater clicked on.
Wool and cotton created contrast that felt both rustic and gentle, and the fringe caught light differently across its strands. Hanging beside a window it added a tactile warmth that paper prints never did, and passing my hand along the layers felt like reading a beloved, worn book.
Steps
- Cut a wooden dowel to the desired width and prepare yarn bundles in three or more color groups.
- Fold each yarn bundle in half, loop them over the dowel, and pull strand ends through the loop to secure each tassel.
- Trim the tassel bottoms into a tapered shape and arrange the tassels along the dowel to create layered rows.
- Wrap the dowel ends with thin yarn for a finished look and tie a hanging cord at each end of the dowel.
- Adjust tassel spacing and trim any uneven ends until the hanging has a balanced silhouette.
Playful pom pom garland for mantel or doorway

I strung a pom pom garland across my fireplace last winter and it felt like wearing a cheerful scarf indoors. The pom poms bounced when the dog nosed at them, and their fuzzy edges softened the straight lines of the mantel.
Mixing chunky yarn with thin wool created a lively rhythm, while the color palette—muted pinks, mustard, and cream—kept the effect boho rather than childlike. The garland added a cozy punctuation to the room and became a small ritual to lift the space whenever I walked by.
Steps
- Wind yarn around a pom pom maker or cardboard template until dense, then tie securely in the center and cut loops to form a pom pom.
- Fluff and trim each pom pom into a round shape and repeat to make a collection in chosen colors.
- Thread a length of sturdy cord through each pom pom center or tie them individually onto the cord at even intervals.
- Hang the finished garland across a mantel, doorway, or over a bed and adjust spacing so the pom poms hang evenly.
Tassel keychain with beads and leather accents

My keys feel noticeably happier since I added a tassel keychain with beads and a leather loop. The leather brings a grounded contrast to the light, airy yarn, and when it brushes against my handbag it makes a soft, satisfying shush.
Metallic beads catch brief glints of light, while the tassel ends sometimes pick up tiny threads from the lining and wear in a way that gives the piece personality. It has become a small ritual to find my keys by touch and sound before checking pockets, which feels oddly comforting.
Steps
- Gather a small leather strip, a metal key ring, a handful of beads, and yarn for the tassel.
- Fold the yarn bundle, secure it beneath the leather loop with strong thread or thin cord, and slide beads onto the hanging yarn or the leather for decoration.
- Attach the leather loop to the metal key ring and trim the yarn ends to form an even tassel.
- Add a dot of clear glue inside the leather fold for extra hold and let dry before using.
Pom pom plant hanger accents for trailing greens

There’s something delightful about seeing a pom pom peeking out from a hanging plant. I added small pom poms to a macramé plant hanger and the contrast between the wooly fluff and the glossy leaves became a playful conversation.
In afternoon sun, the pom poms throw little soft shadows on the pot, while dew on the leaves catches light and makes the scene feel lush. The added texture makes the plant display feel curated and a little whimsical, like an everyday corner that was quietly dressed up.
Steps
- Make small pom poms in coordinating colors and trim them to a neat, compact shape.
- Tie or stitch the pom poms onto the macramé cords at random or evenly spaced intervals along the hanger.
- Secure knots with a dab of glue inside the pom pom center for longevity and let fully set before hanging the plant.
- Place a potted trailing plant into the hanger and ensure the pom poms sit clear of soil and water exposure.
Tasseled lampshade trim for warm evening light

I once swapped a plain lampshade trim for a handmade tasseled edge and the lamp suddenly felt more intimate. The tassels caught the lamp glow and created a soft halo as the fringe swung with tiny drafts.
The tactile fringe offered a slow-motion curtain of shadow and light that made the room feel like a small, cozy nook. Choosing mid-weight yarn gave each tassel a gentle, structured drop, and the mix of warm neutrals brought a quiet richness that looked right at home next to worn wood furniture.
Steps
- Measure the lampshade circumference and prepare tassels of equal length and quantity to wrap around the shade edge.
- Secure each tassel to a narrow cotton trim or ribbon by looping or tying, spacing them evenly as you go.
- Adhere the trim to the lampshade edge with fabric glue or a strong double-sided tape suitable for fabric.
- Allow the adhesive to set thoroughly before replacing the lampshade on the lamp to prevent shifting.
Boho pillow with tassel fringe around edges

I tucked a tasseled fringe onto an old cushion cover and it felt like giving an old friend new shoes. The fringe adds a rhythmic softness along the edges and the tassels sway when someone leans back, creating a subtle motion that makes a couch feel lived-in.
Mixing a chunky wool fringe with thinner accent tassels created a layered look that invited touch. The contrast between the woven pillow fabric and yarn fringe produced a sensory mix—textural and approachable—that made guests reach for the cushions more often than before.
Steps
- Measure the pillow edges and prepare a length of fringe or small tassels to cover the perimeter.
- Pin the fringe along the pillow seam allowance and sew in place with a matching thread using a sewing machine or hand stitch.
- Reassemble the pillow cover and fluff the pillow insert so the tassels drape outward naturally.
- Trim any uneven tassel ends for a neat, intentional finish and smooth the fringe with a soft comb if needed.
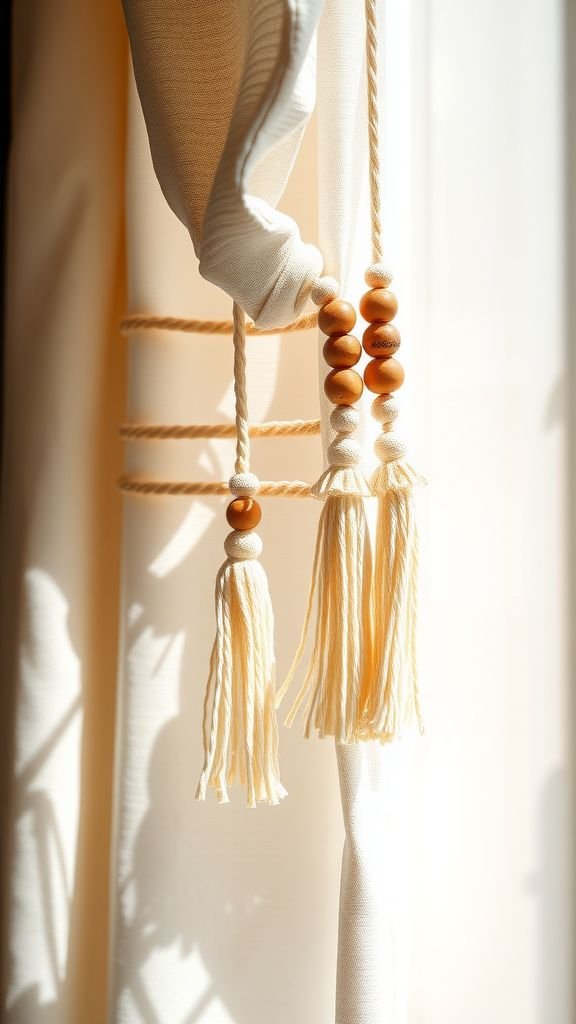
Tassel curtain tiebacks with wooden bead accents
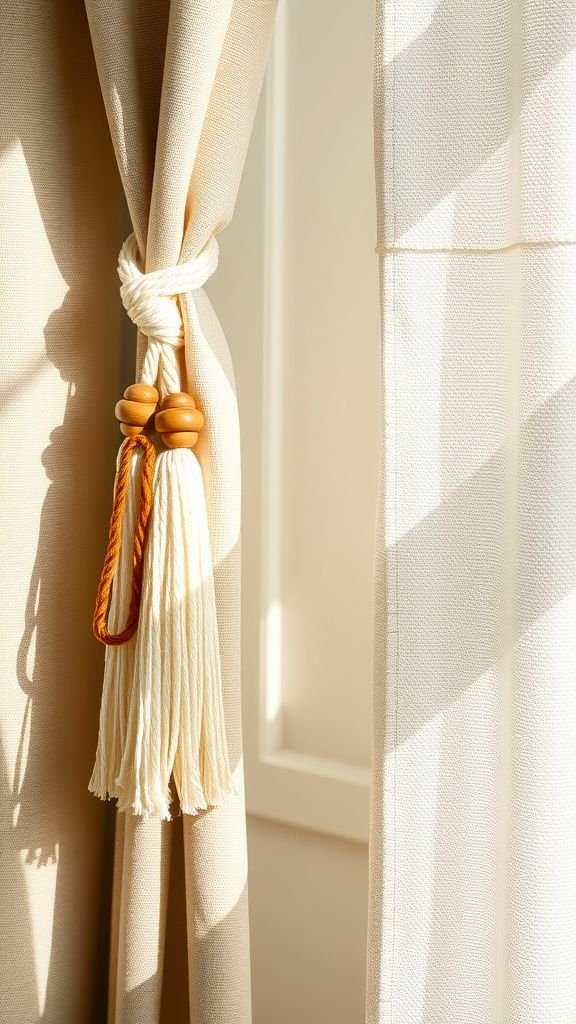
Curtain tiebacks with tassels softened the doorway in a way I didn’t expect. Each tieback had wooden beads that clicked softly when the curtains moved, adding a low, gentle rhythm to the room.
The tassel’s weight pulled the curtain fabric into graceful folds and the tactile cord offered a familiar handle to sweep the curtains aside. I liked how the mix of smooth bead and fuzzy yarn created a pleasing contrast, and guests would often pause to run a finger along the beads without thinking about it.
Steps
- Create two matching tassels with sturdy cord loops at the top for hanging.
- String a few wooden beads onto the cord above each tassel and secure them with tight knots.
- Wrap each tieback around the curtain at the desired height and fasten by tying the loop or slipping over a hook.
- Adjust bead placement so tassels hang symmetrically and trim any excess cord for a clean look.
Pom pom rug edging to soften hard floors

Adding a pom pom fringe to the edge of a small woven rug turned a functional floor piece into something playful and inviting. Bare feet met the rug with a little surprise of fluff, and the pom poms muffled the hard edge where rug met floor.
Color choices mattered; muted earth tones provided warmth without shouting, while a few brighter pom poms offered a lively punctuation. The rhythmic spacing of the pom poms created a border that felt handcrafted and made the rug seem like a treasured find rather than a standard store purchase.
Steps
- Make pom poms in chosen colors and sizes, trimming them into neat round shapes.
- Sew or tie each pom pom along the rug edge with strong thread or thin cord, keeping consistent spacing.
- Reinforce attachment points with extra stitching or a dab of fabric glue tucked under the rug backing.
- Gently comb the pom poms to fluff them and trim uneven fibers for a tidy border.
Tassel bookmark with metal charm and fringe

I made a tasseled bookmark for my battered novel and it turned reading into a small ritual. Sliding the thin cord between pages and letting the tassel hang out of the book felt oddly luxurious.
A tiny metal charm added a soft clink when the book closed, and the fringe brushed the cover like a tiny bookmark companion. The feel of soft yarn against paper and the little weight of the charm made returning to my place in the story feel intentional and a little celebratory.
Steps
- Cut a length of cord or ribbon for the bookmark and attach a small tassel at one end.
- Add a metal charm or bead above the tassel by threading or tying it onto the cord.
- Seal knots with a small drop of glue if desired and trim any loose ends.
- Place the cord between pages with the tassel hanging outside to mark the reading spot.
Pom pom wine bottle decor for casual gatherings

A simple string of pom poms slipped over a wine bottle turned the ordinary into something festive without fuss. The pom poms cushioned the glass and added a soft, whimsical layer to the table setting.
In candlelight the fuzzy shapes cast soft-edged shadows and the mix of neutrals with one accent color felt relaxed and thoughtful. It was an easy way to mark the bottle as part of the setting and gave guests a small smile when they reached for a glass, as if the bottle had been dressed for the occasion.
Steps
- Make several small pom poms and trim them into consistent shapes and sizes.
- Thread the pom poms onto thin twine or ribbon and knot between each one to keep spacing.
- Drape the pom pom string around the neck of a wine bottle, tucking the ends under a bottle label if needed.
- Arrange bottles on the table so the pom poms face outward for guests to see.
Tassel and pom pom garland for picnic or party

I strung a mixed tassel and pom pom garland over a picnic blanket and it made the spread feel festive without being loud. The movement of tassels in the breeze and the bobbing pom poms added an unforced rhythm, while the textures sat well next to wicker baskets and ceramic plates.
Color choices leaned toward sunset tones that harmonized with the grass and wood, giving the scene an easy warmth. Guests kept commenting on the charm of the garland, and it became part of the backdrop for photos and conversation.
Steps
- Create tassels and pom poms in complementary colors and sizes so the composition feels balanced.
- Attach pieces alternately to a strong cord or ribbon, spacing them evenly and securing each with a knot.
- Test the garland by draping it where it will hang and make any spacing adjustments for visual balance.
- Hang the garland across an outdoor table edge, tree branch, or entry to add a festive touch.
Boho bag charm for backpacks and totes
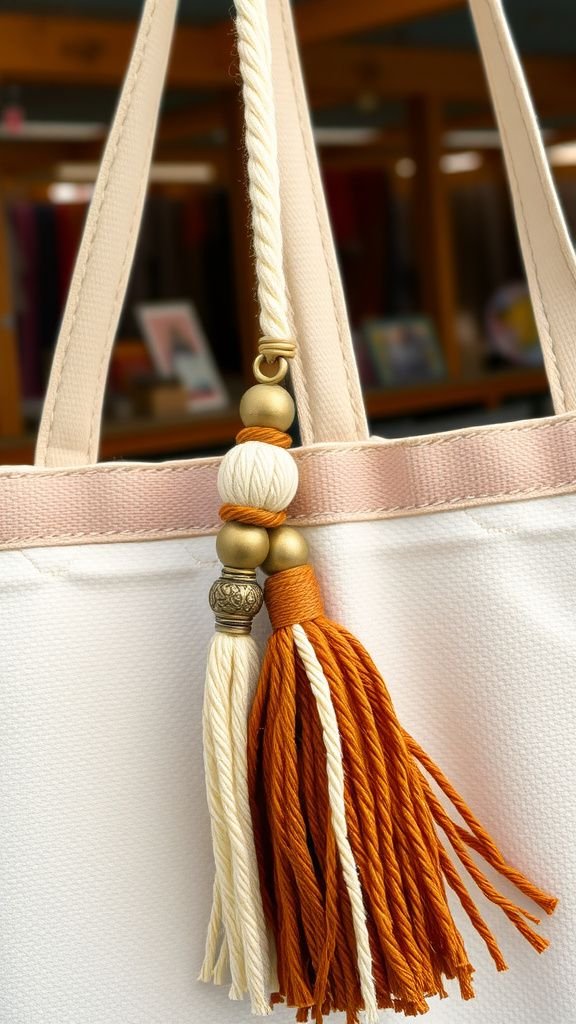
I clipped a boho bag charm onto an old canvas tote and it felt like the bag had been given new personality. The charm jingled lightly as I moved and the fringe brushed against fabric pockets in a companionable way.
Little accents like a tiny coin, metal bead, and a collar of colored thread made the charm feel handcrafted and balanced. It was an easy way to personalize a plain bag and the soft, tactile elements made reaching into the tote feel a touch more pleasant each time.
Steps
- Assemble a tassel or small cluster of pom poms and add a few beads or charms to the hanging cord.
- Secure all elements with tight knots and thread a small metal clasp onto the top loop.
- Clip the charm onto a zipper pull or bag handle so it hangs freely without obstructing use.
- Check for secure attachment and adjust bead placement for visual balance.
Tassel curtain valance for a cozy window nook

A small tassel valance perched above a cottage window made the whole nook feel treasured. The little tassels caught morning light and created a soft fringe that made the window look more composed, like a framed picture.
I favored a palette that echoed the garden outside, which made the valance feel integrated rather than decorative for decoration’s sake. The tactile fringe encouraged lingering by the window with a cup of tea, and the overall mood of the space shifted toward quiet hospitality and calm reflection.
Steps
- Measure the window width and prepare a length of trim or a row of matching tassels to span the valance.
- Attach the tassel row to a narrow strip of fabric or wooden trim, spacing tassels evenly.
- Mount the valance above the window with small brackets or nails, ensuring level placement.
- Adjust tassel alignment and trim any uneven ends for a neat silhouette once installed.
Dreamcatcher revamp with tassels and fluffy pompoms

Giving an old dreamcatcher a tassel and pom pom refresh felt like waking a sleepy object into something lively. The added tassels hung below the hoop and caught air in a slow, calming sway.
Pom poms tucked into the web added playful dots of color that contrasted with the lace-like weaving. Hanging over a bedside table, the piece offered a gentle, tactile focus that made the space feel softer at night.
The layered textures created a small handmade ritual of touch and sight before turning out the light.
Steps
- Create tassels of varying lengths and attach them to the bottom of the dreamcatcher hoop.
- Make small pom poms and weave or tie them into the dreamcatcher web or along the hoop rim.
- Secure knots and trim any excess yarn, ensuring decorations sit balanced around the hoop.
- Hang the refreshed dreamcatcher above a bed or near a window where it moves gently with air currents.
Tassel earrings in muted boho colorways
I slipped on a pair of tassel earrings in muted earth tones and they felt like a small, wearable craft. The tassels moved with a gentle flirt, brushing against the jawline and catching light in subtle ways.
A metal cap lent a little weight so the fringe hung neatly, and the softness of the yarn contrasted nicely with the cool metal. Wearing them turned ordinary errands into a chance to enjoy the little motion of the fringe, and friends often commented on how the colors complemented everyday outfits.
Steps
- Trim yarn strands to the desired tassel length and gather into a neat bundle.
- Secure the top of each bundle with a metal cap or tightly wrapped wire, then attach an earring hook.
- Trim tassel ends for uniformity and apply a small drop of glue inside the cap if needed for reinforcement.
- Polish metal findings and store the earrings flat to maintain tassel shape.
Napkin rings with mini tassels and beads
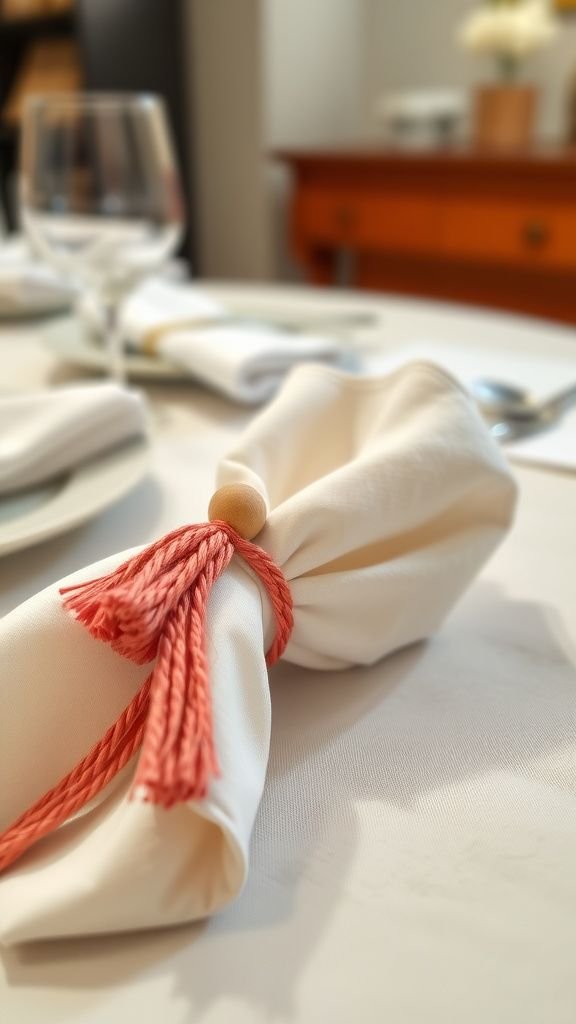
Swapping plain napkin rings for ones with mini tassels made table settings feel more intentional on casual nights. Each tiny tassel added a little rhythm to place settings and invited a soft touch when gathering napkins.
Wooden beads threaded above the tassels provided a slight clack as guests shifted plates, a pleasant, low-level sound that felt homey. I enjoyed the small scale of these accents; they were manageable to make and added a handcrafted note that made ordinary meals feel gently dressed.
Steps
- Create small compact tassels and select narrow rings or loops to attach them to.
- Thread beads onto the ring before tying the tassel in place so the beads sit above the fringe.
- Secure the tassel with tight knots and trim ends for a neat miniature shape.
- Place a tassel-adorned napkin ring around folded napkins and arrange on plates for a finished table.
Pom pom placemats for cheery breakfast moments
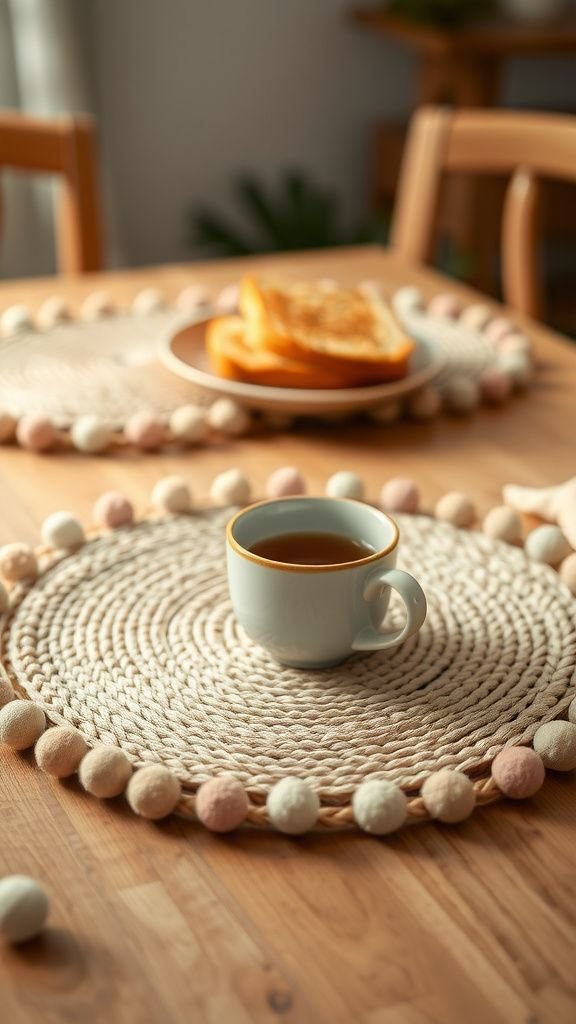
A set of placemats trimmed with small pom poms brightened morning coffee routines. The pom poms provided a soft frame around plates and their subtle volume kept the table looking relaxed.
Once or twice the dog stole a stray pom pom, which became a funny memory at the breakfast table. The tactile margin gave each place setting a sense of care without fuss, and the chewable softness of wool pom poms felt pleasing under fingertips when clearing plates or moving mugs across the table.
Steps
- Create a row of pom poms sized to match the placemat edges and trim them into consistent round shapes.
- Sew or tie each pom pom along the placemat perimeter with sturdy thread, keeping even spacing.
- Reinforce attachment points with extra stitches and trim any loose fibers for a tidy appearance.
- Place the finished placemats on the table and smooth the pom pom border so the pieces sit flat.
Tassel coaster set with fringe for coffee table
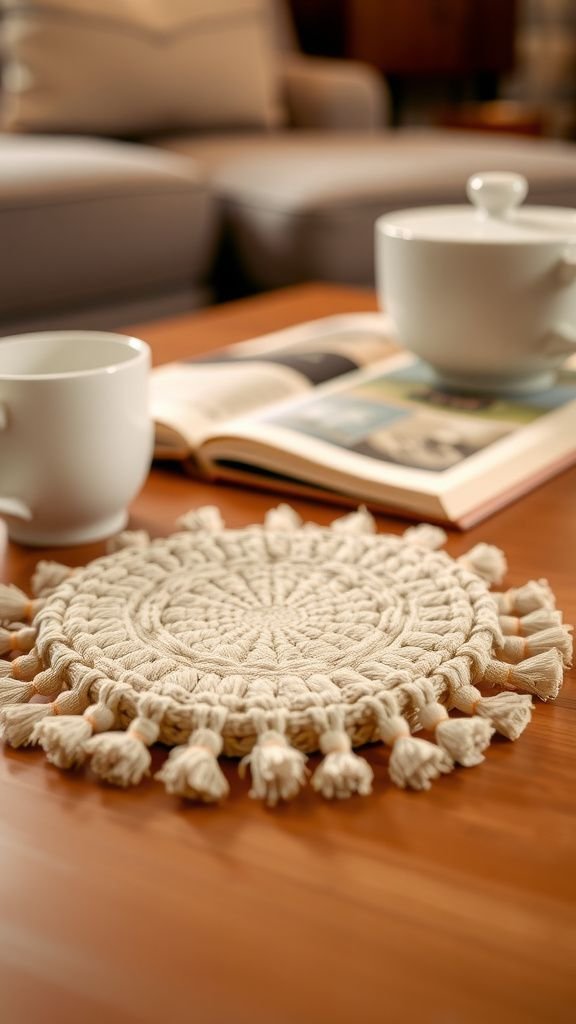
A coaster set trimmed with tiny tassels turned every cup into a small, tactile pleasure. The fringe cushioned glasses and gave the coffee table a handmade rhythm, with tassels forming a little halo around each coaster.
I liked how the fringe softened the edges and absorbed small drips without feeling fussy. When friends stopped by, the coasters prompted compliments and conversations about where they came from.
They felt like a modest, everyday luxury that made slow moments feel appreciated.
Steps
- Cut coasters from cork or felt and create small tassels matching the coaster dimensions.
- Attach tassels around the coaster perimeter with tight hand stitches or strong fabric glue, spacing them evenly.
- Allow glue to dry fully if used and press coasters under weight to ensure secure adhesion.
- Use the coaster set on a coffee table and store flat to keep tassels neat.
Lampshade fringe with pom pom trim for bedside lamp

I swapped a thin pom pom trim onto a bedside lampshade and suddenly the bedside felt curated. The tiny pom poms clustered at the lower rim caught soft light and made the glow feel more intimate.
Reaching to turn off the lamp now included a small pause to admire the way the pom poms diffused the light, and the tactile fringe suggested a gentler end to the day. The compact scale of the pom poms balanced well with smaller lamps, where a heavy fringe would have been too much.
Steps
- Measure the lampshade circumference and prepare a thin pom pom trim length to match.
- Adhere the pom pom trim to the inside or outside edge of the lampshade with fabric glue or double-sided tape suitable for fabric.
- Press the trim firmly into place along the entire edge and allow the adhesive to cure fully.
- Replace the lampshade and switch on the lamp to enjoy the softened light effect.
Tassel curtain beads for boho window detailing
I threaded small tassels between curtain beads and the result felt quietly festive. The beads added a smooth rhythm, the tassels a soft counterpoint, and together they brought motion and texture to the window frame.
Light filtered through the beads and created moving specks of shade across the curtain fabric as the breeze passed, which felt soothing on slow afternoons. The combination read like a little handmade chorus at the window and made the room feel thoughtfully arranged without seeming staged.
Steps
- Select small tassels and matching beads, ensuring holes are large enough to thread cord through.
- Thread beads and tassels alternately onto a length of cord to create a repeating sequence.
- Secure cord ends with knots or small crimps and attach the beaded strand along the curtain header or side.
- Adjust spacing and bead positions so tassels hang evenly and the strand moves freely with air.
Mini pom pom bouquet for shelf or desk display

A small bouquet of pom poms in a tiny vase brightened my desk on days when plant care felt like too much. The pom poms have a steady cheerfulness and they never droop, which made them ideal for a low-attention decorative touch.
Arranged in a short ceramic vessel, the soft round shapes contrasted with angular pencils and notebooks, making the workspace feel less utilitarian. Colors were chosen to sit beside my notebook covers, and the resulting cluster felt like a miniature celebration of texture and color.
Steps
- Make several small pom poms and trim their stems short so they sit in a small vase or container.
- Attach each pom pom to a wire stem or wooden stick with glue or secure wrapping.
- Arrange the stems in a short ceramic or glass vessel, adjusting heights for a balanced bouquet.
- Place on a desk or shelf and fluff pom poms as needed to maintain round shapes.