I have a soft spot for small, tactile projects that change the rhythm of a room, and wooden bead home decor crafts have been my go-to for cozy weekends. There is something calming about the weight and grain of each bead as I sort colors and sizes, and the quiet rhythm of threading becomes almost meditative.
Over time I have collected a handful of favorite wooden bead home decor crafts that feel warm and lived-in.
These ideas grew from casual experiments with paint, twine, and leftover beads, and each finished piece has a gentle presence in the house.
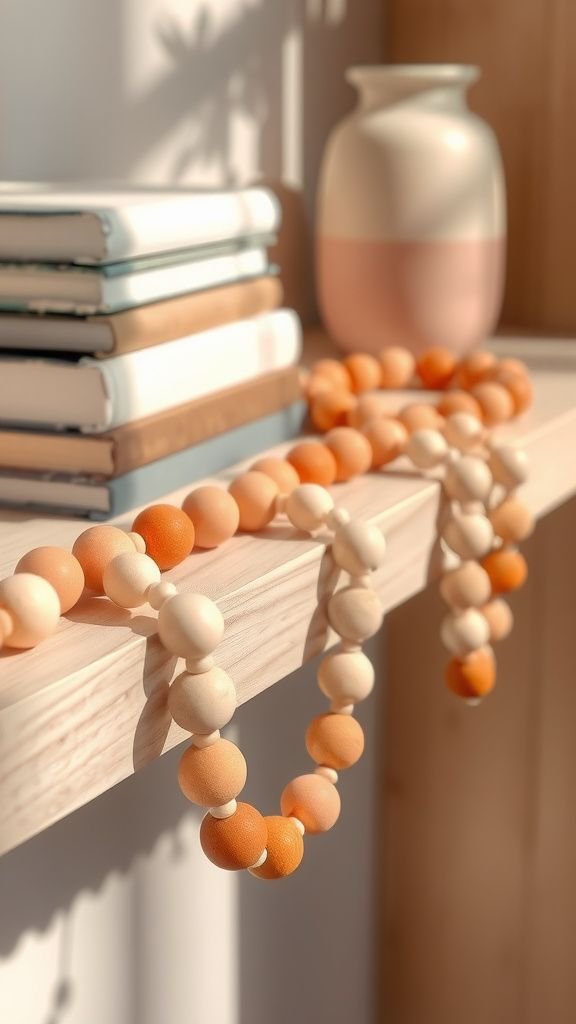
Neutral mantel garland with mixed bead sizes

A mantel strung with mismatched wooden beads feels like a quiet conversation between texture and light. I like the way the larger beads sit heavy and grounded while smaller ones skip along, creating a pleasing rhythm.
The wood grain shows soft fingerprints and a subtle scent that reminds me of old books. When draped in gentle curves the garland casts delicate shadows on painted brick, bringing a calm, layered look without shouting for attention.
It often becomes the finishing touch that makes the shelf feel settled.
Steps
- Lay out beads by size and tone to form a balanced sequence.
- Thread beads onto a strong cord until the desired length is reached.
- Fasten ends securely with a knot and hide excess cord inside the end beads.
- Drape the garland across the mantel, adjusting curves until it feels natural.
Ombre painted bead garland for a shelf
I remember painting a handful of beads into a gentle ombre and feeling unexpectedly pleased with the result. The transition of color along the garland reads like a slow gradient, and it perks up a plain shelf without demanding much attention.
The painted beads have a faint sheen that catches the light differently than the raw wood, creating a small visual surprise. When placed among books and pottery the ombre thread feels playful but restrained, a little nudge of color that lifts the whole arrangement.
Steps
- Sort beads by size and set up a paint area with small brushes and a palette.
- Paint beads in graduated tones from light to dark, letting each layer dry thoroughly.
- Thread beads onto cord in the ombre order and secure the ends with knots.
- Arrange the finished garland along a shelf, softening bends for a relaxed look.
Macramé wall hanging threaded with beads
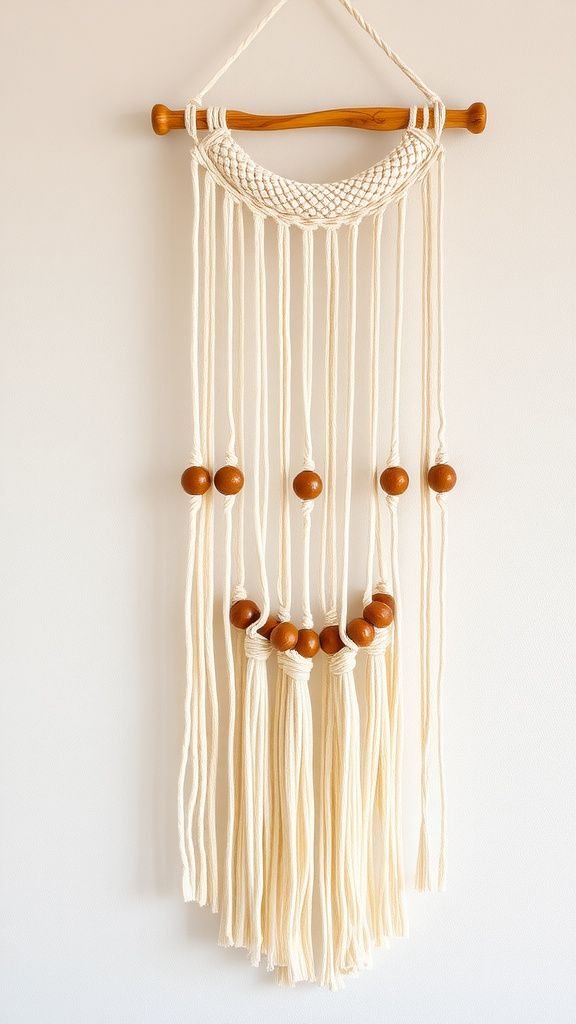
Combining knotted linen and wooden beads made me slow my pace and notice small movements in the threads. The beads punctuate knotted lines, adding a mellow contrast between rough cord and smooth spheres.
I enjoy running my fingers along the fringe and hearing the faint clack as beads settle into place. Hung near a window the piece moves slightly with drafts, the beads catching light and throwing tiny, lively shadows.
It lends a handcrafted, tactile energy to an otherwise simple wall and invites closer inspection.
Steps
- Cut lengths of cord and arrange them on a dowel to create the macramé base.
- Tie a series of square knots and add beads by threading them onto selected cords.
- Continue alternating knots and beads until the desired pattern is formed.
- Trim fringe ends evenly for a finished silhouette and hang the dowel on a wall.
Hanging plant holder with bead accents
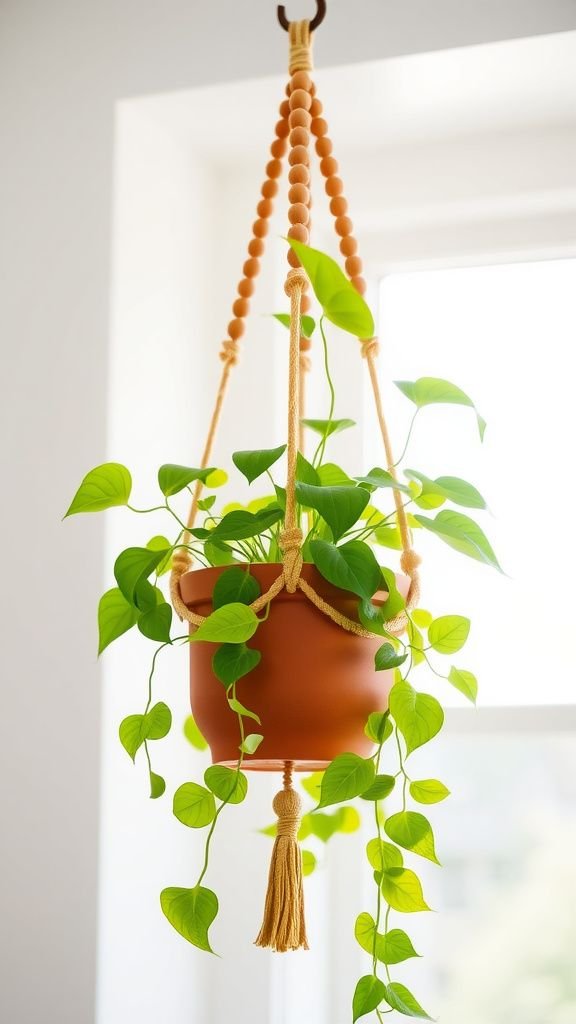
A hanging planter threaded with wooden beads turned a simple pot into something quietly joyful. The beads nestle along the cords and shift when the plant sways, adding a gentle, rhythmic murmur.
I like how the smooth beads contrast with the trailing greenery and rough terracotta lip. The scent of fresh soil mingles with the wood, and a single bead cluster near the pot feels like jewelry for the plant.
It brings a relaxed cottage energy to a sunny corner without making the space feel busy.
Steps
- Prepare a sturdy cord cradle for the pot and arrange suspension lengths evenly.
- Slide beads onto the cords at chosen intervals, grouping them for visual interest.
- Secure the cords beneath the pot and tie a strong hanger knot at the top.
- Hang the planter from a ceiling hook and adjust beads so they sit comfortably.
Door curtain tieback with chunky beads

A simple tieback made from chunky wooden beads turned an ordinary curtain into something quietly considered. The beads sit heavy and reassuring in my hand, their rounded warmth contrasting with the cool weight of fabric.
When looped, the tieback creates a fold that catches light and outlines the window in a new way. I enjoy the small ritual of drawing back curtains and watching the beads settle into place, their sound muted and gentle.
It feels like a subtle DIY upgrade that adds a calm touch to morning routines.
Steps
- Arrange large beads along a durable cord to achieve the right length for looping.
- Secure the bead sequence with a knot and add a decorative tassel if desired.
- Loop the tieback around the curtain and adjust bead spacing for a balanced drape.
- Fasten the cord end neatly so it does not slip during use.
Threaded napkin rings with mixed textures
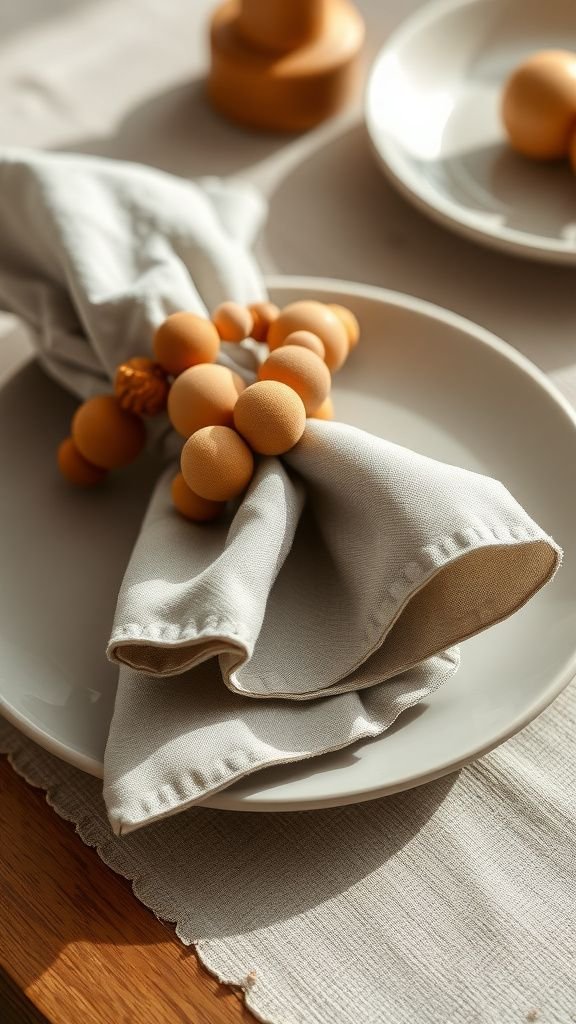
I like how a set of bead napkin rings can change the tone of a table without much fuss. The beads nestle against folded linen and add a tactile pause between plate and glass.
When I run a finger over them I notice the contrast between sanded smooth beads and a few rawer ones with tiny knots and pores. They feel satisfying to hold and bring a handmade quality to mealtimes.
Paired with natural linens and simple dinnerware they create a relaxed table that invites conversation.
Steps
- Select small to medium beads and lay out combinations that feel balanced.
- String beads onto a loop of cord sized to fit around a folded napkin.
- Tie the cord securely and hide the knot within a bead or under a decorative wrap.
- Repeat to make a full set and arrange them around each place setting.
Beaded fringe for a small pendant light

Adding a fringe of wooden beads to a pendant light softened the glow and introduced a quiet rhythm overhead. The beads catch the lamp’s warmth and scatter it in tiny, cozy reflections.
From below the fringe makes the fixture feel finished and a touch more intimate. I found that a mix of sizes added depth, and the slight movement when the air shifted gave the room a gentle liveliness.
It reads like an old textile or vintage find, making the light feel personal rather than factory-made.
Steps
- Measure the pendant circumference and plan a repeating bead pattern for the fringe.
- Cut short strands of thin cord, thread beads onto each strand, and secure the ends.
- Attach each beaded strand around the pendant edge at regular intervals.
- Adjust strand lengths so the fringe hangs evenly and test the light for shadow play.
Decorative cabinet knobs with tiny wooden beads
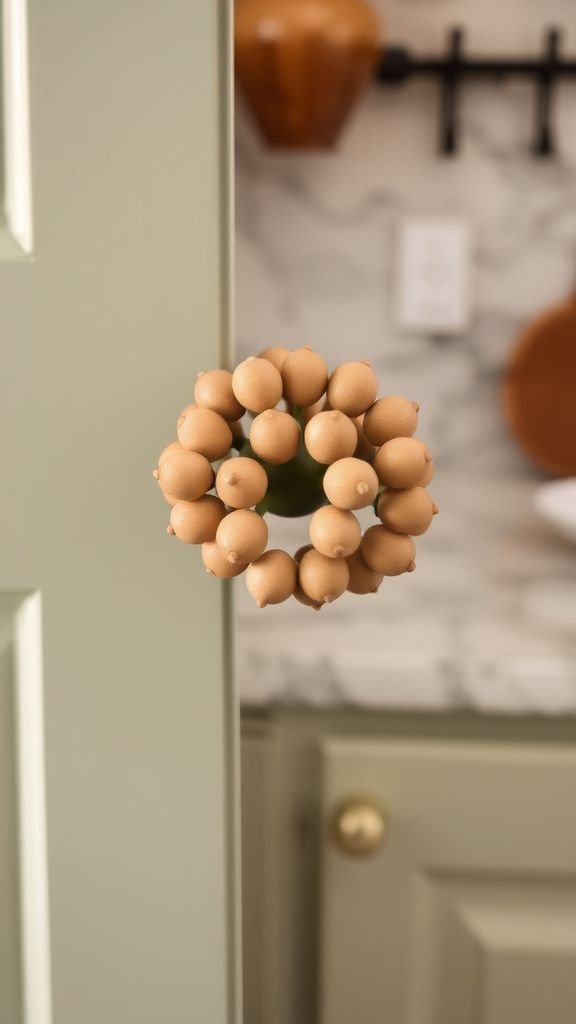
Replacing bland cabinet knobs with bead-wrapped knobs felt like a gentle refresh that I keep noticing. The beads add a small tactile reward when opening doors, and the warmth of wood against fingertips is oddly comforting.
A cluster of beads around a metal base softens the hardware and ties cabinetry to other wooden elements in the room. Light catches the rounded surfaces and highlights grain patterns, making each pull a little moment of texture.
It reads as thoughtful and handcrafted without overwhelming the overall design.
Steps
- Remove existing knobs and gather small wooden beads and strong adhesive or thin wire.
- Wrap beads around the knob base, securing them closely to create an even layer.
- Allow adhesive to set fully before reinstalling the knobs on the doors.
- Reattach knobs and test smoothness when opening and closing the cabinetry.
Beaded mirror frame for a boho touch
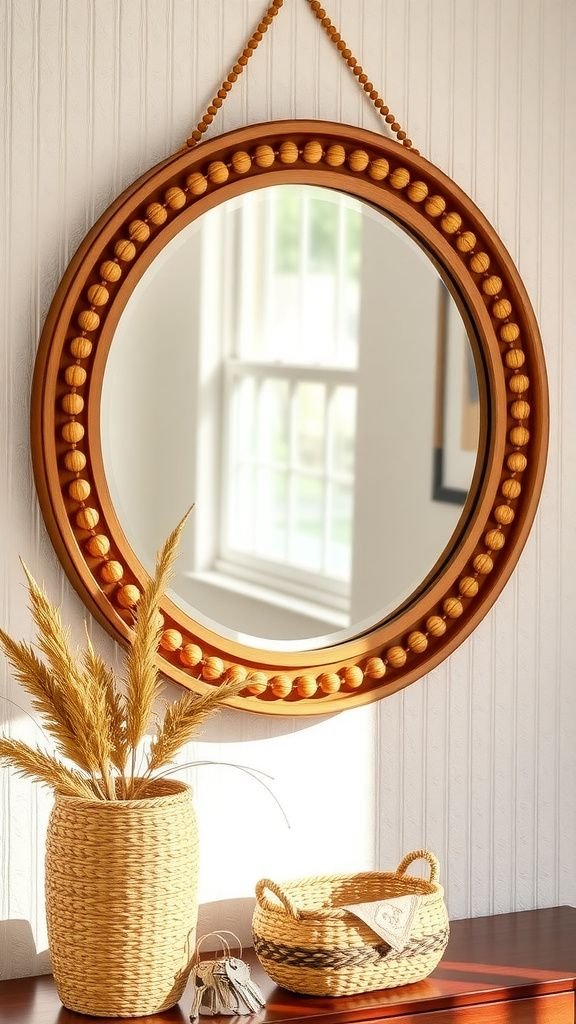
A mirror rimmed with wooden beads has a way of softening reflections and catching morning light in a friendly way. The beads create a border that feels handmade and approachable, and their small shadows add a touch of depth to the frame.
I like pairing different bead sizes to build a subtle pattern that reads from a distance and rewards inspection up close. Hung over a console or sink the piece brings a lived-in, welcoming energy, and it makes daily routines feel a little more pleasant.
Steps
- Gather beads and a strong craft glue suited for wood and mirror backing.
- Apply glue around the mirror frame edge and press beads in the desired arrangement.
- Work in sections to keep alignment even, letting adhesive set between passes.
- Allow the entire frame to cure before rehanging the mirror on the wall.
Candle centerpiece with beaded ring detail

A beaded ring resting around a pillar candle changes the centerpiece from plain to tactile and inviting. The wood adds warmth against wax and creates a quiet contrast with flame and shadow.
I enjoy the gentle sound when the table moves and the way bead edges pick up the glow. Placed on a wooden tray alongside greenery the ring helps compose a small vignette that feels seasonal without needing elaborate additions.
It reads as thoughtful and understated, the kind of thing that draws a second look during evening meals.
Steps
- Select beads that complement the candle size and arrange them into a circular layout.
- Thread beads onto a flexible wire or cord and form a snug loop around the candle base.
- Secure the loop with a discreet twist or knot and tuck ends inward.
- Place the beaded ring on a tray with the pillar candle and surrounding accents.
Photo display string threaded with wooden beads
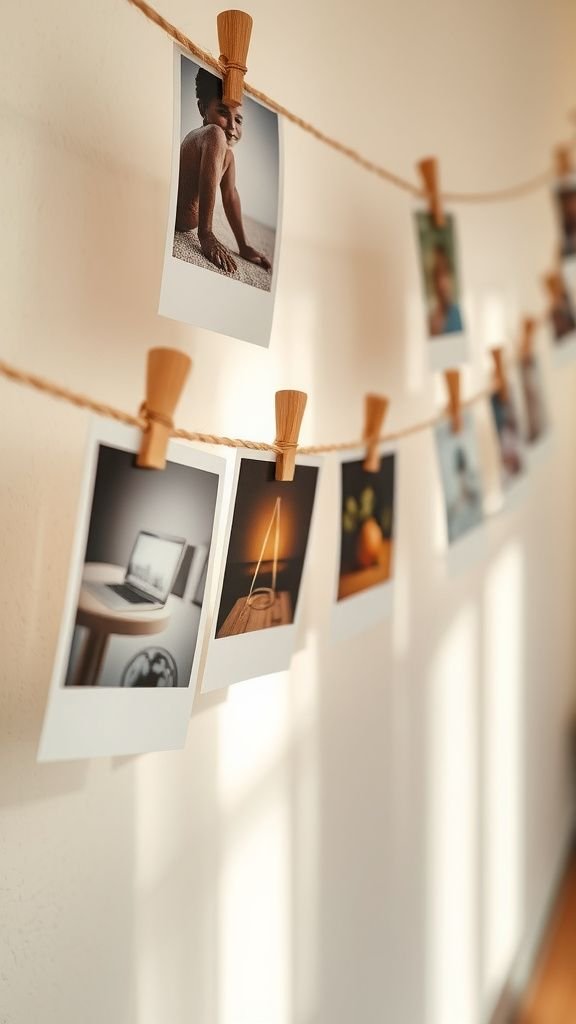
I enjoy a simple photo line where beads act as gentle anchors between images. The beads add pauses that soften clothespins and paper edges, and their tactile presence turns a photo wall into a textured story.
When sunlight hits them they create tiny highlights amidst snapshots, tying together moments from different shelves and frames. The arrangement feels casual and changeable, inviting new pictures without demanding a perfect layout.
It makes the wall feel like an unfolding diary rather than a formal gallery.
Steps
- Stretch a length of cord across a wall or shelf and secure ends with hooks.
- Thread beads onto the cord at intervals to create visual pauses between photos.
- Attach prints with small clips, spacing them to balance with bead placement.
- Adjust beads and photos until the display has a relaxed, even rhythm.
Curtain valance trimmed with bead strands

A narrow valance trimmed with bead strands feels like a whisper at the top of a window. The beads drop in soft lines and catch the edge of daylight in a playful way.
I found that a mix of lighter and darker wood tones gave the treatment a lively but understated look. From the room the bead strands flutter slightly and create a delicate visual rhythm across the window.
It reads as handmade and relaxed, a calming detail that frames a view without interrupting it.
Steps
- Measure the valance width and cut multiple beaded strands to matching lengths.
- Attach the strands along the valance edge at even intervals, securing them firmly.
- Trim any excess cord for a neat appearance and test for even hanging.
- Rehang the valance and adjust bead spacing for a balanced look.
Lampshade trim made from tiny wooden beads

A band of tiny beads around a lampshade can change its silhouette from plain to quietly finished. The beads form a delicate border that scatters light and adds a handmade touch to a bedside lamp.
I noticed how the small spheres soften the lamp’s edge and create a faint pattern on the wall when lit. The tactile presence invites fingers to trace the rim, and the overall effect feels like a softened nod to vintage trims.
It subtly elevates a lamp without stealing the room’s focus.
Steps
- Measure the lampshade circumference and cut a flexible trim base to size.
- String small beads onto thread and secure the thread to the trim base evenly.
- Affix the beaded trim to the bottom edge of the shade with an adhesive suited for fabric.
- Allow adhesive to cure before switching the lamp on to enjoy the new glow.
Place card holders with single bead stands

At the table I used single beads threaded on short wires as place card holders, and they felt like little sculptural nods to the gathering. The beads catch the light and offer a tactile counterpoint to paper name cards.
Their small scale makes them unobtrusive, while the wood brings a gentle warmth that complements china and glass. I enjoy the quiet satisfaction of arranging them so that each card sits upright and readable.
They feel casual yet thoughtful, perfect for a relaxed meal with close friends.
Steps
- Thread a single medium bead onto a short length of stiff wire or floral stem.
- Bend the wire into a stable base that supports a paper card upright.
- Add a dab of glue at the base if extra stability is needed and let it dry.
- Place a card into the wire slot and arrange holders along the table.
Seasonal wreath threaded with wooden beads
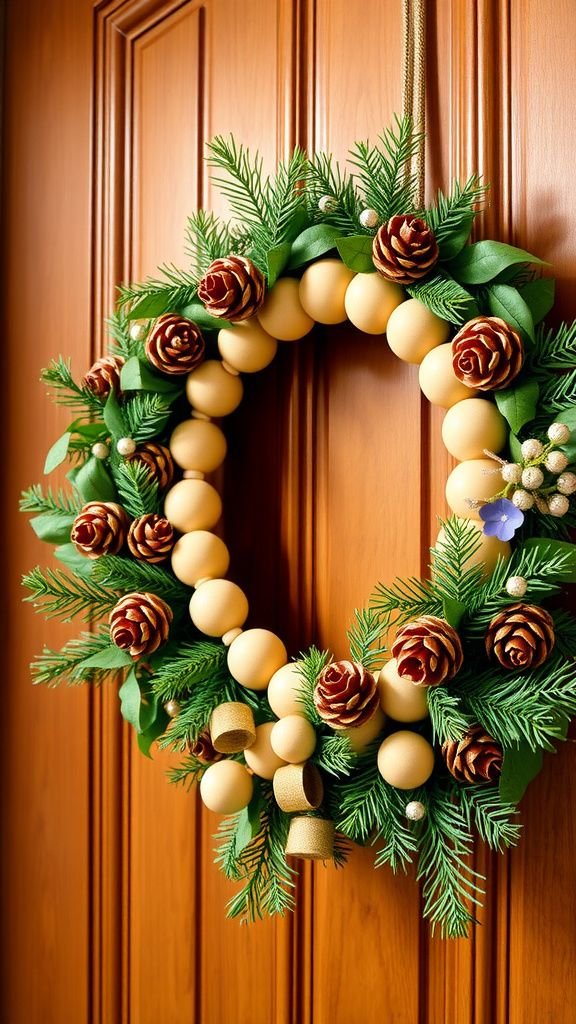
A wreath accented with wooden beads felt like a subtle update to seasonal decor. The beads nestle among greenery and ribbon, introducing a warm, tactile counterpoint to leaves and pinecones.
I enjoyed how the bead color choices could shift the mood from winter restraint to spring freshness. When the wreath hangs on a door it gives a friendly, handmade signal to visitors.
Up close the beads invite a touch, and their smooth surfaces contrast pleasantly with the rougher organic materials around them.
Steps
- Lay out a wreath base and plan bead placement among foliage and other accents.
- Thread beads onto wire or cord and weave them into the wreath form.
- Secure bead strands and tuck ends beneath foliage for a seamless look.
- Hang the wreath and rotate it slightly until the bead arrangement feels balanced.
Heat-resistant bead trivet for small dishes
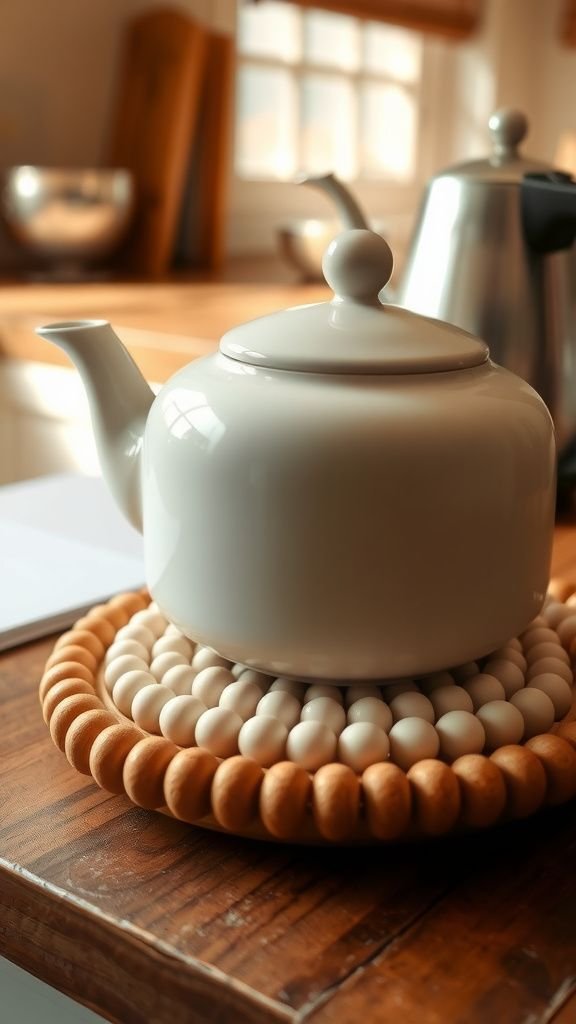
A compact trivet built from thicker wooden beads felt protective beneath a hot mug and charming on a kitchen counter. The rounded beads created a bouncy platform that kept heat away from surfaces, and the wood’s natural tones added a homey accent.
I liked setting down a steaming cup and hearing the soft clack as beads settled. It reads as practical and pretty, a small object that makes daily routines feel considered.
When not in use it looks nice propped near a kettle or stacked with other trivets.
Steps
- Arrange larger, heat-resistant wooden beads into a circular or square layout on a flat surface.
- Secure beads together using a strong, heat-resistant adhesive or by weaving sturdy cord through them.
- Allow the assembly to cure fully before placing any hot items on it.
- Store the trivet in an accessible spot near the stove or teapot.
Shelf-edge bead garland for a playful border
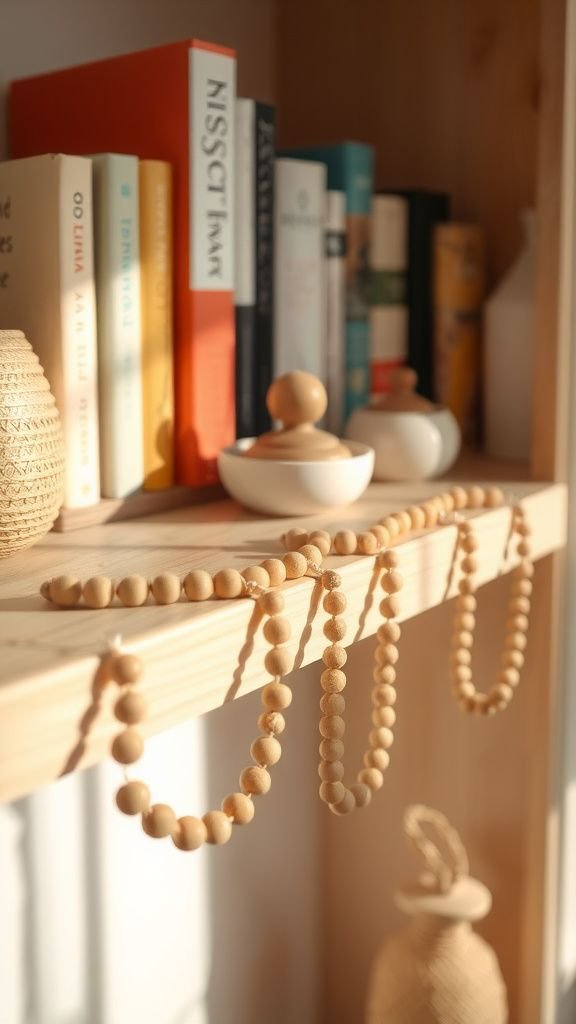
I draped a slim bead garland along a shelf edge to give the line a softer rhythm. The beads created tiny interruptions that hid a hard edge and brought a casual, playful note to stacked objects.
Running a hand along the shelf is pleasant now, thanks to the bead texture, and I like the way light picks out the rounded forms. The garland feels like a small wink of craft that ties together books and pottery on the shelf without changing the entire layout.
Steps
- Measure the shelf length and cut a cord slightly longer to allow for draping.
- String small beads in a pattern that complements the shelf items.
- Secure the ends of the cord under the shelf or with discreet hooks.
- Adjust drape and bead spacing so the garland sits naturally along the edge.
Room divider strings made with long bead strands
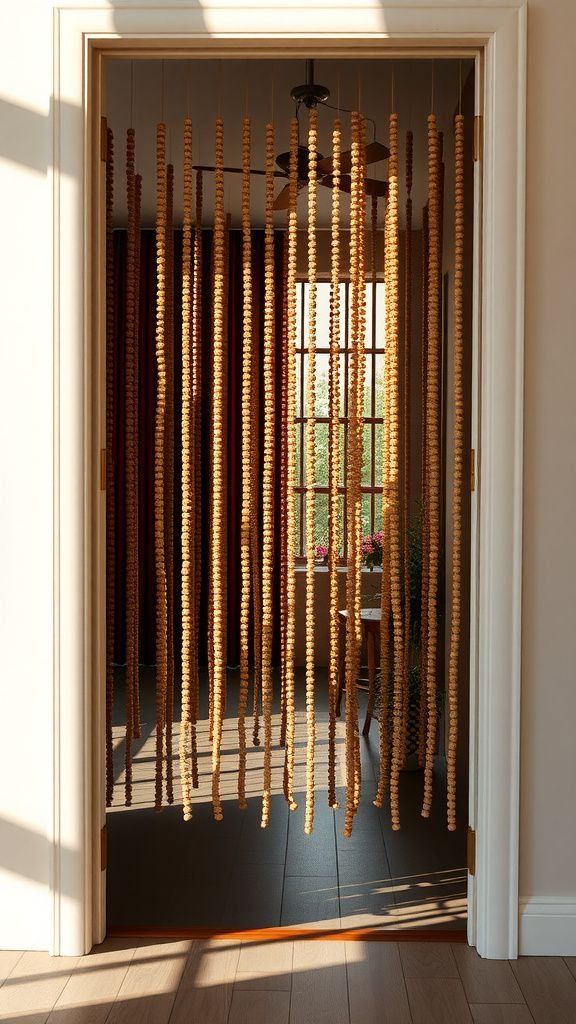
I tried stringing long bead strands to create a casual room divider and appreciated the gentle sense of separation it offered. The vertical lines of beads sway slightly with movement and create shifting glimpses between spaces.
Their weight and grain lend an organic feel that feels lighter than a solid partition but more intentional than an open doorway. The way light travels through the strands casts playful shadows on the floor, and the tactile presence suggests privacy without blocking conversation or flow.
Steps
- Attach a sturdy rod across the doorway or opening where the divider will hang.
- Thread multiple long bead strands and space them along the rod for even coverage.
- Secure each strand at the top so they hang straight and move freely.
- Trim bottoms to a uniform length or stagger them for a layered effect.
Plant pot collar of beads for a decorative rim

Adding a collar of beads around a plant pot gave the piece a crafted finishing touch that made the pot feel personalized. The beads hug the pot rim and create a small ledge of texture that frames the plant.
I enjoy the way the wood contrasts with the glossy ceramic and the soil’s dark sheen. Up close the grain of each bead tells a little story, and the overall effect is a calm accent that harmonizes with leaves and light.
It makes each plant feel more intentional in the room.
Steps
- Measure the pot rim and prepare a flexible cord long enough to wrap around it.
- Thread beads onto the cord and adjust spacing until the collar sits flush with the rim.
- Secure the cord ends with a tight knot and hide the join beneath a bead.
- Place the collar on the pot and adjust so it rests evenly without slipping.
Decorative bowl filler made from wooden bead spheres
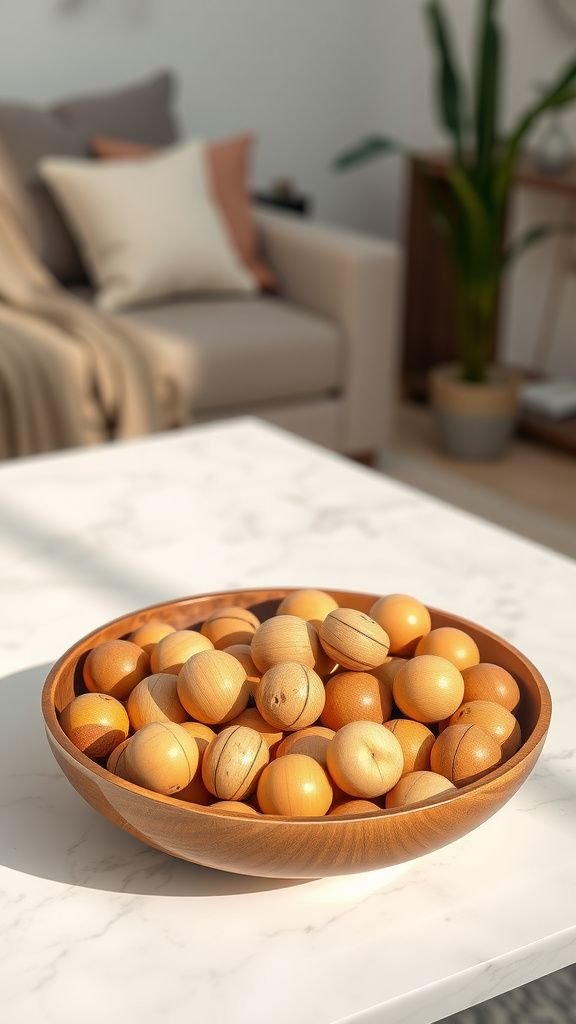
A shallow bowl filled with wooden bead spheres became a quiet, tactile centerpiece on my coffee table. The mixed sizes create a rhythm as the eye moves across the surface, and the warmth of the wood plays nicely against a cool stone bowl.
I often find myself nudging beads aside when I reach for a drink, enjoying the pleasant sound and movement. The arrangement feels low-effort yet thoughtfully composed, offering texture and a neutral focal point that complements other tabletop objects.
Steps
- Select a shallow decorative bowl and an assortment of wooden bead spheres.
- Fill the bowl to the desired level, arranging larger beads first and filling gaps with smaller ones.
- Balance the colors and sizes so the display feels harmonious from all angles.
- Place the bowl on a table and rotate occasionally to refresh the look.
Basket handle wraps with bead clusters
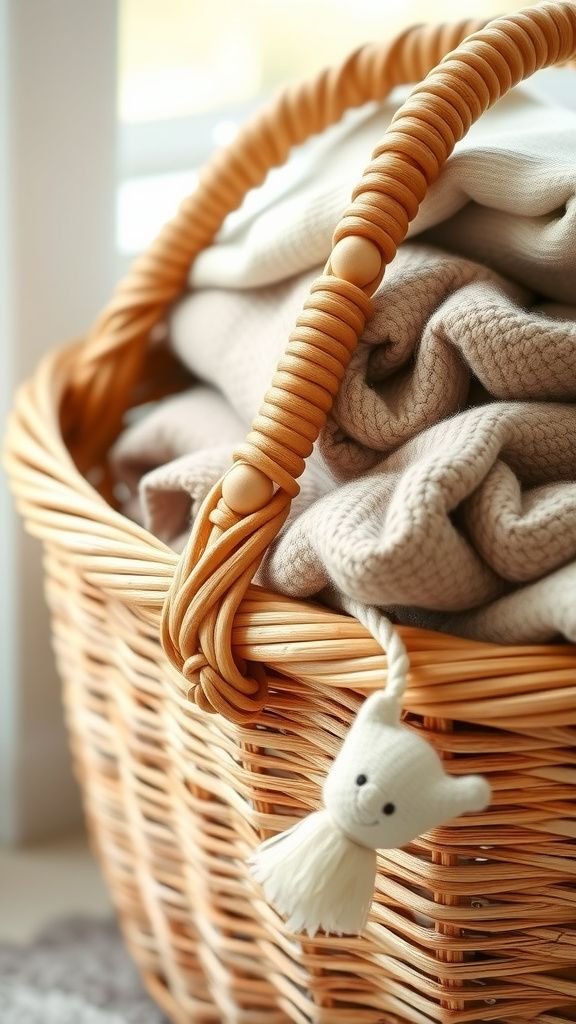
Wrapping basket handles with clusters of beads turned ordinary storage into something friendlier to touch. The beads soften the feel against palms and give the basket a little personality on the shelf.
I liked selecting a handful of complementary tones so the clusters read like small ornaments rather than clutter. The contrast between woven basket fibers and round beads is pleasing to the senses, and the added texture makes reaching into the basket feel like part of the ritual of tidying and finding things.
Steps
- Gather small bead clusters and a length of twine or thin leather cord.
- Wrap the cord around the handle, incorporating bead clusters at intervals and securing them tightly.
- Finish wraps neatly and tuck cord ends under previous turns for a clean look.
- Test the handle for comfort and adjust bead placement as needed.