I still remember my first attempt at a felt flower bouquet, fingers dusted with wool fibers and a warm mug nearby. That first cluster of soft blooms felt like a tiny celebration on the windowsill, and since then I have been mixing colors and textures in quiet afternoons.
These DIY Felt Flower Bouquet Crafts kept becoming weekend projects, each one learning something new about petal layers, stem weight, and how a matte wool bloom can brighten a corner.
I love how approachable the materials are and how personal each bouquet turns out.
Soft wool peony with layered petal detail

Peony blooms in felt carry a plush fullness that makes me smile every time. The layered petals sit slightly staggered, catching soft indoor light and casting gentle shadows that give a lifelike depth.
The wool surface has a muted sheen and a tactile warmth under fingertips, like holding a petal that remembers sunshine. When a bouquet of these sits on my kitchen table, it reads calm and cozy, and the color choices shift the mood from playful coral to quiet cream depending on the palette.
Steps
- Trace a set of concentric petal templates onto wool felt and outline each petal group with a pencil.
- Snip the petal shapes from the felt, keeping edges soft and rounded for a natural look.
- Layer petal groups from largest to smallest, securing each layer at the base with a small bead of fabric adhesive.
- Fasten a wrapped stem inside the base and allow the adhesive to set before arranging into a bouquet.
Vintage-style rolled rose with tight center

Rolled roses in wool have a nostalgic, corset-like heart that I find comforting. The center coils hold shadows and remind me of paper roses from childhood craft kits, but the felt gives that southern cotton softness.
Color transitions near the core catch the eye, and a tiny halo of frayed edges adds personality. They sit well with dried grasses or leafy stems, offering a quaint counterpoint to glossier blooms.
When placed in a mason jar, these roses read like a keepsake from a slow, sunny afternoon.
Steps
- Trace a spiral shape onto felt and cut along the spiral edge for a long continuous petal strip.
- Curl the spiral inward around a small felt core, keeping layers snug as the flower forms.
- Apply a thin bead of fabric adhesive beneath the final coil to secure the base.
- Insert a wrapped floral wire as a stem and allow the adhesive to set before grouping with other stems.
Daisy cluster with textured button centers
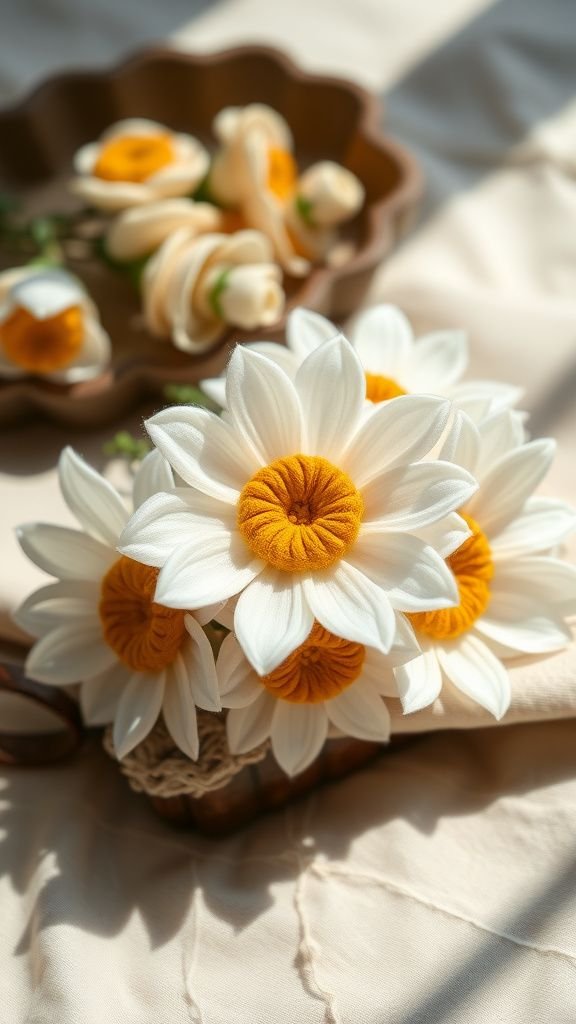
Daisies in felt bring a cheerful, breezy vibe that makes a corner feel sunnier. The thin white petals are slightly stiff yet gentle to the touch, and the textured center often calls for a contrasting fabric button or a tuft of wool that offers visual interest.
I remember laying out a handful on my lap, arranging them into a loose cluster that looked like a meadow. Their simplicity plays well with small filler stems and leafy sprigs, and a basket of these daisies brightens a windowsill without feeling fussy.
Steps
- Trace petal templates onto felt and cut several matching petal sets for each bloom.
- Create a textured center by gluing a small fabric button or rolling a tuft of wool into a tight ball.
- Arrange the petals around the center and secure each petal base with a dab of fabric adhesive.
- Fasten a thin wrapped stem into the center and allow everything to set before gathering into a bouquet.
Ranunculus with frilled layered petals and depth

Ranunculus felt blooms have that hypnotic, concentric look that keeps drawing my eye. The frilled edge layers create a soft spiral that seems delicate despite the wool’s firmness.
Each ring of petals catches light differently, producing tiny contrasts between inner shadow and outer blush. I once matched a ranunculus palette to a faded vintage dress and the result felt nostalgic and joyful.
Arranged with taller stems, these blooms sit low in a bouquet and invite the hand to linger on their dense, tactile layers.
Steps
- Trace multiple petal rings onto felt, varying the ring widths for inner and outer layers.
- Cut each ring and gently curl the edges with a rounded tool to suggest frill.
- Stack rings from largest to smallest, adhering each ring at the base with fabric adhesive to form a dense center.
- Insert a wrapped stem into the finished base and allow adhesive to set before arranging.
Wildflower medley with varied petal silhouettes

A wildflower medley in felt feels like a pocketful of sunlight collected from a grassy verge. The mix of slender daisies, round buds, and tiny bell shapes keeps the eye moving, and the differing petal silhouettes give the bouquet an improvisational charm.
Some stems lean shyly while others stand more upright, creating a relaxed, unforced flow. My favorite detail is the way small seed-head substitutes peek between blooms, and the wool’s matte finish keeps the palette soft even when colors are bright.
Steps
- Select a range of petal templates for slender, round, and bell-shaped blooms and trace onto felt.
- Cut each petal shape and form small bud centers by wrapping tiny felt circles and securing with adhesive.
- Assemble petals around each center to form distinct wildflower heads and secure bases with fabric adhesive.
- Bundle varied stems together and wrap the visible bases with floral tape to finish the medley.
Bold anemone with dark contrasting center

Anemones in felt feel dramatic in the nicest way, their dark centers grounding pale, silky petals. The contrast makes the bloom read cinematic, especially when set against linen or wood.
I remember one navy-centered anemone in a tiny vase looking like a miniature stage—there was a crisp personality to it. The petals have a gentle droop that mimics real flowers, and the center’s tactile tuft seems to pull light inward.
These are striking as single stems or paired with softer fillers for balance.
Steps
- Trace large petal shapes for the outer flower and smaller components for the dark center onto felt.
- Cut petals and create the center by forming a dense tuft of wool or a felt disk wrapped with thread.
- Arrange petals around the center and secure at the base with a bead of fabric adhesive.
- Add a wrapped stem and allow the adhesive to set before placing the stem in a vase.
Bright poppy with crinkled petal charm

Poppy petals made from felt have a nostalgically crinkled look that feels breezy and playful. The slightly irregular edges and thin, flared shape capture a sense of movement, as if the bloom had been caught in a light gust.
The center often boasts a dense cluster of darker wool that adds texture and a focal point. I keep a handful of poppies in a low vase by my reading chair; they add an energetic note without shouting, and their delicate silhouette pairs well with slender grasses.
Steps
- Trace petal shapes with slightly irregular edges onto thin wool felt for a crinkled effect.
- Cut the petals and create a textured center by winding dark wool into a small dense bundle.
- Layer the petals around the center, securing each at the base with fabric adhesive to hold the flared shape.
- Fasten a wrapped stem into the base and allow the adhesive to cure before arranging with other stems.
Tulip silhouette with clean petal lines

Tulips crafted from felt have a clean, architectural silhouette that reads modern and calm. The smooth curves of each petal give an elegant profile, and the felt’s thickness lends a sculptural quality.
I like how a trio of tulips in complementary tones looks almost like a little installation on the mantel, each bloom nodding slightly at a different angle. The matte wool surface softens the geometry, making the arrangement approachable rather than austere.
They pair especially well with long, simple stems and minimal greenery.
Steps
- Trace two matching petal templates for each tulip onto medium-weight felt and outline with a pencil.
- Cut the petal shapes and layer them to form a tulip cup, aligning edges for smooth curves.
- Secure the petal bases with a small bead of fabric adhesive and insert a sturdy wrapped stem.
- Allow the adhesive to set fully before arranging tulips in a tall vase for display.
Chrysanthemum with many thin curled petals

Chrysanthemums rendered in felt have a lively, feathery personality thanks to their many thin petals. The curled strands create a soft halo that seems to vibrate with color, and the textured mass feels pleasantly substantial in hand.
I recall making a cluster that looked almost like a pompom, and the tactile detail prompted people to reach out for a closer look. When grouped with simpler blooms, chrysanthemums add a rhythmic complexity that keeps the eye exploring the bouquet rather than settling right away.
Steps
- Trace a ring template and cut many narrow petal strips from felt for the chrysanthemum’s fringe.
- Curl each narrow strip gently around a center core to create layered texture.
- Secure the curled strips to the center core using fabric adhesive, building outward until the bloom reads full.
- Add a wrapped stem to the base and let the adhesive cure before combining with other stems.
Tiny baby’s breath filler in wool clusters
Baby’s breath rendered in wool makes a delicate, airy filler that ties larger blooms together. The tiny felt florets form cloud-like clusters that soften the bouquet edges and add a whisper of texture.
When I tuck a bundle of these among bolder blooms, they provide a quiet counterpoint that draws attention to shape and spacing. They have a cottony appearance and a barely-there scent of wool that somehow feels familiar, lending a casual garden mood even in an indoor setting.
Steps
- Cut many small round felt circles and gather them into tiny clusters by bunching a few together.
- Secure each cluster at the base with a touch of fabric adhesive and add a thin wrapped stem.
- Create multiple clusters and trim stems to complementary lengths before inserting them as filler around focal blooms.
Eucalyptus-style wool greenery with muted tones

Eucalyptus shapes in felt bring a grounding, leafy rhythm to a bouquet. The muted green tones and rounded leaves have an understated elegance, and the felt’s texture suggests a soft, touchable leaf rather than glossy greenery.
I often tuck eucalyptus stems between brighter blooms to create breathing room and a cool counterbalance. The stems add length and direction, guiding the eye through the arrangement.
Their presence makes a bouquet feel more composed, like a small landscape caught in a vase.
Steps
- Trace elongated round leaf shapes onto green felt and cut a set of matching leaves.
- Bend a thin floral wire and seat it along each leaf base, securing with a small bead of fabric adhesive.
- Wrap a thin strip of felt or floral tape around the base of each leaf to conceal the wire and create a finished stem.
- Arrange eucalyptus stems among blooms to add height and muted color contrast.
Boutonniere-style single bloom for small displays

A single felt bloom made in boutonniere style has a punchy, intimate energy. It sits compact and polished, the little base neatly finished and the stem slender.
I made a tiny version once to tuck into a wrapped gift and the receiver smiled at the homemade charm. The small scale reveals details otherwise overlooked: subtle petal curves, tiny center motifs, and the neatness of the stem wrap.
These mini stems are perfect for tiny vases or as a finishing touch on a desk shelf.
Steps
- Choose a single bloom template and cut its pieces from felt, keeping proportions small and neat.
- Form a compact flower head by gathering petals around a small center and securing them with fabric adhesive.
- Wrap a thin floral wire as the stem and cover the base with a small felt circle for a tidy finish.
- Allow the adhesive to set before placing the boutonniere bloom into a miniature bud vase or tying onto a gift.
Bridal bouquet with romantic muted palette

A bridal-inspired felt bouquet with muted tones reads gentle and timeless. The palette of soft blush, cream, and sage evokes a quiet ceremony in a sunlit garden.
The matte wool petals photograph well, and the bouquet’s weight feels reassuring in the hands. I remember practicing a few arrangements on my kitchen counter, switching out a bloom here and there until the balance felt right.
Small leafy stems and tiny filler flowers bring a handheld bouquet to life without overwhelming the softness of the main blooms.
Steps
- Select a harmonious palette of blush, cream, and sage felt for focal blooms and greenery.
- Construct each bloom by layering petals and securing bases with fabric adhesive, then add individual stems.
- Arrange the blooms into a handheld shape, wrapping the visible stems together with ribbon and concealing any raw edges.
- Tuck small greenery stems around the perimeter to soften the bouquet outline and allow adhesives to set.
Mini mason jar bouquet for casual displays

A tiny felt bouquet in a mason jar feels cheerful and effortless, perfect for a breakfast nook or small shelf. The short stems sit snugly inside, the blooms packed close in a happy, informal cluster.
The glass catch of light amplifies the felt’s muted tones and shows little air bubbles in the jar for a rustic charm. I love arranging these for seasonal color swaps; they’re small enough to gather quickly and resilient to frequent handling.
They make a simple corner feel cared for without a fuss.
Steps
- Assemble several small felt blooms and filler stems, building each flower head and stem separately.
- Trim stems to jar-friendly lengths and group them into a compact cluster that fits the jar opening.
- Nest the stems in a mini mason jar and add a small decorative ribbon around the neck for finishing.
- Adjust bloom positions gently until the cluster reads balanced and allow any adhesives to set.
Rustic bouquet with burlap and wool accents

A rustic felt bouquet wrapped in burlap carries a farmhouse warmth that feels familiar and comforting. The burlap’s coarse weave contrasts nicely with wool’s soft nap, and the tactile mix invites a hand to linger.
I once paired sunburnt orange blooms with a frayed burlap wrap and it read like a late-summer memory. Small ribbon ties and exposed stems give the arrangement a relaxed character, as if it were gathered from the garden and set down on the porch table for a while.
Steps
- Create a selection of felt blooms and filler stems in warm autumnal tones.
- Bundle the stems into a loose cluster and encase the lower stems with a burlap wrap, folding the burlap to frame the base.
- Secure the burlap with twine and trim any excess fabric for a tidy look, allowing adhesive to set if needed.
- Adjust bloom heights so the bouquet reads natural and inviting for display.
Cascading bouquet with trailing felt vines

A cascading felt bouquet introduces movement with trailing vines and layered blooms that tumble gently downward. The vines, soft and flexible, provide a sense of flow that makes the arrangement feel animated rather than static.
I recall draping one over a low table edge and the trailing elements looked as though they were mid-fall, tender and poetic. The combination of dense flowers and airy trailing leaves creates contrast and keeps the composition interesting from every angle.
Steps
- Craft a mix of focal flowers and elongated leaf or vine stems in complementary colors.
- Arrange the focal blooms at the top of the bouquet and position trailing vines to extend downward, securing bases with fabric adhesive.
- Bind the stem cluster together tightly and conceal the wrap with a decorative ribbon or felt band.
- Allow adhesive to set and make small adjustments to vine placement so the cascade reads natural.
Ombre bouquet shifting from light to dark

An ombre felt bouquet plays with a gentle color gradient that moves the eye across the arrangement. Starting with pale tones and graduating into richer hues gives a bouquet a composed, intentional feel.
The wool’s matte finish allows subtle shifts to show without glare, and the transition can be soothing or bold depending on the chosen palette. I enjoy arranging petals so the gradient feels organic rather than forced, and the result often looks like a painterly study of a single color family.
Steps
- Select a color family and cut blooms in a range from the palest to the richest tones.
- Arrange the blooms in a loose gradient, placing lighter flowers on one side and deeper tones on the other.
- Secure stems together with a wrap that complements the palette and tuck small filler stems to soften transitions.
- Allow any adhesives used to set before final placement in a vase or handheld wrap.
Holiday poinsettia arrangement in rich reds

Felt poinsettias in rich reds and deep greens bring a handcrafted warmth to holiday decor. The star-shaped petals have a crisp geometry softened by wool’s nap, and a clustered center gives the flower a joyous focus.
I once made a handful for a mantel and their saturated hues read festive without being flashy. Paired with a few evergreen-style leaves, the bouquet looks seasonal yet timeless, and the tactile quality invites guests to admire details up close during gatherings.
Steps
- Trace and cut pointed petal shapes from deep red and burgundy felt for the poinsettia blooms.
- Create a small clustered center from golden felt or thread and secure it at the bloom base with fabric adhesive.
- Layer the red petals around the center, fastening each layer at the base until the star shape reads full.
- Add green felt leaves and wrap stems together, allowing the adhesive to cure before display.
Scented sachet bouquet for quiet fragrance

A felt bouquet combined with scented sachets brings a gentle olfactory layer to the visual charm. Tiny wool sachets tucked between blooms can hold dried lavender or other dried petals, releasing a soft fragrance when brushed.
The sachets add rounded shapes and an extra hand-sewn detail that feels intimate. I keep one near my bedside and the small scent lifts the space without overwhelming it.
The pairing of tactile felt flowers and quiet fragrance creates an overall sense of calm and homeliness.
Steps
- Sew several small felt pouches and fill them with dried lavender or similar dried botanicals.
- Close each sachet with a neat stitch and attach a short stem to each pouch base using fabric adhesive.
- Tuck the scented sachets among the felt blooms in the bouquet to distribute fragrance gently.
- Adjust positions so the sachets are visible but do not overshadow the floral shapes.
Monochrome bouquet with textural contrast
A monochrome felt bouquet explores texture rather than color, letting petal shapes and surfaces take center stage. When all elements share a single hue, small variations in felt thickness and petal edge treatment become more pronounced.
I once built a cream-on-cream cluster where the bouquet read like a study in light and shadow. The interplay of smooth tulip cups with ruffled chrysanthemums created a refined harmony.
Monochrome arrangements feel cohesive and deliberate, inviting closer inspection of each bloom’s character.
Steps
- Choose a single color of felt in multiple weights for variety in petal texture.
- Construct a mix of bloom types—smooth, ruffled, and fringed—then assemble each head with fabric adhesive.
- Combine the finished flowers into a balanced cluster, arranging by texture rather than color variation.
- Wrap the stems in a matching fabric for a unified finish and allow adhesives to set.
Wool succulent bouquet with sculptural leaves
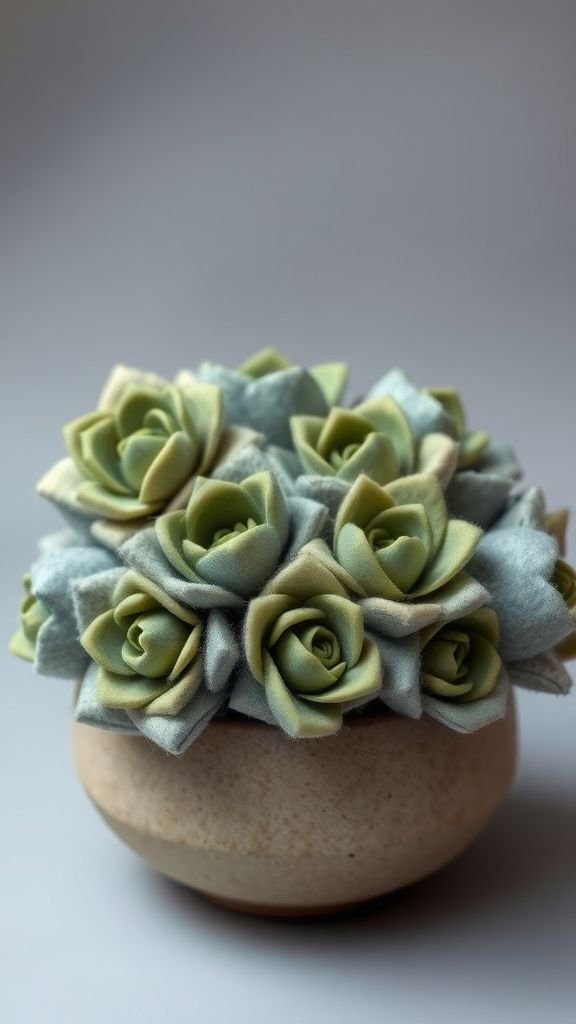
Felt succulents bring a sculptural, architectural feel to a bouquet. The rounded, overlapping leaves read almost ceramic from a distance, but up close the wool fibers reveal softness.
I enjoy arranging succulents with low, compact blooms for a modern table display; their geometric repetition offers a soothing rhythm. The palette tends toward dusty greens and gray-blues, which pair nicely with warm neutrals.
These stems have a quiet presence that invites touch and contemplation.
Steps
- Cut leaf shapes in graduated sizes and layer them concentrically around a small felt core to form rosette succulents.
- Secure each leaf layer at the base with fabric adhesive and shape slightly to suggest depth.
- Attach a short wrapped stem to the succulent base and let adhesives cure.
- Combine several succulent stems into a shallow arrangement for a low, sculptural bouquet.