I remember the first time I brought a clump of moss into the apartment and left it on a windowsill to see how it would settle. That quiet patch of green softened the room in a way that a pillow or print never did.
Rustic moss home decor has a knack for making spaces feel calm, a little wild, and surprisingly cozy.
Over the years I’ve gathered ideas from flea markets, forests, and lazy afternoons at craft fairs, pairing moss with wood, stone, and glass. These projects highlight how Rustic Moss Home Decor crafts bring texture and a touch of outdoorsy warmth into everyday rooms.
Weathered wood frame with moss-filled recesses

I found an old frame at a weekend market and loved how the ridges and knots seemed to invite green growth. The moss settles into the shallow channels like a soft carpet, and when sunlight hits it the textures pop, giving the frame a lived-in, forest-side mood.
Close up, the contrast between the rough, dry timber and the damp, velvety moss is tactile and oddly comforting. I enjoy how a simple frame becomes a tiny landscape, a place where shadow and green meet in quiet company.
Steps
- Clean the frame and remove loose debris from grooves.
- Soak sheet moss briefly, then press it gently into the frame recesses.
- Secure moss with hidden pins or floral wire tucked into crevices.
- Mist the moss lightly and set the frame upright in indirect light.
Moss-covered terrarium with tiny pebbled paths

On a rainy afternoon I arranged little pebbles around a low mound of moss and suddenly a miniature world felt present on my coffee table. The moss looks like a soft lawn while the pebbles create tiny walkways that catch the eye.
Moisture gives the moss a luminous sheen and each tiny frond seems to lean toward the light. There is a calming rhythm watching that green surface shift as humidity rises and falls, like a living painting that breathes with the room.
Steps
- Place a layer of pebbles, charcoal, and potting soil at the terrarium base.
- Position clumps of moss and arrange pebbles to form pathways and borders.
- Add small decorative elements like miniature stones or a tiny bridge.
- Close or open the terrarium to create a stable humid environment.
Rustic wreath with mixed moss textures and twigs
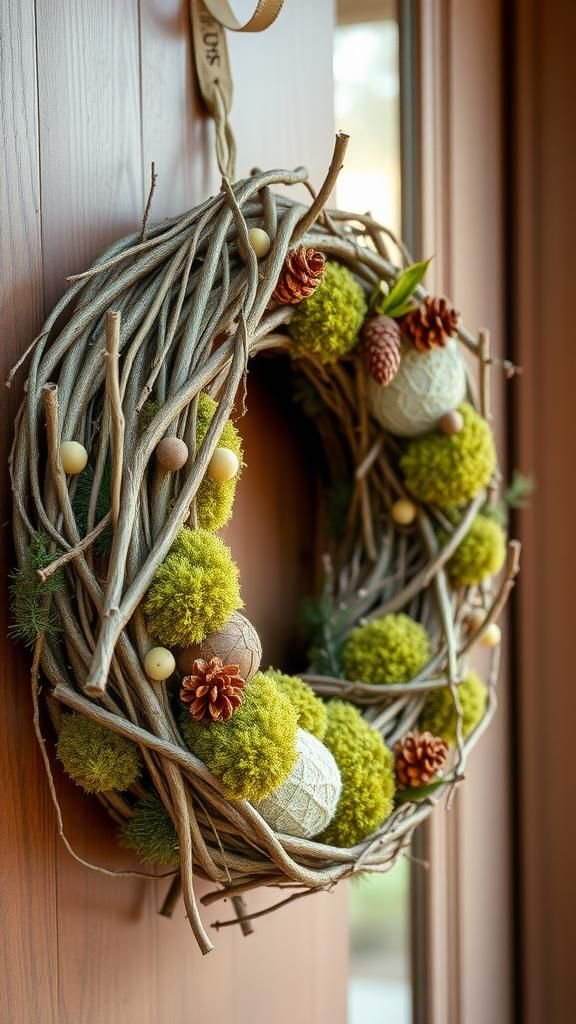
A wreath made with moss draped over intertwined twigs felt like a porch found in a storybook. The varying textures of cushion moss and sheet moss sit against twiggy branches and small seed pods, creating gentle contrasts.
Morning light filters through the wreath and throws delicate shadows onto the doorway, and the scent of damp earth seems to linger. I often catch myself pausing at the door, tracing the soft outlines with my eyes, enjoying how nature’s little details can make a threshold feel more personal.
Steps
- Form a twig base by twisting branches into a circular shape and securing them.
- Layer different moss types over the twig base, tucking edges snugly.
- Add decorative accents like seed pods and small pinecones.
- Hang the wreath on a protected exterior spot or indoor wall.
Moss tabletop runner for an intimate dinner table

I set a strip of moss down the center of a reclaimed wood table and suddenly the whole meal felt slower and more attentive. The verdant strip absorbs candlelight, softening it into a warm glow, and the moss’s texture invites eyes to rest along the table’s length.
There’s a comforting dampness in the scent that pairs well with wooden platters and warm ceramics. Even without flowers, the runner reads like an invitation to linger, adding a quiet, woodland mood to shared moments.
Steps
- Lay a length of burlap or linen along the table center as a base.
- Arrange overlapping strips of moss atop the fabric, creating continuous coverage.
- Nestle candles, small vases, and decorative stones into the moss.
- Refresh moss moisture lightly before the gathering.
Coasters with moss in shallow wooden dishes

I stumbled upon tiny wooden dishes at a craft fair and imagined little green pads sitting in them. The moss settles like a living sponge, giving each coaster a soft cushion that feels good under a ceramic mug.
There is a subtle earth scent when mugs are lifted, and the contrast between smooth wood rim and plush moss creates a harmonious tactile pair. Guests often ask about them, then hesitate before placing their cup down, as if they’re being gentle with something delicate and alive.
Steps
- Choose shallow wooden dishes or slices with a slight lip.
- Place compacted moss into each dish, trimming edges for a neat fit.
- Optionally add a felt backing to protect surfaces.
- Refresh moss with a light mist when it begins to dry.
Soft moss candle ring for warm tabletop glow

When I wrapped a slim candle with a moss ring, the light seemed to settle into the green and glow from within. The moss adds a dampened, earthy scent that blends with wax and wick, and the visual warmth is immediate.
Tiny variations in moss height create playful shadows around the base of the candle, giving each flicker a shifting pattern. The arrangement reads as intimate and informal, a quiet centerpiece that anchors a space without shouting for attention.
Steps
- Form a circular ring with floral wire to match the candle base.
- Press small clumps of moss onto the wire, securing with thin pinning wires.
- Place the ring around the candle, leaving space for safe air flow.
- Light candle in a calm monitored setting.
Moss mirror frame that softens reflections

A mirror that wears moss along its edge changes how the room reflects back. The greenery softens the frame, blurring hard lines and lending a sense of lived comfort.
When I catch my reflection, the moss feels like a quiet halo, injecting a gentle outdoorsy vibe into a bathroom or hallway. Light skimming the moss reveals tiny, jewel-like dew points, and the whole piece makes a mirror feel less utilitarian and more like a small view into a woodsy pocket of the home.
Steps
- Select a mirror with a sturdy frame and clean the surface area.
- Press sheet moss or small clumps along the frame edge, securing firmly.
- Fill gaps with smaller moss pieces for a continuous look.
- Mist occasionally to maintain healthy appearance.
Tiny moss fairy houses for a mantel display

I painted little doors on scraps of wood and set them among patches of moss, and suddenly the mantel felt like a neighborhood for tiny wanderers. The moss forms lawns around the doors, cushioning the tiny scenes with a softness that invites a second look.
Little pebbles and acorn caps add character, and the overall effect is whimsical without being childish. Each miniature house seems to hold a small story, and arranging them becomes a quiet activity on chilly afternoons when the rest of the room is warm and still.
Steps
- Prepare small wooden or clay house shapes and decorate tiny doors and windows.
- Arrange moss around and beneath each house to create little lawns.
- Add miniature accessories like pebbles, acorn caps, and tiny signs.
- Place houses on a mantel or shelf away from direct drafts.
Hanging moss pendant for a rustic overhead accent
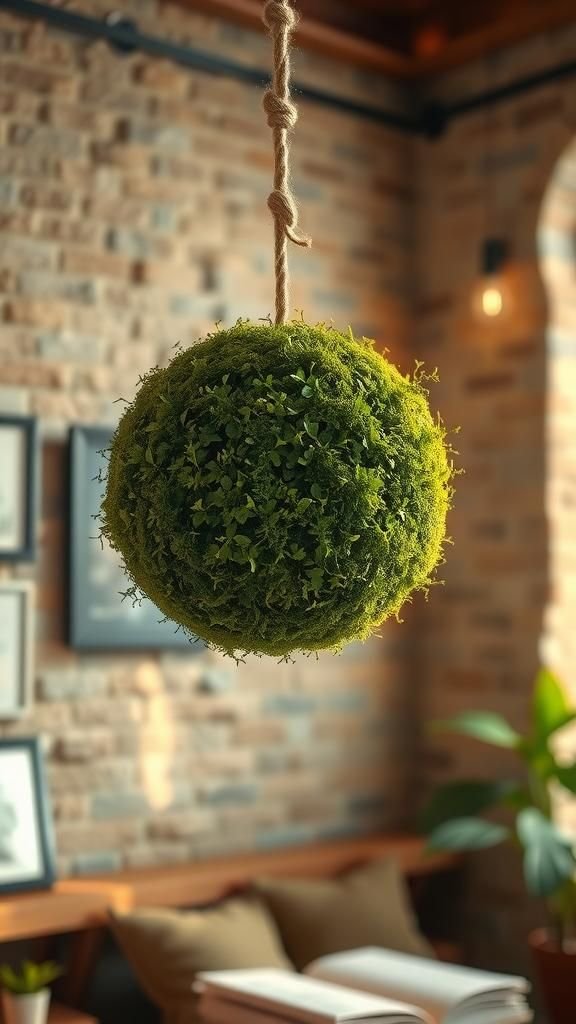
A hanging globe of moss suspended above a reading nook gave the corner an earthy hush. The hanging element moves faintly with room air, and the moss catches light in ways that make it feel almost luminous.
I loved the sound of pages turning beneath that green canopy; it felt like being under a small, private tree. The combination of rope, wood, and damp moss reads like a collected piece, something that could have existed in an old cabin and now lives quietly in a city apartment.
Steps
- Create or select a lightweight frame suitable for hanging and line it appropriately.
- Attach moss around the frame in even coverage and secure with wire or string.
- Suspend the pendant from a ceiling hook at desired height.
- Check stability and mist occasionally to keep moss vibrant.
Moss runner in a wooden tray for coffee table charm
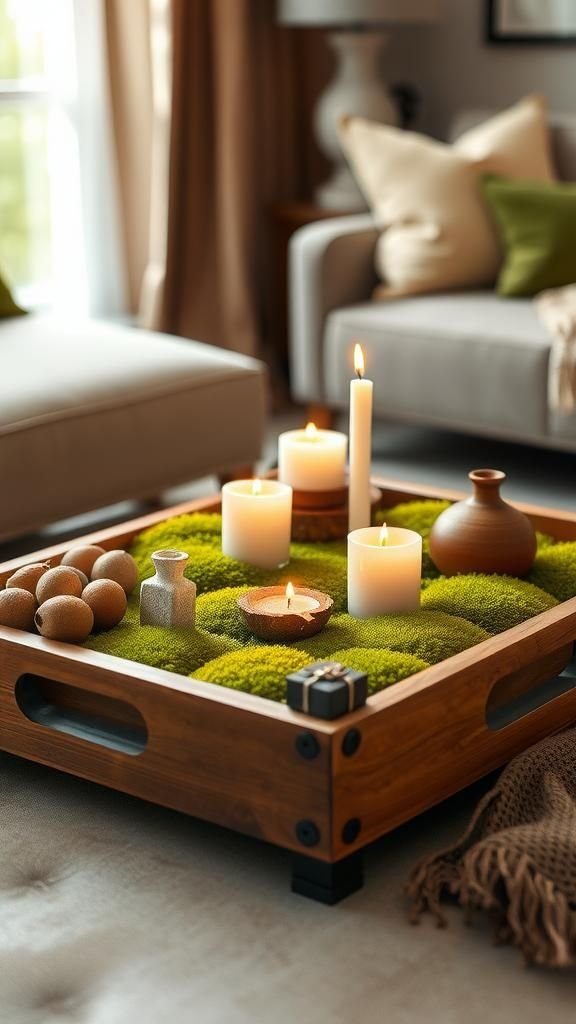
A shallow wooden tray lined with moss became a little stage for candles and vintage finds. The moss adds a soft base that contrasts with the tray’s weathered edges, and the air around it smells faintly of earth.
I often tuck a cup or a little sculpture into the green and find that the whole arrangement feels more intentional. There’s something restful about a tray that reads like a tiny landscape, a place where small gatherings and quiet mornings meet.
Steps
- Select a shallow wooden tray and ensure it is clean and dry.
- Lay moss evenly inside the tray, pressing gently for contact.
- Arrange decorative elements such as candles, stones, or a small vase.
- Mist the moss as needed to keep it healthy.
Moss-adorned planter for ceramic pots
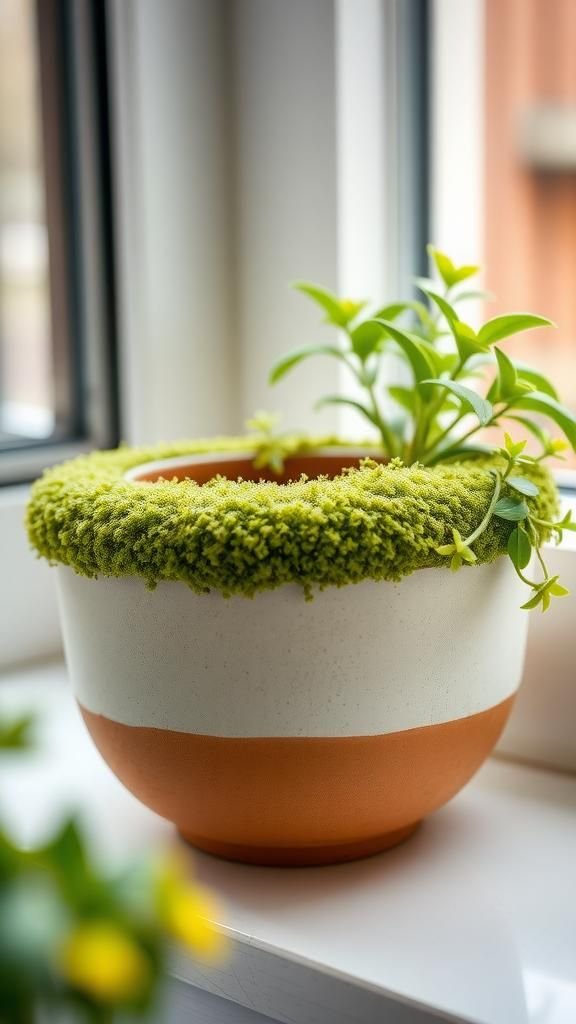
When I wrapped the outer rim of a ceramic pot with moss, the planter gained an immediate mellow personality. The velvety green trims the pot like a collar, softening glazed surfaces and making the whole piece feel more grounded.
Moisture and light bring out tiny variations in green that glow against matte clay, and the scent of damp moss complements the soil below. It’s a small touching detail that makes a planter feel cared for and slightly secretive, like a well-loved object with a quiet history.
Steps
- Choose a ceramic pot and moisten moss to make it pliable.
- Press moss along the outer rim or chosen area and secure discreetly.
- Add the plant to the pot and position on a stable surface.
- Refresh moss moisture occasionally to maintain appearance.
Wall-mounted moss panel like an indoor green patch
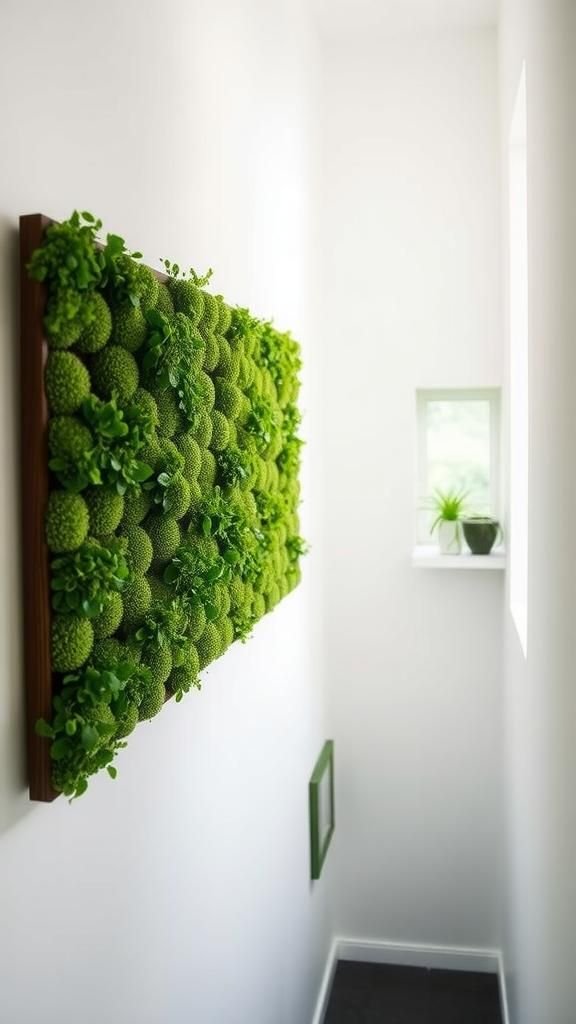
I stumbled on the idea of a small wall panel covered in moss and suddenly a blank stairwell felt livable. The panel reads as a snapshot of forest floor, dense and quiet, and it softens the wall’s echo.
When a breeze passes, tiny bits of moss sway imperceptibly, and the color bands shift as light changes through the day. It brings a contemplative pause to passing moments, as if the wall holds a memory of outdoors that won’t hurry away.
Steps
- Select a shallow frame or panel and prepare a backing suitable for moss placement.
- Arrange moss types across the panel to create texture and coverage.
- Mount the panel securely to the wall with appropriate hardware.
- Maintain humidity around the panel to keep moss healthy.
Moss-adorned lamp base for soft, organic lighting

A lamp with a moss-wrapped base casts a different glow, one that feels rooted and gentle. The moss muffles the industrial edge of metal or ceramic, and its muted greens dance with the lamp’s warm light.
At night the lamp looks like a small patch of forest lit from within, and in the morning it reads as a calm companion to brewing coffee. The tactile mix of fabric shade, moss, and base makes the object feel handcrafted, as though it has grown into its place over time.
Steps
- Prepare the lamp base by cleaning surface areas where moss will be attached.
- Affix moss around the base in pleasing arrangement and secure discreetly.
- Ensure electrical components remain accessible and safe.
- Light the lamp and enjoy the softer ambiance created.
Natural moss centerpiece with driftwood and stones

I built a centerpiece around a piece of driftwood cradled by moss and found the living arrangement felt like a shore memory. The pale wood and dark green moss play off each other, while smooth stones add quiet punctuation.
There’s a coolness to the display that balances warm candlelight or ceramic serving pieces, and the whole piece encourages slow conversation. It reads as collected rather than crafted, like a small vignette from a relaxed coastal walk brought indoors for the table.
Steps
- Select a stable base such as a shallow tray or wooden plank.
- Position driftwood and arrange moss around it, filling gaps naturally.
- Tuck smooth stones and small shells into the composition for contrast.
- Place centerpiece on a table, refreshing moss moisture as needed.
Moss and succulents: a mixed-texture planter scene
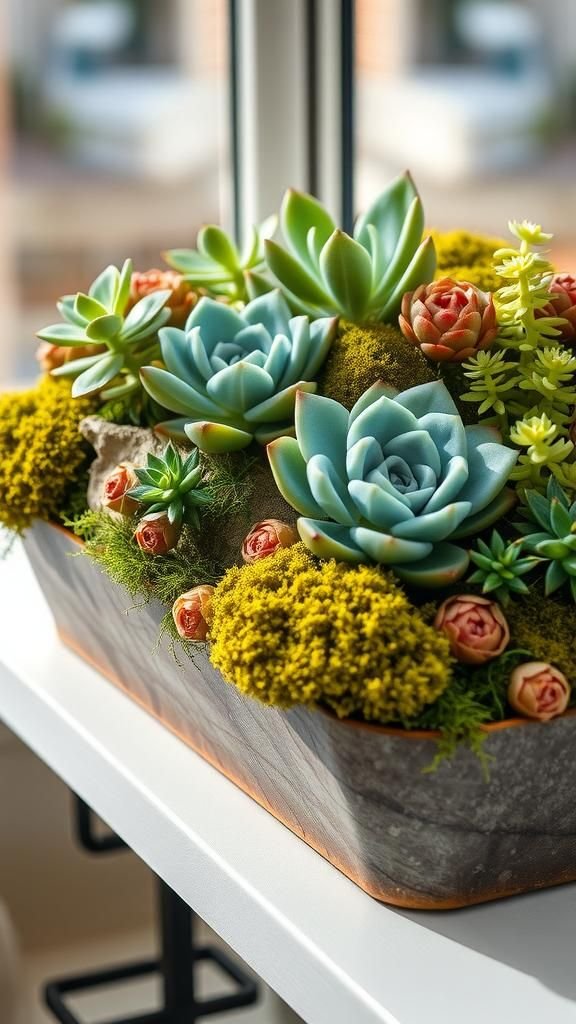
Combining moss with low-water succulents felt like bringing two moods together; the moss offers lush softness while the succulents present sculptural shapes. The arrangement balances a dry silhouette with a moist underlayer, and the color contrasts are quietly satisfying—sage and chartreuse against fleshy blues and greys.
When placed on a bright sill, the combination reads fresh and composed, and it’s fun to watch the way light plays on different leaf surfaces through the day.
Steps
- Choose a shallow planter with good drainage and add appropriate substrate.
- Position succulents and place moss around them to cover exposed soil.
- Create visual balance by varying height and texture within the planter.
- Water sparingly and allow light to support succulent growth.
Moss napkin rings for a woodland table setting

I wrapped cloth napkins with soft green rings and felt like I had invited the woods to dinner. The moss feels plush under fingertips and frames each place setting with an intimate, crafted touch.
Paired with simple pottery and wooden utensils, these rings bring a cohesive quietness to the table. Guests tend to linger over them, commenting on the texture and scent, and the rings help the meal feel curated without fussiness—an easy, tactile detail that makes the table feel warmer and closer.
Steps
- Form small circular rings from flexible wire or thin wooden bands.
- Press moss onto the rings and secure with floral pins or binding.
- Slide rings around folded napkins and arrange plates accordingly.
- Lightly mist moss before the meal if it looks dry.
Moss clock face for an organic timepiece

A wall clock with a moss-covered face felt like a small rebellion against sterile clocks. The numbers recede into the green, and the hands glide over a living surface that softens the passage of minutes.
When I glance up, the moss offers a small pause, a reminder of quiet growth rather than rushed schedules. The tactile contrast between mechanical hands and soft moss creates a balance that makes timekeeping feel gentler, almost ceremonial, in a room where the clock hangs.
Steps
- Remove the clock face and lay it flat on a protected surface.
- Affix sheet moss over the face, cutting around the hands as needed.
- Reassemble the clock mechanism and ensure hands move freely.
- Hang the clock on a stable wall and check time accuracy.
Moss place cards for a natural-feeling dinner

I tucked small moss patches under handwritten name tags and instantly the place settings felt personal and grounded. The moss adds a soft backdrop that makes card stock pop, and the little mounds give each seat a quiet presence.
There’s a tactile pleasure in lifting a card to find that green cushion beneath, and the scent of damp earth pairs nicely with table aromas. It’s a modest touch that nudges guests toward a slower, more attentive meal experience without being showy.
Steps
- Prepare small flat pieces of card stock with guest names.
- Place compacted moss under each card to create a soft base.
- Arrange place cards at each setting, spacing evenly around the table.
- Mist moss lightly before guests arrive if it looks dry.
Moss-covered switch plates as subtle wall details

Replacing a plain switch plate with one wrapped in moss made an unnoticed corner feel thoughtful. The moss softens the hard edge of the plate and blends the fixture into surrounding textures, turning a small utilitarian object into a decorative pause.
When fingers press the switch, they meet cool, soft green rather than blank plastic, and that small tactile surprise brings a tiny domestic delight. It’s a modest detail that quietly changes how the room feels when experienced up close.
Steps
- Remove the switch plate from the wall and disconnect power if needed.
- Attach moss to the plate backing, leaving openings for switches and screws.
- Reinstall the plate and ensure switches operate smoothly.
- Keep moss slightly moist if it begins to dry.
Moss bookshelf accents between stacks of books

I began tucking moss patches between stacks of books and the shelves felt less austere, more like a curated collection from a traveler who lingered outdoors. The moss softens hard lines and creates small pockets of green that interrupt rows of spines in a pleasant way.
When light hits the shelves, tiny shadows and highlights play across the moss surface, adding movement to an otherwise static display. It turns a library into a little landscape where stories and living texture coexist.
Steps
- Identify shelf spots where moss will be visible without crowding books.
- Place compact moss pads between stacks or on top of books as accents.
- Adjust positions to balance visual weight across the shelf.
- Gently mist moss if it becomes dry in indoor air.
Moss centerpiece for a seasonal mantel arrangement

I gathered pinecones, dried branches, and a bed of moss for a mantel and found the display quietly seasonal. The moss served as a soft base that made the harder textures pop, and the color palette felt restrained and natural.
Afternoon light across the mantel highlighted tiny ridges of moss, giving depth to otherwise simple elements. The arrangement felt unhurried, a display that could remain through changing weeks, lending the room a steady, calm presence without needing daily attention.
Steps
- Lay a strip of moss across the mantel as the base.
- Arrange pinecones, branches, and seasonal pieces on top, blending into the moss.
- Balance items symmetrically or asymmetrically depending on preference.
- Refresh moss moisture occasionally to retain color.