I always look forward to the small, joyful ritual of making shamrocks each March. Those paper leaves and soft felt clovers bring back afternoons spent at a kitchen table with crayons scattered and a radio playing faintly in the background.
St Patrick’s Day Shamrock Crafts became my go-to way to invite color and a bit of whimsy into chilly late-winter days.
Over the years I tried many versions, from tiny charms to oversized garlands. St Patrick’s Day Shamrock Crafts feel like a friendly tradition, a chance to mix textures, bright greens, and a few unexpected materials for cheerful results.
Paper shamrock garland for windows and walls

A string of paper shamrocks always brightens a room with soft, fluttering movement. I remember the satisfying whisper as each leaf shifted in a warm draft and the clean matte of construction paper under my fingertips.
Colors ranged from pale mint to deep emerald, and tiny patterned scraps added playful surprise. The garland felt festive without overwhelming the space, and when it caught afternoon light the edges cast delicate green shadows on white walls.
It became a simple way to bring a bit of holiday cheer into a living room or child’s corner.
Steps
- Fold sheets of colored paper and trace a shamrock template onto them.
- Cut out each shamrock shape and arrange them in an alternating color sequence.
- Attach the shamrocks to a length of twine with small dots of glue along the top edge.
- Space the shapes evenly and hang the garland across a window or along a mantel.
Felt shamrock coasters with soft texture
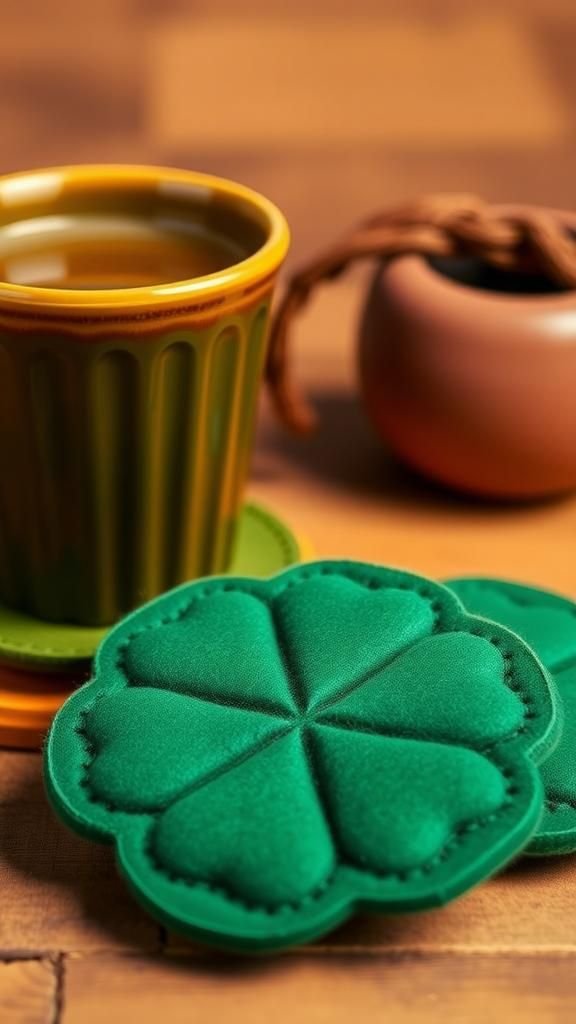
Felt coasters have a comforting fuzz that feels cozy in hand and quiet against a tabletop. I liked running my fingers along the rounded lobes of a shamrock and noticing how the fabric muffled the clink of mugs.
Greens ranged from mossy to kelly, and tiny embroidered veins added a subtle sheen when the light hit. The slightly spongy thickness protected wood surfaces, while the edges looked handmade and earnest.
Leaving a set on a coffee table always invited compliments and a few stories about fond childhood crafts.
Steps
- Trace shamrock shapes onto felt and cut two matching pieces for each coaster.
- Place the pieces together and stitch around the edge, leaving a small opening for filler.
- Insert a bit of batting for cushioning and finish stitching to close the opening.
- Add simple embroidery lines to suggest leaf veins for a finished look.
Salt dough shamrock ornaments for hanging

Salt dough carries a warm, oven-baked scent and a pleasantly rough surface once fully dry. My kitchen filled with the gentle aroma of baked dough the first time I made shamrock ornaments, which felt oddly comforting.
Each piece had a unique edge where fingerprints indented slightly, lending character to the shapes. Once painted in glossy green hues, they reflected light softly and had a handmade charm that survived the years.
Hung on ribbon, they added weight and presence to a door or a simple wall display.
Steps
- Mix flour, salt, and water to form a workable dough and roll it out to an even thickness.
- Press shamrock cookie cutters into the dough and make a small hole near the top for hanging.
- Bake the shapes until firm and allow them to cool fully on a rack.
- Paint each ornament in shades of green and thread ribbon through the holes for hanging.
Shamrock suncatcher with translucent color
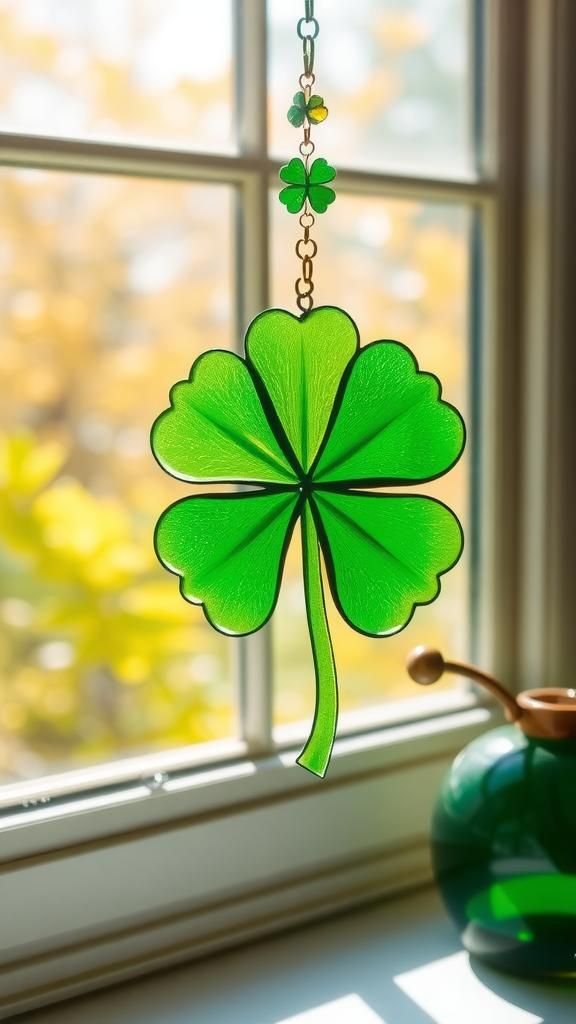
Suncatchers have a way of capturing light and scattering it like tiny stained-glass moments. I remember pressing a shamrock silhouette against a sunny pane and watching jewel-toned hues glow in the afternoon.
The translucent colors pooled slightly around the edges, creating delicate gradients that changed as the sun moved. Hanging one in a south-facing window transformed ordinary light into a small, playful spectacle.
The smooth sheen and warm brightness made the whole room feel a touch softer and cheerier on grey days.
Steps
- Cut a shamrock shape from clear acetate or thin plastic and trace the design onto it.
- Fill interior sections with translucent craft paints or liquid window clings and allow them to set.
- Once dry, outline the shamrock with a thin black or metallic border for definition.
- Attach a loop of thread at the top and hang the suncatcher in direct sunlight.
Mosaic shamrock from broken tiles and glass
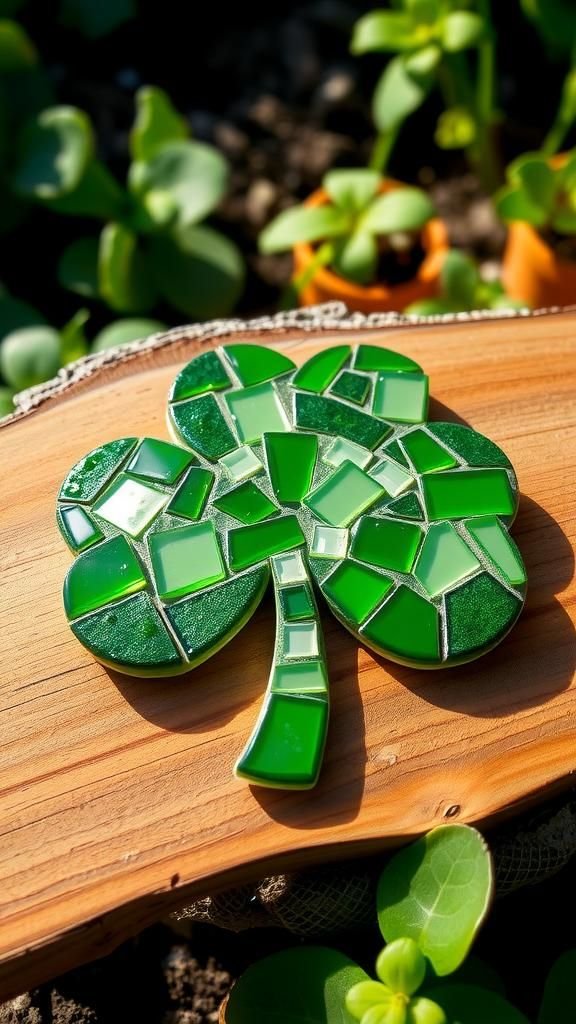
A mosaic shamrock brings a rugged sparkle that invites close inspection. I recall sorting through tiny shards of ceramic and glass, each piece reflecting light at a slightly different angle.
The grout between fragments had an earthy matte that contrasted with the glossy chips, and the whole felt like a miniature landscape of green lakes and stone pathways. The tactile contrast between smooth glass and gritty grout made me linger with my fingertips.
Displayed on a stepping stone or wall plaque, the mosaic caught light in unexpected ways.
Steps
- Draw a shamrock outline on a backing board and arrange tile and glass pieces within the shape.
- Fix each shard in place with a small dab of adhesive, maintaining the overall pattern.
- Mix grout and spread it over the mosaic, pressing it into the gaps between pieces.
- Wipe off excess grout with a damp sponge and let the surface cure until firm.
Jar lid shamrock magnets from found materials
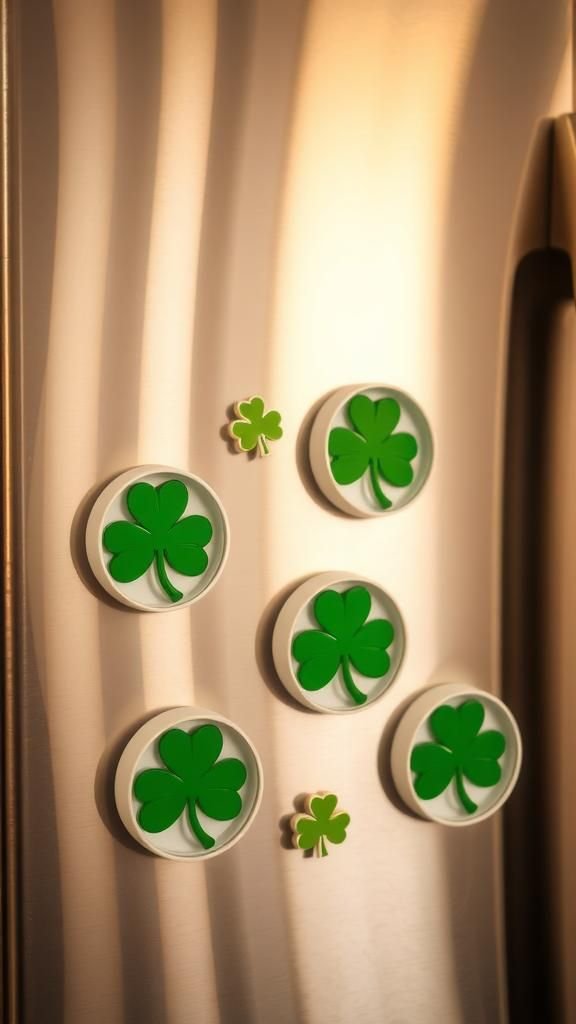
Reclaimed jar lids turned into shamrock magnets felt playful and pleasantly informal. The metal rim had a faint coolness to the touch and the painted surface offered small imperfections that added warmth.
I liked pressing one onto a fridge and watching it hold a grocery list with a modest, cheerful presence. The circular shape framed the shamrock nicely, and the magnet’s modest weight made it feel sturdy.
Little flecks of leftover paint or a tiny chip became part of the charm rather than a flaw.
Steps
- Select jar lids and paint or cover the inside surface with green paper or fabric to form a backdrop.
- Attach a shamrock cutout to the center of each lid with adhesive.
- Secure a small magnet to the back of the lid and allow bonding time.
- Polish the outer rim and display the magnets on a refrigerator or metal board.
Button shamrock art framed on textured cardstock
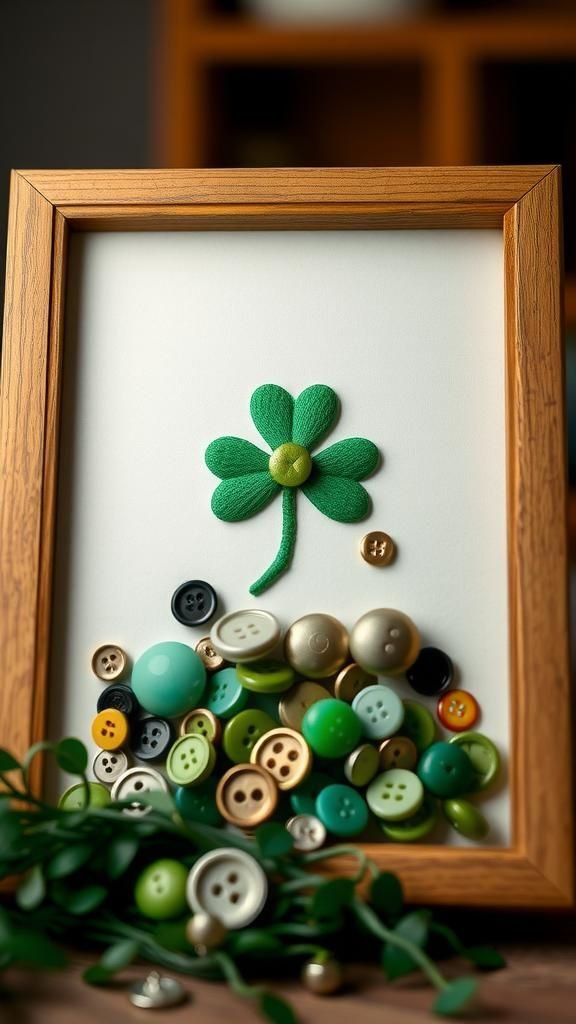
A button shamrock collage offered a playful, slightly noisy texture as each round piece bumped gently against its neighbor. I enjoyed sorting through a bowl of mismatched buttons, feeling their smooth plastic and old brass, imagining different color groupings.
On textured cardstock the buttons created a low-relief map of clover leaves that caught light on high points and nestled into shadows between buttons. Framed behind glass the piece looked unexpectedly refined, turning found bits into a tactile, cheerful image that invited a closer look.
Steps
- Arrange buttons on a sheet of thick cardstock to form the shamrock outline and play with color placement.
- Fix each button in place with adhesive, working from the center outward to maintain shape.
- Allow the glue to dry fully before trimming the cardstock to size.
- Place the finished piece in a frame for display on a shelf or wall.
Embroidery hoop shamrock with delicate stitching
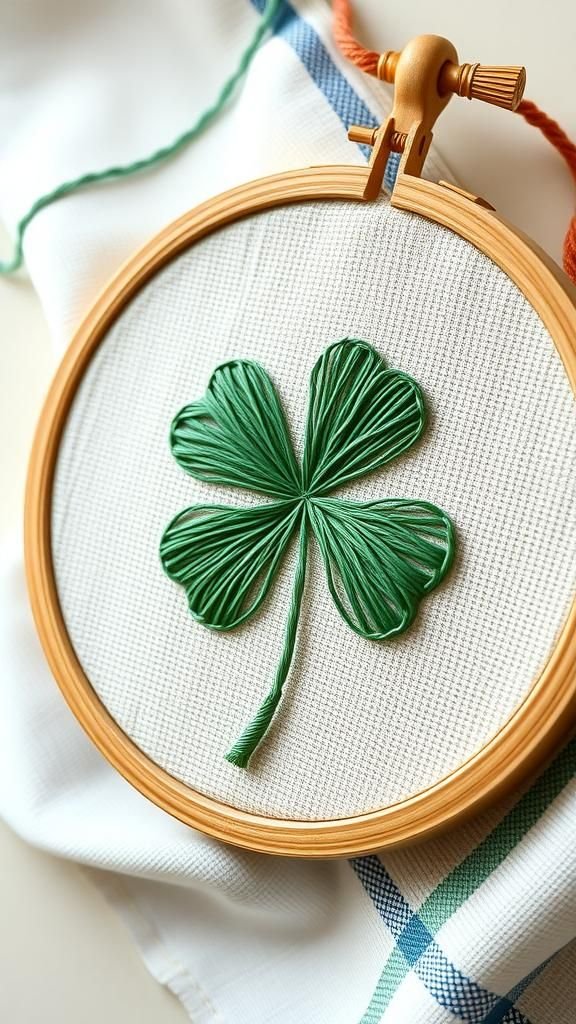
An embroidered shamrock carries a gentle, domestic comfort, with threads lying like small streams across fabric. I often found myself tracing the tiny backstitch along a leaf and appreciating the rhythmic repetition of each pass.
The raised stitches caught light and cast faint shadows, lending subtle depth to what started as a flat piece of linen. The wooden hoop framed the motif like a warm collar, and a tiny stitched border added a finishing whisper.
Displayed on a kitchen wall, it felt intimate and quietly handcrafted.
Steps
- Transfer a shamrock outline onto a piece of fabric stretched taut in an embroidery hoop.
- Stitch along the outline and fill in leaf areas with a chosen stitch pattern and thread colors.
- Add subtle vein details with a finer thread for dimension.
- Secure the fabric in the hoop and trim any excess for a neat finish.
Yarn-wrapped shamrock wreath for door display
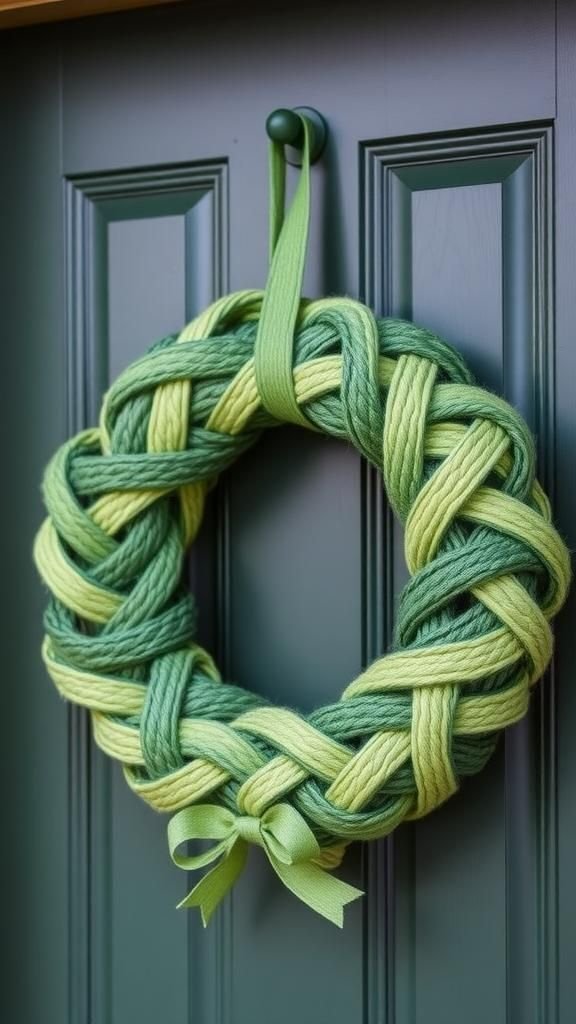
Yarn wrapping transformed a simple frame into a plush halo of green tones that felt inviting to touch. I ran fingers along the wrapped curves and enjoyed the slightly fuzzy silhouette against cool winter air.
The layered yarn offered subtle variations where fibers overlapped, creating a cozy, hand-knit impression without bulky weight. Small accents like a contrasting bow or a string of beads added movement and tiny hints of shine.
Hanging outside, the wreath seemed to soften the entryway and welcome visitors with quiet color.
Steps
- Prepare a shamrock-shaped wire or cardboard frame as the base for wrapping.
- Secure a yarn end and wrap tightly around the frame until the surface is covered with no gaps.
- Add a contrasting yarn or ribbon accent to one side for visual interest.
- Attach a loop at the back for hanging on a door or wall.
Clay shamrock pendant with rustic charm

A small clay pendant felt pleasantly cool in the palm before it warmed slightly with the heat of a hand. The surface took impressions easily, capturing tiny fingerprints and subtle texturing that gave each piece personality.
After glazing it picked up a glassy sheen that intensified the green and made highlights blink when the light struck. Strung on a simple cord it swung with a modest weight, catching sightlines when layered with other necklaces.
Wearing one felt quietly personal, like carrying a tiny talisman fashioned from clay and memory.
Steps
- Shape a small piece of polymer or air-dry clay into a shamrock silhouette and refine the edges.
- Use a thin tool to make a hole near the top for threading.
- Bake or allow the clay to dry according to the material’s instructions.
- Paint or glaze the pendant and thread it onto a cord once fully finished.
Pressed flower shamrock greeting cards
Pressing tiny blossoms into a shamrock design felt like bottling a quiet afternoon outdoors. The petals pressed flat retained their delicate veins and a whisper of color that contrasted with deep green leaves.
The card’s surface had a faint papery scent and a soft tactile difference where the flowers lay. Sending one carried a whisper of something personal, as if the recipient could almost feel the garden breeze.
Each card felt like a small, patient work, blending botanical details with gentle, leafy shapes.
Steps
- Arrange pressed flowers and leaves into a shamrock layout on a blank card surface.
- Adhere the botanical pieces with archival glue to preserve their color and shape.
- Allow the adhesive to dry thoroughly and press the card under a heavy book if needed.
- Write a short note inside and envelope the card for mailing or gifting.
Crayon resist shamrock watercolor painting
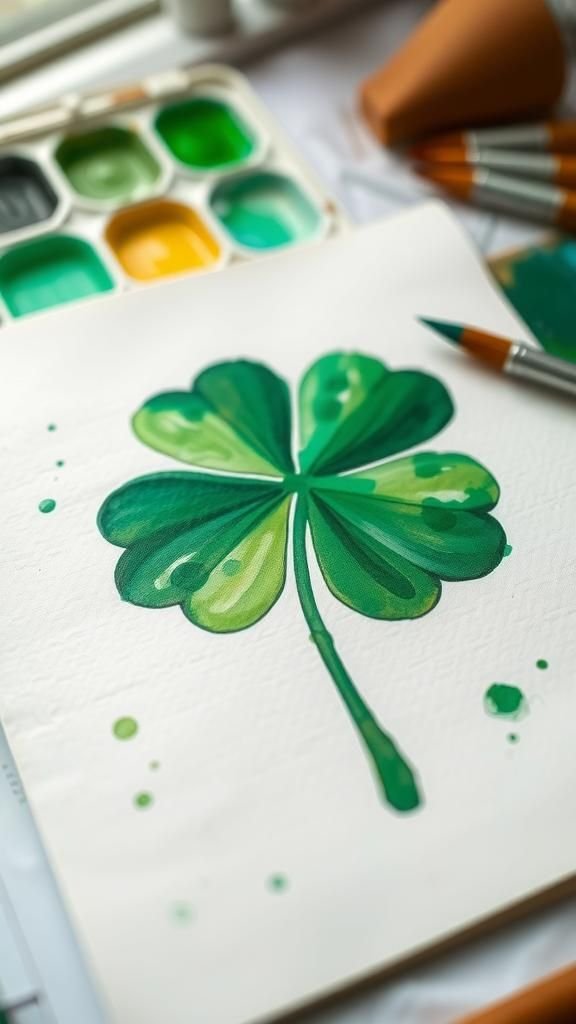
The crayon resist technique produced a playful contrast between waxy lines and watery pigments. I liked how the crayon created faint ridges that repelled bright greens, letting washes pool in soft gradients around pale veins.
The paper warped slightly where the paint pooled, giving the piece an organic, handmade feel. When dry, the shamrock appeared luminous, with layered greens that felt both airy and anchored.
The tactile texture of watercolor paper and the faint wax sheen together made the artwork feel like a small, lively study.
Steps
- Draw a shamrock outline and interior details lightly with a white or clear crayon on watercolor paper.
- Mix green watercolor washes and brush them over the paper, allowing the wax lines to resist the paint.
- Layer additional washes for depth, letting each layer dry between applications.
- Once finished, flatten the painting under a heavy book if the paper has buckled.
Stained glass effect window shamrocks with shimmer
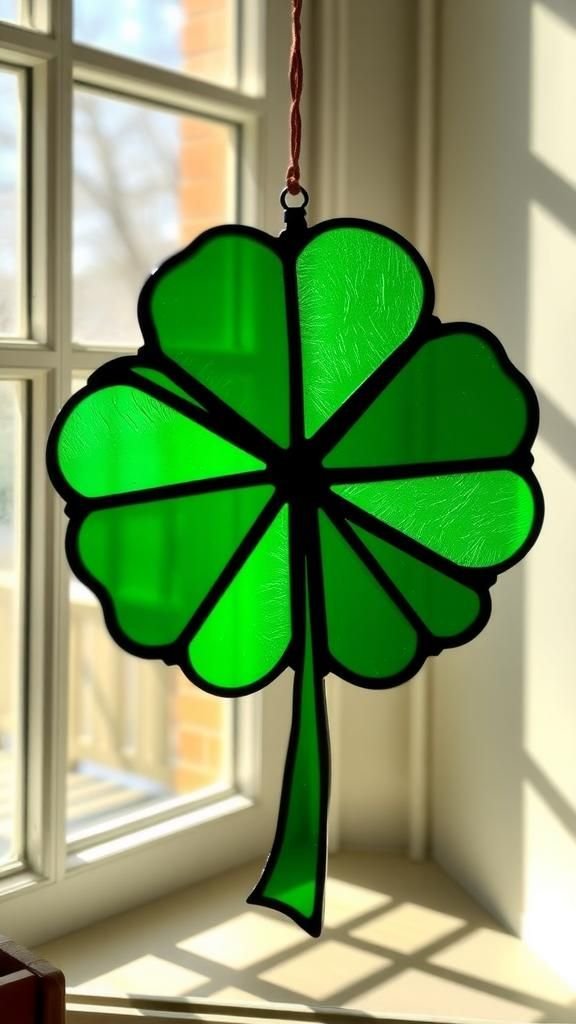
A stained-glass shamrock carried a jewel-like clarity that brightened even dull afternoons. The faux glass had a cool smoothness and the leaded lines between sections caught the eye with thin dark contrast.
When the sun slipped through the panes the colors glowed warmly, casting tiny green reflections on a nearby sill. The overall presence felt refined yet playful, like a miniature gallery piece hung at eye level.
Displaying one turned a plain window into a small celebration of color and light.
Steps
- Sketch a shamrock design onto clear plastic or glass-safe surface and outline sections with faux lead strips.
- Fill each section with stained-glass paint in varying green tones and allow to dry.
- Add highlights or metallic accents once the paint has cured.
- Affix a suction cup or hanging loop to display the piece on a window.
Cardboard shamrock puppets for playful storytelling

Cardboard puppets had a satisfying crispness at the edges and a reassuring weight that made them easy to handle. I enjoyed the gentle rustle as a puppet moved and the slightly rough texture of recycled board under fingertips.
Painted faces or tiny embellishments gave each shamrock a little personality as if it were a quiet character waiting to be spoken for. When set against a simple fabric backdrop they carried a theatrical charm, inviting low-key performances that felt homespun and affectionate to anyone watching.
Steps
- Cut shamrock shapes from sturdy cardboard and decorate the front with paint or markers.
- Attach a stick or handle to the back with tape or adhesive for manipulation.
- Add small details like eyes or accessories to give each puppet character.
- Stage a simple backdrop and let the puppets take a turn in short skits.
Twig shamrock garden markers with natural feel
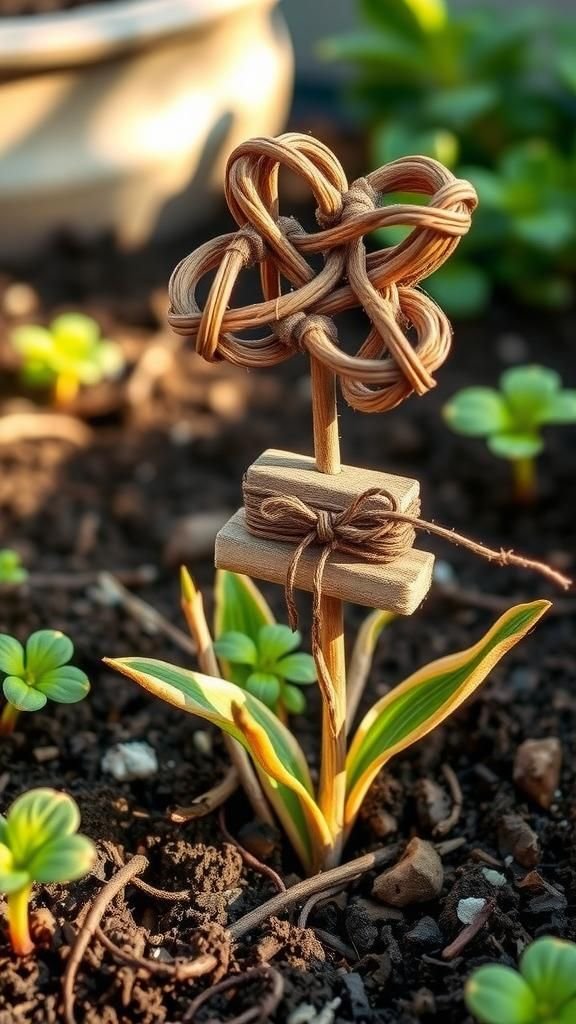
Twig markers carried an earthy scent and a pleasing irregularity from their bark and knots. I collected slender branches that had a slightly rough texture and arranged them into leaf shapes that felt organic and irregular.
The muted palette of wood and mossy lichen created a quiet harmony in a garden bed, and the markers aged gracefully over the season. Tapping one produced a faint hollow sound, and the whole group blended into soil and greenery with a humble, pastoral charm that felt right at home outdoors.
Steps
- Gather flexible twigs and bind them into a shamrock shape with thin floral wire or twine.
- Trim excess length for a neat appearance and reinforce joints so the shape holds.
- If desired, apply a clear outdoor sealant to extend longevity.
- Insert the finished markers into garden beds to label rows or decorate planters.
Watercolor ombre shamrocks on heavy paper

Ombre watercolor shamrocks had a gentle transition from deep hunter greens to pale celadon that looked like a miniature horizon. The paint bled at the edges in delicate, organic patterns and pooled in tiny darker rings where pigment settled.
The paper drank the color slowly, leaving a tactile tooth that invited a fingertip for a closer look. Displayed in a row, each shamrock held a different mood depending on saturation, and the overall effect felt meditative and quietly elegant when placed in a slim frame.
Steps
- Sketch light shamrock outlines on heavy watercolor paper and wet the surface slightly where color will flow.
- Apply graduated green washes, allowing pigments to blend naturally for a smooth ombre.
- Add deeper accents to the leaf bases for contrast if desired.
- Let the paintings dry flat and mount them in a narrow frame or mat for display.
Glitter resin shamrock charms with glossy finish

Glitter resin charms had a cool, glassy surface that shimmered when tilted. I loved watching tiny sparkles shift like a slow-moving constellation beneath the clear topcoat.
The charms felt tidy and polished in a hand and their edges reflected light in narrow, glossy lines. Suspended on a string they made a soft tinkling sound when they bumped together.
The combination of translucent green hues and flecks of metallic glitter created a playful elegance that felt both contemporary and celebratory.
Steps
- Mix a small batch of clear resin and stir in green pigment and fine glitter until evenly distributed.
- Pour the mixture into shamrock-shaped silicone molds and degas with a heat source to remove bubbles.
- Allow the resin to cure fully according to the product’s time frame.
- Demold the charms and sand any rough edges before attaching jump rings or cord for hanging.
Origami shamrock bouquet with delicate folds
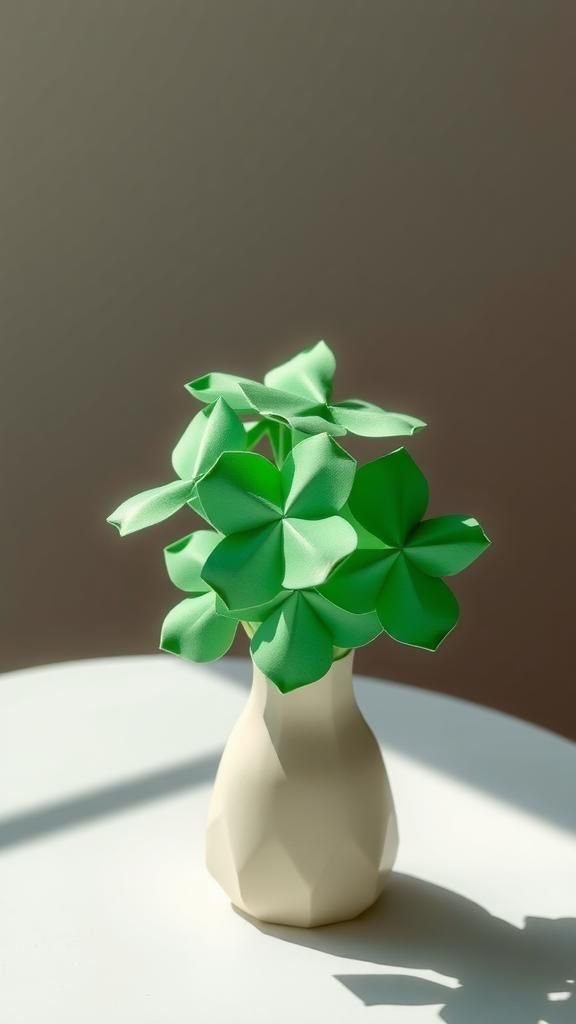
Origami shamrocks had crisp creases that created precise planes and tiny shadows along each fold. Folding paper into a leaf felt quietly absorbing, with the paper making a light rustle as corners aligned.
A bouquet of these folded clovers looked unexpectedly sculptural, a cluster of green planes catching light in a rhythm. The paper edges created fine silhouettes against a vase, and the overall arrangement read like a low-maintenance floral substitute that kept its shape and color over many days without any fuss.
Steps
- Begin with square sheets of paper and follow a sequence of valley and mountain folds to form a shamrock leaf.
- Create three identical leaves and gently join them at the base to form the shamrock.
- Affix the shamrock to a thin stem or paper straw if a bouquet stem is desired.
- Arrange multiple shamrocks in a small vase or wrap them into a handheld bundle.
Seed paper shamrock gift tags that plant later
Seed paper gift tags held a faint grainy texture and a gentle, earthy scent that hinted at future sprouts. Running a thumb across the surface revealed embedded flutters of seed and the paper’s fibrous weave.
Giving one felt like handing a tiny promise of growth, a tag that might turn into delicate green shoots after a season. The rustic appearance paired nicely with brown twine and simple handwriting, and the idea that a tag could become living foliage added an extra layer of meaning to a small present.
Steps
- Blend recycled paper pulp with wildflower or herb seeds until evenly mixed.
- Press the seeded pulp into a flat sheet and allow it to dry fully on a mesh surface.
- Cut shamrock shapes from the dried sheet and punch a hole for attaching to gifts.
- Tie the tags to presents and include a note about planting instructions for the recipient.
Beaded shamrock bookmark with slender charm

A beaded shamrock bookmark had a satisfying counterpoint between smooth beads and the tiny metal clasp at its end. I enjoyed sliding one between pages and feeling the cool bead chain settle against the spine.
The beads caught light in small pinpricks, and the shamrock charm dangled with a quiet, reassuring weight. The tactile experience of flipping pages with the bookmark in place felt pleasantly analog in a mostly digital reading habit.
It made a book feel like a small curated ritual again.
Steps
- String green beads onto a length of thin wire or cord, leaving room for the shamrock charm at one end.
- Secure the ends with crimp beads or knots to prevent movement.
- Attach a small shamrock charm and a flat metal or bead stopper at the other end.
- Trim any excess wire or cord and test the bookmark in a book to ensure balance.
Potato stamp shamrock printed tea towels
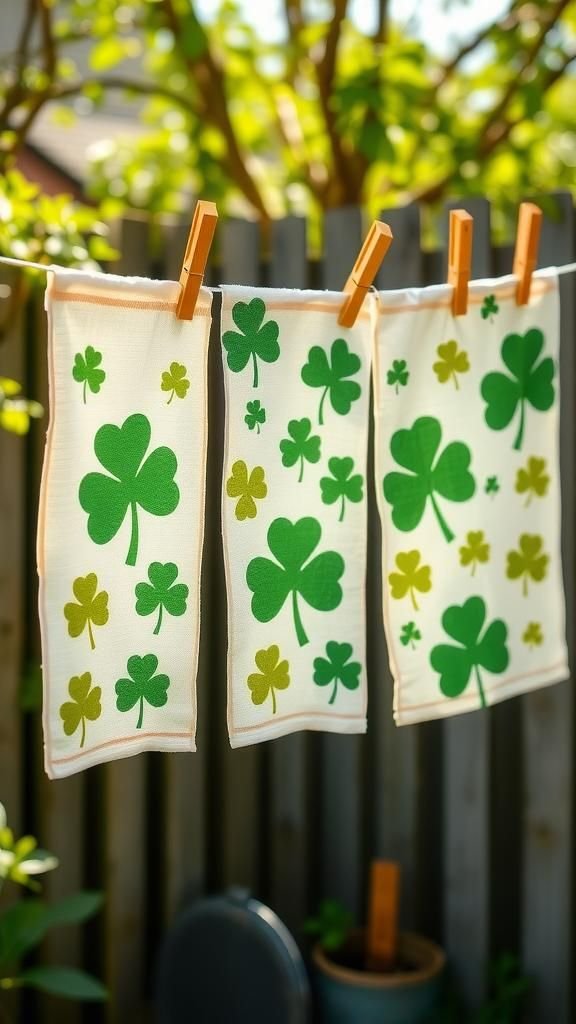
Potato stamping left a rustic, slightly imperfect mark that felt charmingly human. The printed shamrocks varied subtly from impression to impression, each carrying small smudges and areas of denser ink that gave the pattern life.
Fabric absorbed pigment in a way that softened hard edges, creating a pleasant, lived-in look on cotton towels. The cool dampness of freshly washed fabric later intensified the greens, and letting the towels hang on a line made them seem like part of a slow domestic rhythm.
Steps
- Carve a shamrock shape into a halved potato to form a simple stamp surface.
- Press the potato into fabric paint and test the print on scrap fabric to check coverage.
- Stamp a repeating pattern onto tea towels, reapplying paint as needed for consistent prints.
- Allow the paint to dry and heat-set if required for fabric durability.