New Year’s Eve Party Crafts always feel like small acts of celebration that change the mood of a room. I remember one year when a handful of handmade sparkly pieces turned a quiet living room into a place where everyone lingered a little longer, laughing over silly hats and glittery photo props.
Making a few decorations and party favors for New Year’s Eve Party Crafts can be a gentle way to connect with friends and mark the shift into a new calendar.
I enjoy projects that bring texture, sound, and a touch of shimmer to the evening without too much fuss.
Handheld glitter confetti poppers for the countdown

I love the audible crack and the soft shower of glitter when a popper goes off at midnight. These handheld poppers give a crisp, festive moment that feels lively and intimate at the same time.
The weight of the tube in my palm, the sudden blur of metallic flakes, and the faint smell of paper all combine into a memory that lingers. Guests often pause mid-toast just to watch the tiny sparks of color fall, and the scattered glitter becomes a small, shimmering carpet that catches the light for hours.
Steps
- Gather lightweight cardboard tubes, tissue confetti, and a roll of decorative tape.
- Layer confetti into the tube until it feels lively and bouncy inside.
- Fasten one end of the tube with decorative tape so contents stay put.
- Compress the tube lightly and secure the opposite end with tape, leaving a small gap for the pop.
- Decorate each tube exterior with metallic stickers and labels for a festive look.
Countdown banner with sliding number pockets
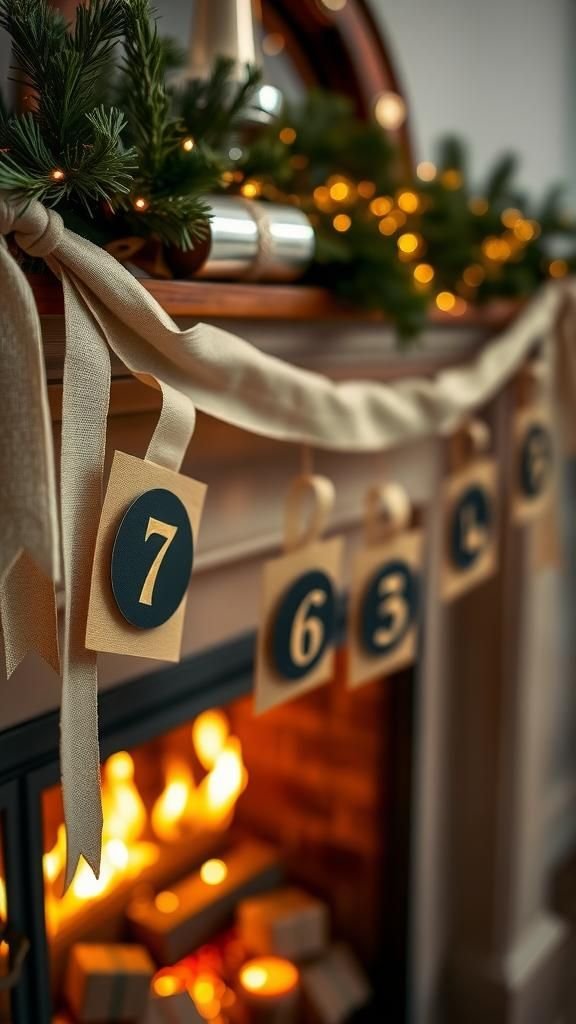
A countdown banner that reveals numbers as the night approaches feels like a small ritual. I enjoy the tactile rhythm of pulling a pocket open to reveal the next numeral, each one printed on thick cardstock with a hint of shimmer.
The banner stretches across the mantel and invites dull moments to become anticipatory ones. The layered textures of linen ribbon and metallic numbers catch the low light, and the tiny flaps create the sort of suspense that makes guests gather closer, murmuring guesses about how the evening will unfold.
Steps
- Prepare a long ribbon background and a set of numbered cardstock pieces.
- Create small pockets by layering cardstock flaps along the ribbon at regular intervals.
- Affix pockets to the ribbon with strong adhesive suitable for paper craft.
- Slide numbered cards into each pocket in reverse order so numbers reveal sequentially.
- Suspend the banner across the mantel using decorative clothespins or ribbon ties.
Sparkling champagne bottle labels to personalize

Personalized champagne labels always make a quiet bottle feel ceremonious. I remember swapping out plain foil for a glossy, gold-flecked label that reflected candlelight and got a few appreciative murmurs.
The paper gives a soft crinkle when handled, and the metallic print catches every flicker. Guests seem to linger over the bottle, admiring the lettering and the way the label wraps around the glass.
Those small custom touches turn a simple toast into a moment that feels carefully considered and just a little bit indulgent.
Steps
- Measure the bottle circumference and cut label paper to a matching width.
- Print or hand-letter a festive message on thick, glossy paper.
- Adhere the label gently around the bottle, smoothing from center outward.
- Add a thin strip of metallic trim along the top and bottom edges.
- Seal edges with a clear protective finish suitable for paper to preserve shine.
Tissue paper metallic tassel garland for doorways
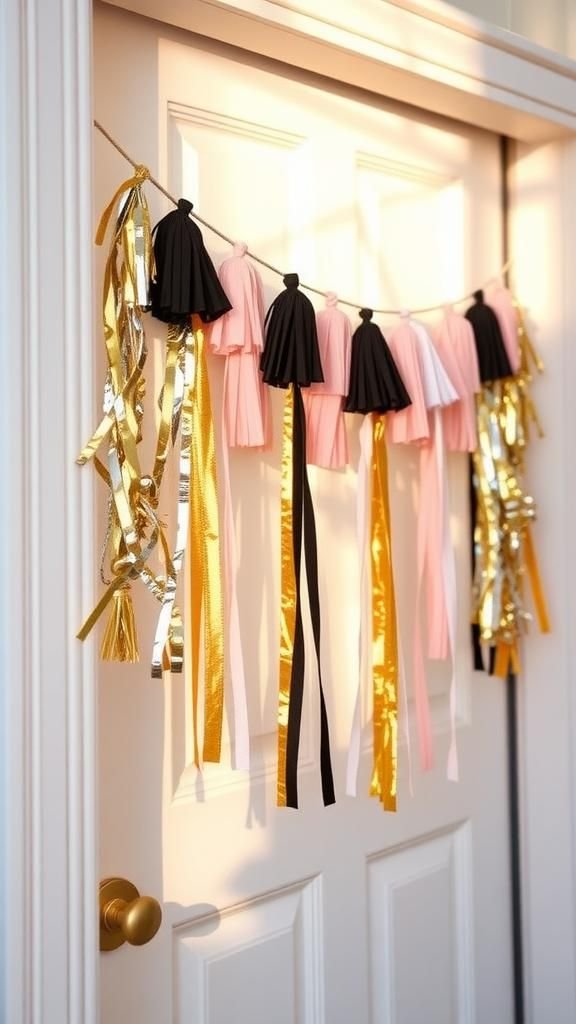
A tassel garland made from tissue and metallic fringe can transform a doorway into an entrance worth pausing at. I like how the tassels sway when people pass beneath, their edges flashing like little flags.
The rustle of tissue against metallic fringe gives off a soft, celebratory whisper rather than a loud clatter. Strung above a threshold, the garland frames the space and signals a shift from ordinary to festive.
It creates anticipation, and I often find myself smiling at how something so light can alter the mood so easily.
Steps
- Cut strips of tissue and metallic fringe into long lengths suitable for tassels.
- Layer pieces and gather at their center to form a tassel bundle.
- Secure the gathered center with thin twine or string, leaving a tail for hanging.
- Repeat to create multiple tassels and space them along a sturdy cord.
- Hang the completed garland across a doorway or above a table.
DIY sequin napkin rings that catch the light

Sequin napkin rings add a tiny, luxurious moment at each place setting. I enjoy seeing how they catch candlelight, throwing tiny reflections across the tablecloth and glassware.
The little circles of shimmer feel playful and grown-up at once, and guests often rotate them between hands to admire the change in sparkle. There’s a satisfying weight when one lifts a napkin wrapped in a sequined band, and the tactile contrast between soft linen and bright sequins gives the table a layered, tactile look that makes the meal feel like an event.
Steps
- Cut narrow strips of sturdy cardstock to form ring bases.
- Cover each strip with rows of sequins, overlapping slightly for full coverage.
- Secure ends of the strip together to form a circular napkin ring shape.
- Tuck a linen napkin into each ring and place at each setting.
- Add a small emblem or name tag to selected rings for personalization.
Mini confetti cones that sit on dessert plates
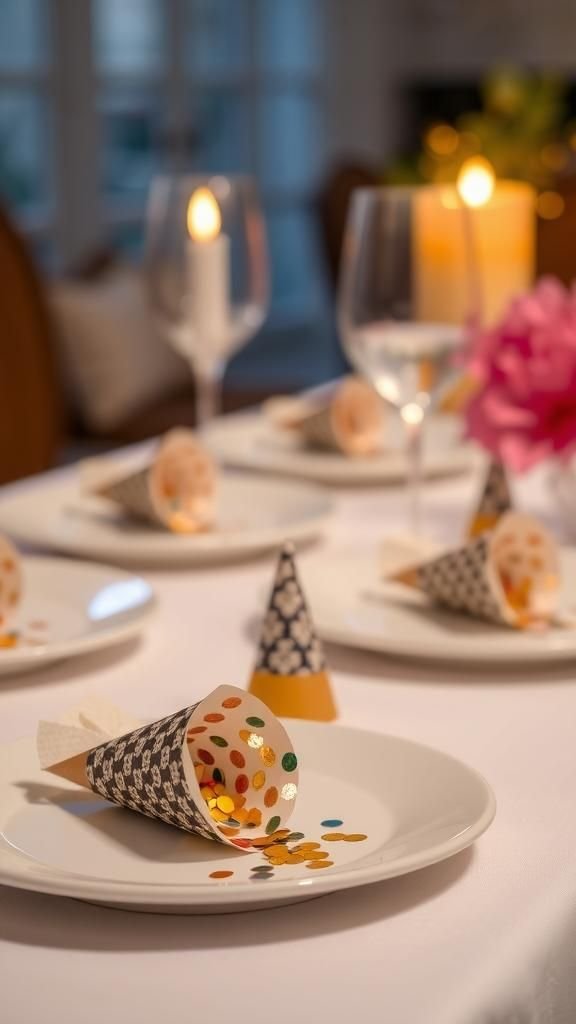
Placing tiny confetti cones on dessert plates feels like leaving a small surprise for each guest. I adore the crisp paper sound when a cone is lifted and the way the confetti looks like a miniature celebration waiting to happen.
The cones add color and texture to the place setting, and their cone shape creates a nice geometric contrast against round plates. Guests often smile at the small detail and the way the confetti mirrors the larger party colors, turning dessert into a continuation of the evening’s theme.
Steps
- Cut circular templates from decorative paper and roll into cone shapes.
- Secure the cone seam with clear tape to hold its form.
- Fill each cone with a small handful of tissue confetti or metallic flakes.
- Place one cone at the edge of each dessert plate for guests to enjoy.
- Scatter a few extra confetti pieces around the plate for visual balance.
Countdown clock coasters that change each hour
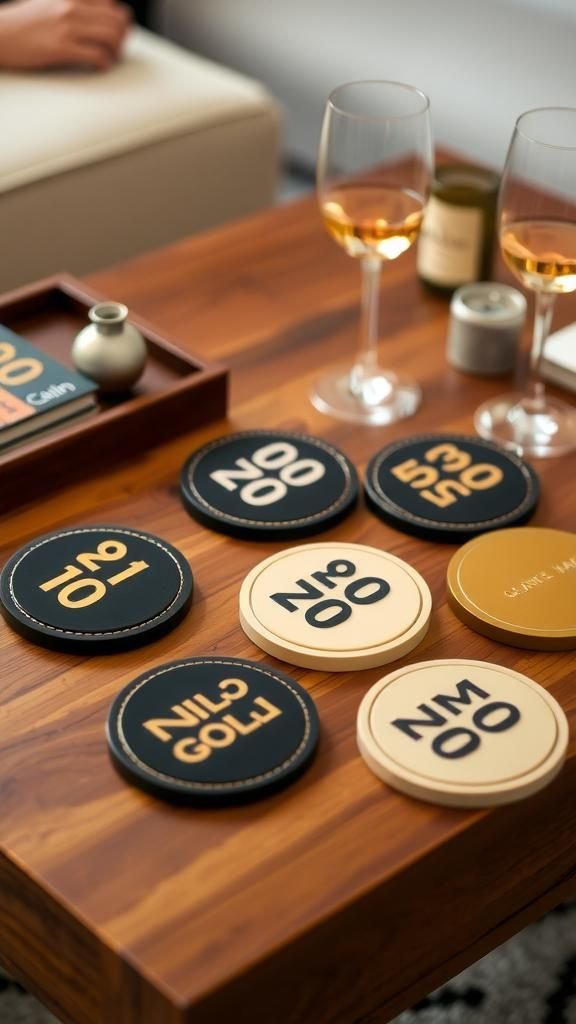
A coaster set that changes its face as the night winds down adds a playful timekeeping habit. I like placing a coaster down and noticing a new numeral appear as conversations shift.
The tactile surface of cork or heavy cardboard feels reassuring under a glass, and the changing design prompts people to glance up at the clock more often. There is a charm in watching the room collectively move toward midnight, coaster by coaster, each one reflecting a slightly brighter color palette as the final moments approach.
Steps
- Cut round coaster shapes from cork or thick cardboard to uniform sizes.
- Print or hand-draw numerals onto thin cardstock circles that fit the coasters.
- Layer the numeral cards atop each coaster and secure edges with adhesive dots.
- Place the coasters around the room in clockwise order for a playful countdown.
- Offer guests a new coaster as each hour passes to mark the time.
Metallic straw cocktail stirrers with mini charms

Cocktail stirrers with tiny charms add a personal note to each drink. I appreciate how the cool metal meets the fingertips and how a little charm jingles when a glass is set down.
They feel like a grown-up party favor that also serves a practical function, and the reflective surface of the stirrers echoes glass and candlelight. Watching friends pick a charm that matches their mood becomes part of the ritual, and the collection of different shapes and textures on the table creates a small treasure hunt effect at the bar area.
Steps
- Select slender metal or reusable straws and small decorative charms.
- Thread a thin ring through each charm and slide it onto the straw end.
- Crimp a small metal bead to keep the charm in place near the top.
- Rinse and polish the stirrers to a bright shine before serving.
- Arrange them in a glass container for guests to choose from.
Glittered balloon clusters with confetti interiors
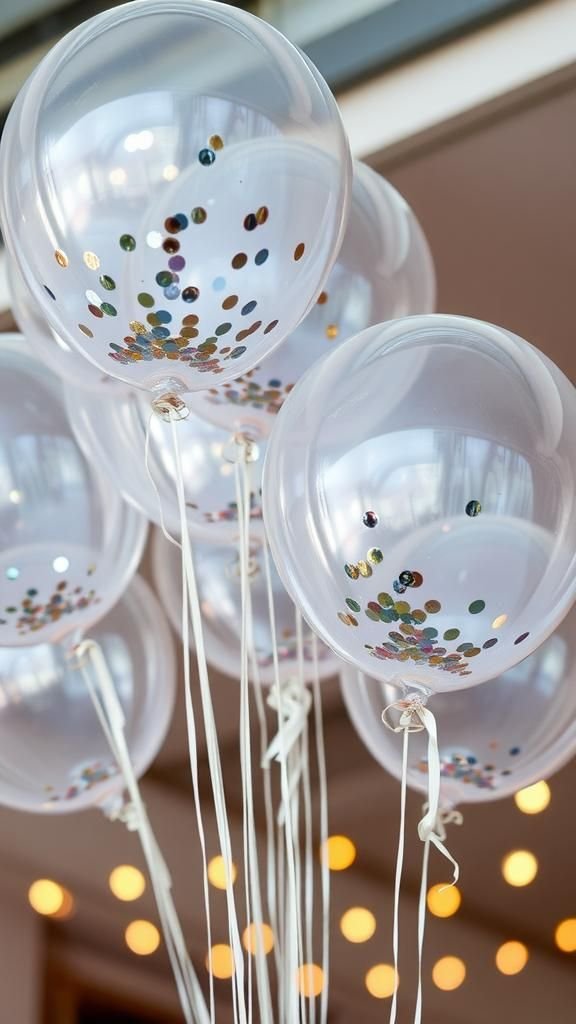
A cluster of balloons filled with confetti and dusted with glitter brings a playful sky to any room. I love the soft thump when a balloon brushes a ceiling beam and the muffled rustle of confetti as it shifts.
The exterior sparkle catches light from fairy bulbs, turning the cluster into a floating constellation. Watching the confetti settle after someone nudges a balloon is oddly soothing, and the bright colors inside peek out like secrets.
They add buoyant movement and a sense of joyful chaos that pairs well with music.
Steps
- Inflate clear or light-colored balloons to medium size and secure necks.
- Introduce small confetti pieces into each balloon before full inflation.
- Lightly dust the balloon exteriors with loose glitter for extra shimmer.
- Tie balloon clusters together and anchor them with small weights.
- Place clusters near the ceiling or group them around a seating area.
Photo booth backdrop of layered metallic fringe
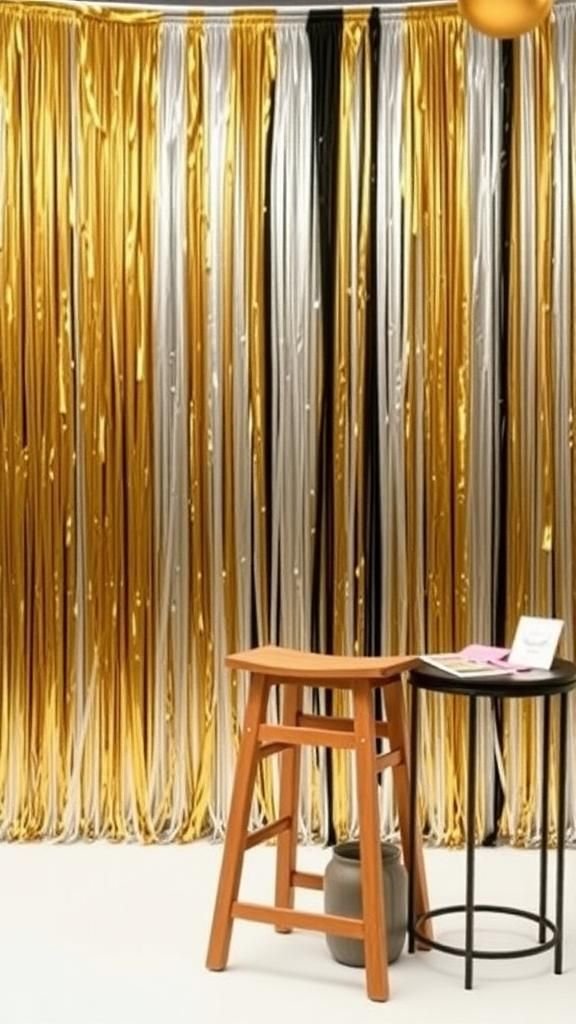
A layered metallic fringe backdrop invites spontaneous snapshots and silly poses. The movement of the fringe catches camera flashes and creates streaks of light in photos, which I find delightful when scrolling through the night’s images later.
The dense layers produce a satisfying curtain effect that feels lush and cinematic, while the metallic tones give every picture a celebratory sheen. Guests gravitate toward the backdrop, grabbing props and experimenting with angles, and the pile of printed photos afterward always becomes a cherished, slightly chaotic document of the evening.
Steps
- Cut long strips of metallic fringe and coordinating tissue fringe in varied widths.
- Layer strips horizontally on a sturdy backing, overlapping edges for fullness.
- Secure each layered strip along the top edge so fringe hangs freely downward.
- Hang the finished backdrop against a wall and place a small stool nearby for photos.
- Add playful props on a side table for guests to grab as they pose.
Sparkler-safe holders for the backyard moments

Creating sparkler holders that feel safe and decorative makes outdoor bursts of light more relaxed. I enjoy the contrast of the sharp, bright trails against the night-sky hush and how the holders ground the little explosions into something composed.
The holders carry a subtle aroma of wood and metal when sparklers are lit, and their shapes can be tailored to match the party’s aesthetic. Guests can pick a holder that resonates with them, and the collection of glowing points across the lawn feels like a private constellation mapped out just for the evening.
Steps
- Select small containers like terracotta pots or metal tins to act as bases.
- Fill containers with sand or small pebbles to create a stable anchor.
- Insert sparklers upright into the filling material so they stand securely.
- Space holders safely apart in the yard, mindful of wind and flammable materials.
- Keep a bucket of water or sand nearby as a precaution after sparklers burn out.
Resolution wish jar with decorative writing tags
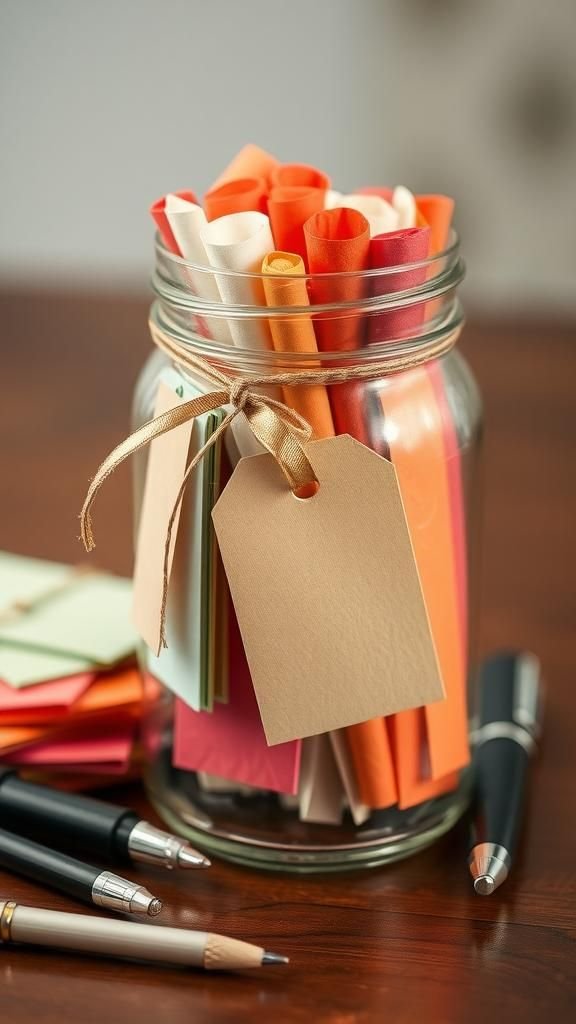
A resolution wish jar collects quiet intentions in a way that feels hopeful rather than heavy. I enjoy the slow cadence of folding a small tag and slipping it into glass, the muted rustle of paper accumulating like a chorus.
The jar itself looks inviting when dressed with a ribbon and a hand-lettered label, and guests treat it like a confessional and a promise at once. Reading the tags later creates a snapshot of the room’s mood on that night, full of small dreams, witty vows, and unexpected honesty that often becomes a warm memory.
Steps
- Choose a clear glass jar and a stack of small decorative paper tags.
- Provide pens with metallic ink and place them beside the jar.
- Invite guests to write a short resolution or wish and fold the tag once.
- Drop folded tags into the jar until it feels pleasantly full.
- Store the jar in a safe place to open together at a later date.
Mini favor boxes in midnight color palette
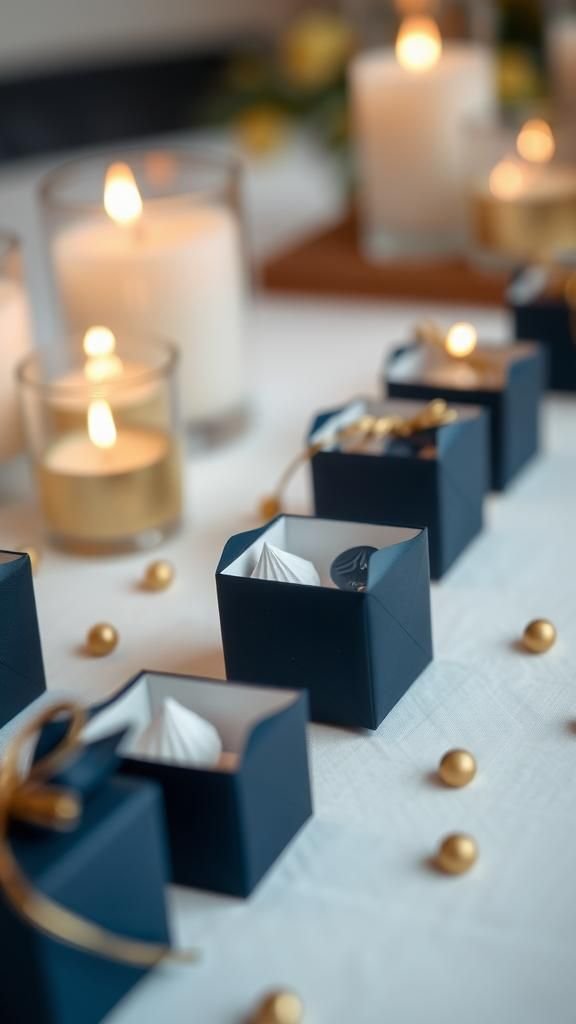
Little favor boxes placed at each seat act like tiny gifts that extend the party’s warmth. I like the surprise of lifting a lid to find a small sweet or charm, the soft weight of unexpected generosity.
Boxes in deep midnight blues, black, and gold feel cohesive with New Year’s tones, and the contrast between matte and metallic finishes adds a tactile richness. Guests tend to admire the presentation and swap contents playfully, turning the small exchange into another shared moment that threads through the evening’s conversations.
Steps
- Fold small favor boxes from thick paper in coordinating midnight hues.
- Place a small treat or trinket inside each box before closing.
- Add a thin ribbon or sticker seal for a finished look.
- Arrange boxes at each place setting or on a dedicated favor table.
- Offer a handwritten note tucked beneath the lid for a personal touch.
Sparkly crown hats that sit just right
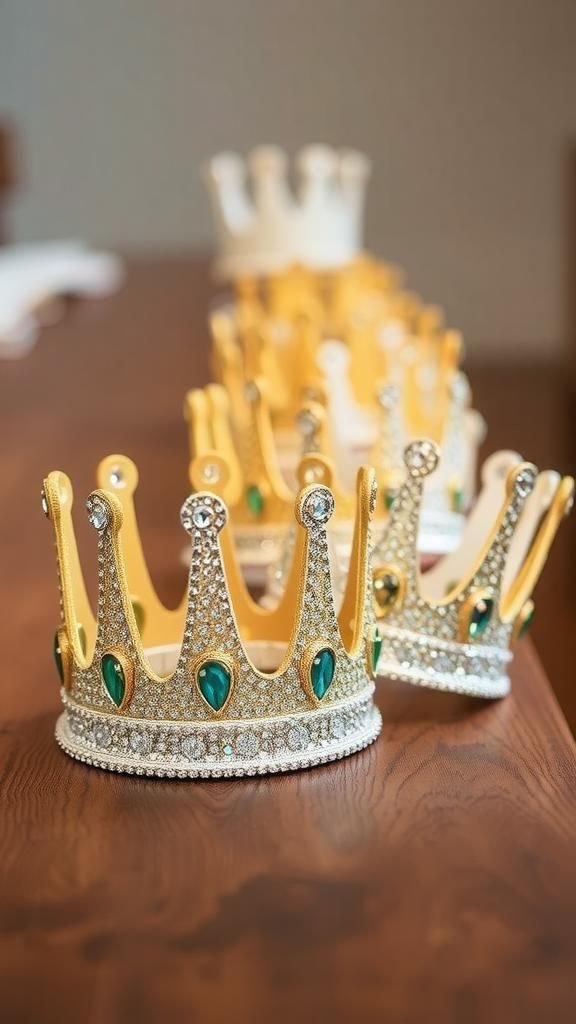
Handmade crown hats bring out the playful side of every guest, settling over hairlines like a tiny coronation. I remember the tilt of a crown and the chuckle that follows; they create instant good-natured hierarchy and silliness.
The layered glitter and soft felt base make them comfortable while still shimmering under lights. Seeing a cluster of friends wearing crowns at the stroke of midnight always feels like a private ceremony, one that signals warmth and permission to be a little ridiculous together for an hour or two.
Steps
- Cut crown shapes from sturdy felt or cardstock in complementary sizes.
- Adorn the crowns with glittery trim and adhesive jewels for sparkle.
- Curve the crown to fit the head and secure ends together for comfort.
- Line interior edges with soft fabric for a gentle fit.
- Arrange crowns on a table near the entrance for guests to pick.
Luminary jars with metallic tissue and LED tea lights
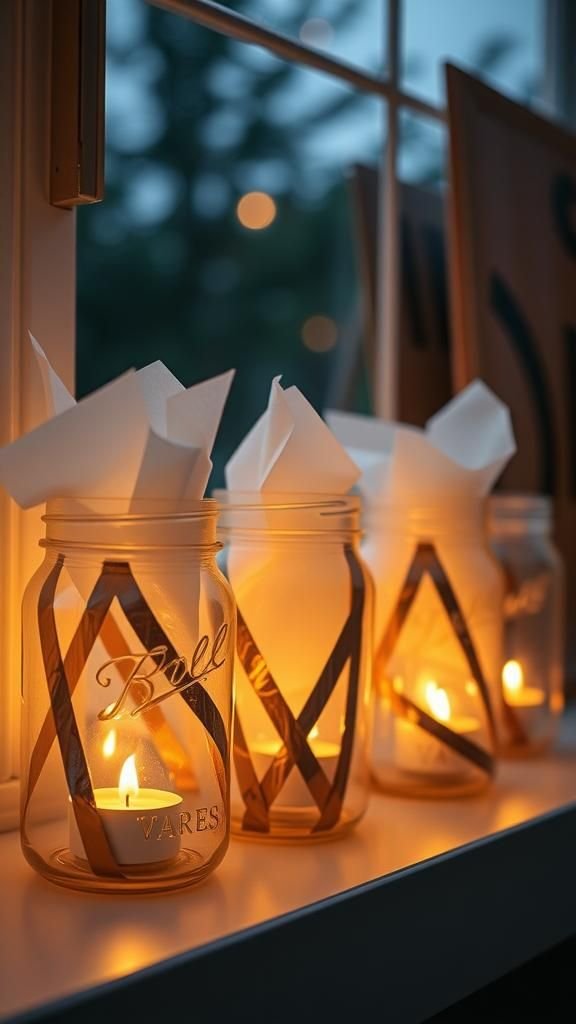
Luminary jars create pockets of soft light that transform corners into intimate nooks. I enjoy how the metallic tissue inside filters LED light into warm, colored glows that feel both gentle and festive.
The jars hum with a quiet, contemplative warmth when arranged along a walkway or windowsill, and the slight crinkle of tissue adds a textural element that pleases the fingers. These little lanterns invite slow conversation and offer a softer counterpoint to flashy decorations, anchoring the party with cozy, reflective points of light.
Steps
- Line clear jars with crumpled metallic tissue paper in desired colors.
- Place battery-operated tea lights inside each jar for safe illumination.
- Arrange jars along entryways or tabletops to create glowing paths.
- Cluster jars in groups of three or five for visual interest.
- Replace batteries as needed to maintain a steady, warm glow.
Photo prop sticks with witty New Year phrases
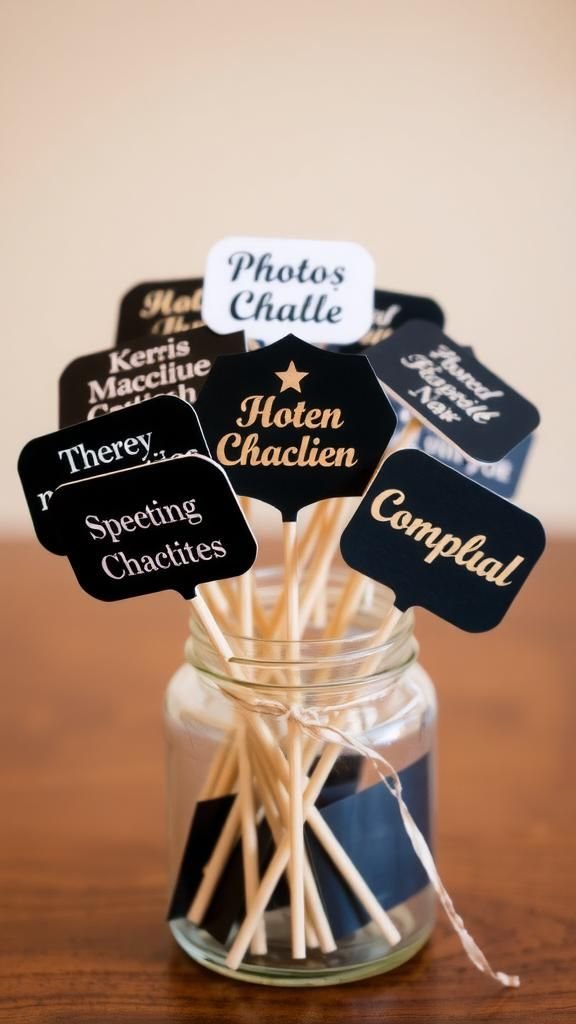
Photo prop sticks with short, witty phrases encourage playful posing and lighthearted banter. I find them especially fun when a phrase matches a guest’s current mood, prompting an exaggerated expression and a burst of laughter.
The tactile feel of the wooden stick and the crispness of the cutout phrase add to the theatrical moment, turning ordinary selfies into staged vignettes. They make the photo corner more lively, and later the images feel like a scrapbook of jokes and shared jokes that keep the memory of the evening bright.
Steps
- Design small phrase cutouts on heavy cardstock in bold fonts.
- Mount each cutout onto a thin wooden stick and secure the joint firmly.
- Offer a variety of phrases reflecting humor and celebration for guests.
- Store sticks upright in a decorated container for easy grabbing.
- Encourage playful use while keeping a few replacement sticks on hand.
Clock face centerpiece with movable hands
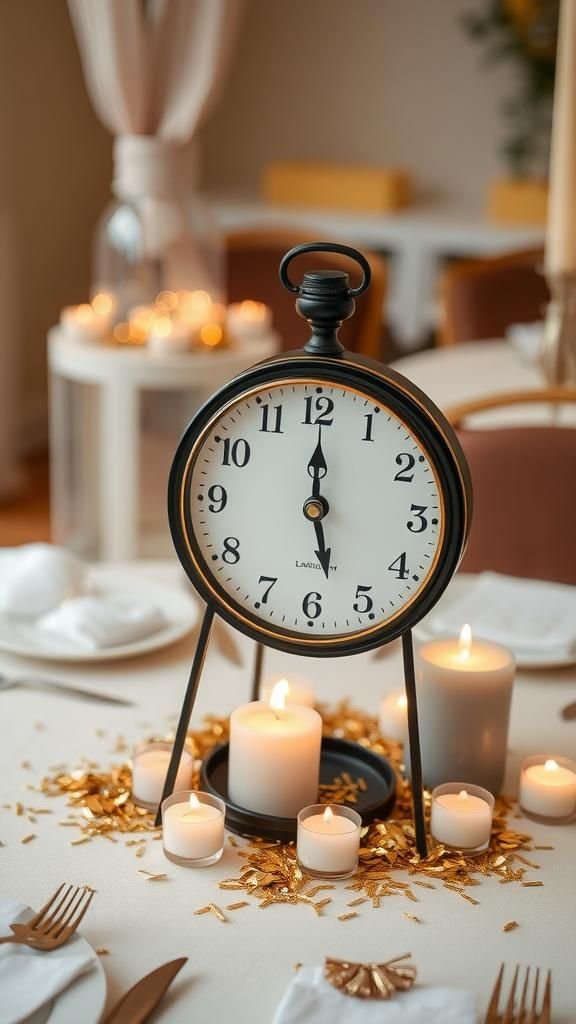
A clock face centerpiece with hands that can be nudged feels like a hands-on way to watch time pass. I enjoy seeing people gather around, gentle fingers adjusting the hands as they chat about what the next hour might bring.
The crisp tick of a real clock or the quiet hum of a decorative mechanism combines with the weight of the centerpiece to create a focal point on the table. Surrounded by candles and metallic accents, the clock reads like a promise that something will arrive, and guests keep glancing at it with mild anticipation.
Steps
- Select a round base and design a clock face on sturdy material.
- Attach a simple clock mechanism to allow adjustable hands.
- Embellish the face with metallic numerals and decorative accents.
- Place the centerpiece among candles and small floral accents on the table.
- Gently move the hands as the evening progresses to mark the approach of midnight.
Shimmering place cards with embossed names

Embossed place cards add a quiet elegance that elevates seating arrangements. I enjoy the moment when a guest notices their name rendered in raised lettering and soft metallic ink; it feels both personal and ceremonial.
The tactile ridge of the emboss invites a fingertip, and the card’s sheen reflects nearby candles in flattering ways. These small tokens often spark conversation about traditions and preferences, and their presence suggests thoughtful planning without being ostentatious, giving each seat its little declaration of welcome.
Steps
- Print or hand-letter names on thick cardstock in an elegant script.
- Apply an embossing powder and heat gently to create raised lettering.
- Trim cards to a uniform size and add a metallic edge for contrast.
- Position each card at its corresponding place setting.
- Keep a few spare cards for any late additions to the guest list.
Old-fashioned party blowers with modern twist

Reimagined party blowers blend nostalgia with a little contemporary shine. I love the playful jitter they bring to a quiet moment and how the small papers unfurl with an eager snap.
When finished with a metallic fringe or a tiny charm, they feel fresh and slightly upgraded from childhood memories. The soft breath that animates them carries laughter, and the sequence of repeated snaps creates a rhythm that is oddly comforting.
They invite guests to indulge in the simple pleasure of making noise together as midnight approaches.
Steps
- Select classic blowers and swap in decorative paper or metallic fringe at the tip.
- Reinforce the connection with a small sleeve so the paper holds during use.
- Add tiny charms or stickers for a contemporary accent at the opposite end.
- Arrange them in a shallow basket near the seating area for easy reach.
- Replace any worn pieces to keep sound and movement lively throughout the night.
Elegant metallic place mats with textured edges
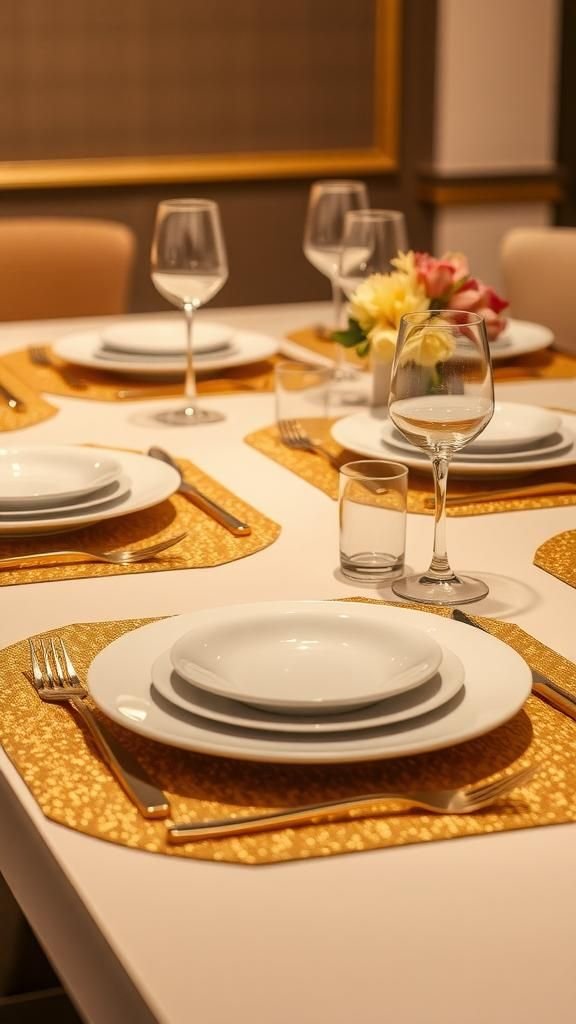
Metallic place mats with textured edges frame each dish like a small stage. I appreciate how the metallic sheen provides contrast against plain plates and makes colors of food pop more vibrantly.
The slight texture around the border adds tactile delight when guests shift plates or rest their wrists. These mats anchor the table visually, lending an organized yet celebratory vibe.
They make the meal feel curated, and even simple hors d’oeuvres benefit from the dramatic backdrop the mats create under warm lighting.
Steps
- Cut placemats from durable metallic-finish material to fit the table setting.
- Add a textured edge using a complementary strip of fabric or trim.
- Secure trims along the perimeter with an appropriate adhesive for textiles.
- Wipe final surfaces clean to ensure a polished appearance.
- Lay mats under settings and adjust spacing for balance down the table.
New Year timeline wall with polaroid memories

A timeline wall of polaroid memories invites guests to revisit the year’s highlights in a tactile way. I enjoy the hush that falls when people linger over a photo, tracing the faces and places with their eyes.
The small squares of image and handwritten captions bring back scents and sounds of past months, and the collage format turns private moments into a shared narrative. Seeing the accumulation of images in one place feels grounding, as if the room briefly becomes a museum of personal delights and gentle milestones.
Steps
- Print Polaroid-style photos that capture memorable moments from the year.
- Mount them on a long backing in chronological order for a timeline effect.
- Add handwritten captions beneath each photo to note the memory or date.
- Hang the timeline on a prominent wall for guests to explore.
- Provide a small table with additional photos for guests to add their own snapshots.